 NetResults Tracker NetResults Tracker |
 |
|
|
Adding a User |  | | |
Constraints to Consider before Adding a User
 A user account must be created in the User Management System (UMS) section before
the user can begin using Tracker. The number of users
that can be added to UMS depends
on the number and type of licenses you have entered in the
License Manager.
Each user created in UMS can be given
access to multiple workgroups.
A user account must be created in the User Management System (UMS) section before
the user can begin using Tracker. The number of users
that can be added to UMS depends
on the number and type of licenses you have entered in the
License Manager.
Each user created in UMS can be given
access to multiple workgroups.
When adding a new user, the profile information (email address, phone number, etc.)
can be entered. This profile information will be displayed in all workgroups to
which the user is given access. When entering information for a
new user account, consider the
character set of the workgroup(s) the user will be accessing. A user can only
be given access to a workgroup with a character set that supports the
characters entered in the user's profile. For example, if a user is created
with UTF-8 characters in the profile, this user account can only
be given access to a workgroup with UTF-8 selected as the character set.
Some basic guidelines related to user / workgroup character set compatibility:
- If a user account contains only ASCII characters
(supported by ISO-8859-1 character set), this user account can be
given access to any workgroup because all character sets (all workgroups) support ASCII
characters.
- If a user account contains non-ASCII characters supported by the Windows-1252
character set, this user account can be given access to any workgroup that
is configured with the Windows-1252 or UTF-8 character sets.
- As mentioned above, if a user account contains non-ASCII characters only
supported by the UTF-8 character set, this user account can only be given access
to a workgroup configured with the UTF-8 character set.
For information on checking a workgroup's character set, review the
Viewing a Workgroup section.
To see a list of characters supported by each character set,
review the information in the
Adding a Workgroup section.
Adding a User
Users can be added from the User Management System (UMS). The option of allowing
workgroup Administrators to add users to their own workgroup(s) without requiring access to
UMS can be enabled in the
Administration Options section.
The following are the steps that need to be done in order to add a
new user and allow this user to begin using Tracker:
- Add a user to the User Management System (UMS) using the steps below
- Give the user access to the necessary workgroup(s) using the
Editing a User's Access to Workgroups
option
- For each workgroup that the user will access, add the user to the
User Administration
page of the
Admin section in the workgroup.
This step can be skipped if the "Add User + Access" option is used when
giving the user access to a workgroup(s) in the step above.
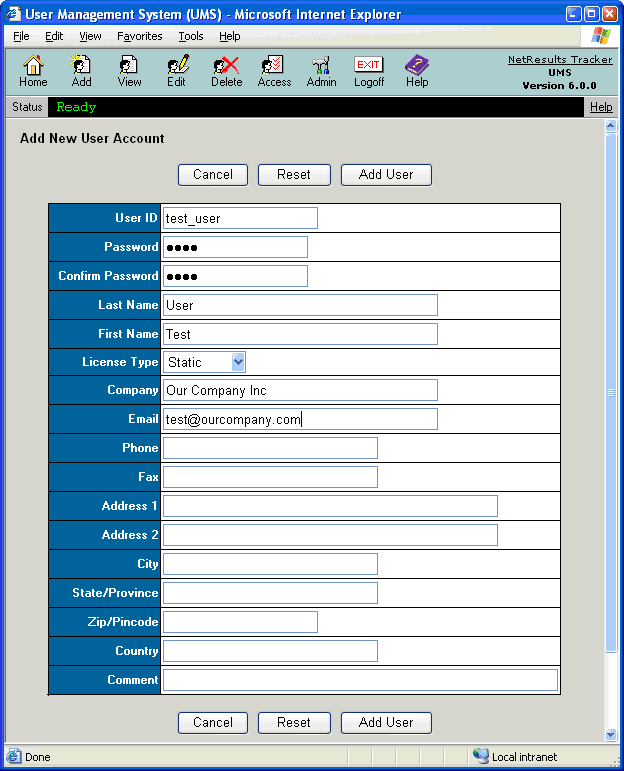
To add a new user:
- Login to the
User Management System
- Click on the Add icon in the top button bar
- Enter information into the following required fields on the
"Add New User Account" page:
- User ID
Unique identifier for user. May be up to 40 characters long.
- Password
Login password for user. May be up to 10 characters long.
This password is not used if the user is only given access to a workgroup(s)
with Active Directory Integration enabled
because the user's Windows user account information will be used
for authentication. In this case, a password is still required
for creating a new user account in case
the workgroup(s) to which the user has access are ever changed to allow
Anonymous access. This password does not need to match the user's Windows
account password.
- Confirm Password
Confirm the login password for user as entered in the Password field above
- Last Name
User's last name
- First Name
User's first name
- License Type
Can be Static, Floating, or Restricted.
See Definition of
Users by License Type for further information.
Users with Static or Floating selected as the License Type
are also referred to as Unrestricted or Non-Restricted users
in various areas of the Help Guides.
- User Type
This option will only be present if the user account option
Enable User Type Property
has been enabled in the Set User Account Options section.
This property for user accounts has been deprecated and is planned to be removed
from a future release. It is possible to use
user group privileges to
achieve the same effect as the User Type property.
User Type can be either Internal or External. A user with External
selected as the user type cannot be assigned to any record
(these users are not listed in the Assigned To pulldown for selection during the workflow
process in the workgroups).
If Restricted is selected as the License type
above, you must select External as the User Type.
- Company
User's company name
- Email
Email address of the user. Used by Tracker for
email notification of events.
- Phone
User's phone number
- Fax
User's fax number
- Address 1
First line of user's address
- Address 2
Second line of user's address
- City
User's city
- State/Province
User's state or province
- Zip/Pincode
User's zip code or pincode
- Country
User's country
- Comment
Any other information about the user to be included in
his or her profile information
- After entering the information,
click on the Add User button to save this new user account.
- A confirmation will be displayed after the user is successfully
added. Click on the Add Workgroup Access button to specify
which workgroups this user will be able to access. Details on giving a
user access to a workgroup(s) can be found in the
Editing a User's Access to Workgroups
Help section.
- After a user is given access to a workgroup, the user must be added to
the User Administration
section of each workgroup. Only after doing this will the user will be able to login to
the workgroup(s) and begin using Tracker. It is possible to add
a user to the workgroup at the same time as access is given. Review the
Editing a User's Access to Workgroups
Help section for details.
The information entered in a user's profile can be viewed by
users when the Assigned To or Reported By fields are displayed
on the View page or in the Home Page and Query reports. The user's name will
appear as a clickable link for those users which have the View User Information
privilege. Clicking on the user's name will display the
details present in the user's profile.
Restoring a User
If you add a user account with a User ID that matches a previously deleted
user account, you will be prompted to restore the user account
by clicking on the Restore User button or to choose a different
User ID by clicking on the Cancel button to return to the
Add New User Account page.
Managing Users within License Limits
If you attempt to add more users than are allowed by your license(s),
Tracker will notify you that you have reached the maximum
number of users for your license type. If you have
more than one type of license (a mix of static, floating, or restricted licenses),
the error will tell you which
license type has reached its limit. You will need to delete another user account
before you are allowed to create a new user account.
Definition of Users by License Type
There are three types of licenses available for use with
Tracker: Static, Floating, and
Restricted.
For all three license types only one user (person) may be logged in to
Tracker per license. In other words, the maximum number of people that
may be logged in to Tracker at any one time is equal to the total number
of Static, Floating, and Restricted licenses you have. The difference between the
license types is how many user accounts may be created per license and what
Tracker features may be used.
- Static
One user account (User ID) may be created for each Static license.
Since there is only one user account per license, users with Static accounts
can always log in to Tracker.
Static licenses are typically used for people who regularly use Tracker
and therefore must be guaranteed access at any time.
Static users are also referred to as "Unrestricted" or "Non-restricted"
users in various areas of the Help Guides.
- Floating
Up to ten (10) user accounts (User IDs) may be created for each Floating license.
However, only one user per Floating license may be logged in to Tracker
at any given time.
Others who try will be denied access until another Floating license user logs off
(clicks the Logoff icon). For instance, if you have 5 Floating licenses, you can have
up to 50 Floating user accounts, but no more than 5 of those 50 users may be
logged in to Tracker at the same time. Floating licenses are typically used for
infrequent users if it is acceptable that they may not be able to login to the system
some of the time (as all Floating licenses may be in use). Although you can create up
to ten user accounts per Floating license, we generally recommend one Floating license
for every 2-3 users to minimize the number of times users can not log in
because all Floating licenses are in use.
Floating users are also referred to as "Unrestricted" or "Non-restricted"
users in various areas of the Help Guides.
- Restricted
One user account (User ID) may be created for each Restricted license.
Since there is only one user account per license, users with Restricted accounts
can always log in to Tracker.
However, unlike the Static and Floating license types, users with Restricted user
accounts can only perform a very limited number of Tracker operations.
They are only allowed to Add new records (report issues), View, Task and Edit records that they
previously added (check status and update issues they have reported), receive email notifications
and alerts, participate in discussions and run text reports
(saved queries) on the Home page to view summaries of records they have added.
A Restricted user can not perform any other operations (such as Delete,
Query, Metrics, History, etc.); cannot be the Assignee for a
record; cannot view
information about source code files; cannot start discussion threads or set alert settings and cannot view
any records which she did not Add.
Restricted licenses are typically used for external users who only need to submit
issues to Tracker and track the progress of these issues. For example,
if you have a large number of customers who only submit reports to your Support
organization very infrequently, you could give those users Restricted licenses.
For more details on licensing including your License Agreement and
the number and type of license(s) you have, please run the
License Manager.