|
||
|
|
Overview
Tracker allows you to define the option menu items of any Pulldown or Release Number field. Option menu items can be added, edited and marked obsolete or deleted at any time.
Option Menu Item List
Each Pulldown or Release Number type field has an option menu item list. To get to this list:

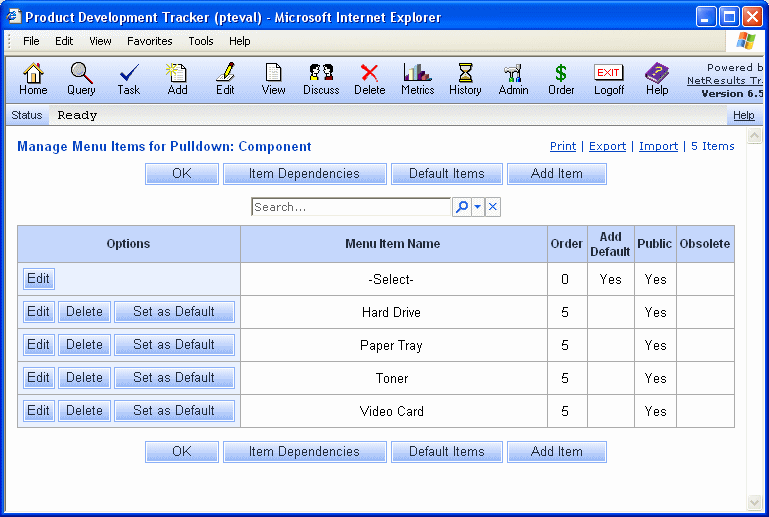
By default, the Option Menu Item list shows the option menu items currently available in the pulldown. The items are sorted by the value of the order property. By default, if there are more than 50 option menu items for a pulldown field, the item list will be broken up into pages. Click on the page pulldown to select a page or click on the Previous or Next arrows to move to another page. You can change how many items are displayed per page via the Maximum Menu Items option in the General Preferences section.
The top right of the page shows a total number of option menu items configured for the field. This count only includes the items currently being displayed on the list. For example, when you first browse to the Item List, the count will include all non-obsolete items. If you search for a list of items, the count will reflect the number of items which matched the search criteria.
For RelNum (Release Number) fields, the pulldown RelNumType will be displayed at the top with four choices "<RelNum Field Name>", "<RelNum Field Name> - B" "<RelNum Field Name> - C" and "<RelNum Field Name> - D". Each of these represents one of the 4 digits in the Release Number field. To see the option menu items for a particular digit, choose that digit. The page will be refreshed to show the items for that digit.
For each option menu item the following properties are displayed:
Printing the Item List
The items displayed on the Item List can be printed using the Print link in the upper right corner of the Item List pages. Only the items currently displayed on the list will be printed (e.g. if you have run a search for a particular set of items, only those items will be printed as opposed to the full set of items).
Exporting the Item List
The items displayed on the Item List can be exported to *.csv format (comma separated values) using the Export link in the upper right corner of the Item List pages. You can then open this file in another tool such as Microsoft Excel or Crystal Reports. Only the items currently displayed on the list will be exported (e.g. if you have run a search for a particular set of items, only those items will be exported as opposed to the full set of items).
Importing Option Menu Items
Option menu items can be imported into a pulldown field. Details can be found in the Importing Pulldown Items into Tracker section.
Item Search
A search function is available to help you quickly locate an option menu item or set of items that match certain criteria.
To search for an option menu item or set of items:
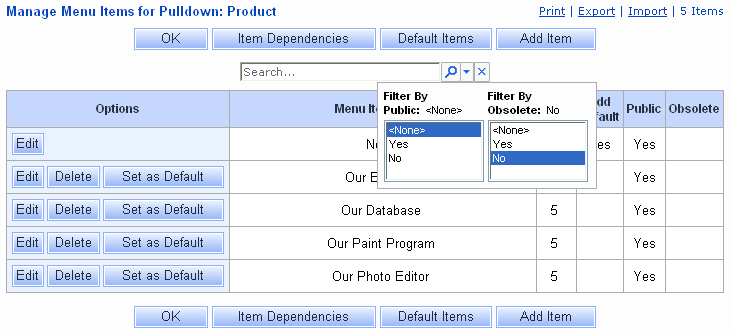
 icon to show the multiple selection boxes for Public
and Obsolete.
In the Public field, selecting "<None>" will include public and non-public items in the search results (this is the default selection). Selecting "Yes" indicates the search results should be filtered to show only public items, selecting "No" will filter the search results to exclude public items.
In the Obsolete field, selecting "<None>" will include obsolete and non-obsolete items in the search results. Selecting "Yes" indicates that the search results should be filtered to show only obsolete items, selecting "No" will filter the search results to exclude obsolete items.
To make multiple selections in the list boxes, hold down the Ctrl button on your keyboard as you click on the items you wish to select.
 Search icon to return the
results that match the selected criteria
Click on the  Remove icon to remove the search criteria
and reset to the defaults (no key word(s) or phrase in Search... box, "<None>" selected for Public,
"No" selected for Obsolete).
It is often a good idea to create a backup of your database before making major changes such as modifying your pulldown menus as some modifications are irreversible other than by restoring a backup copy of your database.
The Items button for the Assigned To field will display the User Accounts section. Items listed in the Assigned To field are the users listed in the User Accounts section. For a user to be available in the Assigned To field on the Add Page, the user must be a member of a user group with the privilege "Can Be Assignee For Add". For a user to be available in the Assigned To field on the Edit Page, the user must be a member of a user group with the privilege "Can Be Assignee For Edit".
The Items button for the Reported By field will display the User Accounts section. Items listed in the Reported By field are the users listed in the User Accounts section.
The Items button for the Status field will display the Global States List. Items listed in the Status field are the states created in the Global States List.
If you anticipate having a large number of option menu items in a pulldown, it is recommended that you choose "Search Pulldown" as the Display Style for the field. This style allows users to type in key words to find any option menu items that match the criteria. When there is a large number of option menu items in the field and the display style is something other than "Search Pulldown", all of the option menu items are displayed in the field, which can impact performance as the browser loads all of the available option menu items. With the "Search Pulldown" style selected, only the items that match a search are loaded, minimizing the time needed for the browser to render the field.
To add option menu items:
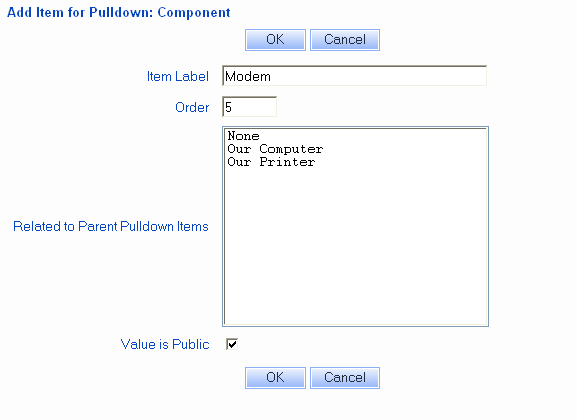
When adding an item you can specify:
The figure below displays the attributes that can configured when an option menu item is added. The field Related to Parent Pulldown Items will only appear if the pulldown field is configured as a dependent pulldown.

If you change the Item Label field for an option menu item, any records with this value selected will display the updated Item Label.
Changing the order field will change the order of the option menu item relative to other option menu items for this field.
Checking the box for the Value is Public option will enable an option menu item to be displayed on the Submit Page and the Knowledge Base Search Page. Unchecking the option prevents the option menu item from being displayed on those pages.
Checking the box for the option Value is Obsolete allows you to mark an option menu item so that it is no longer a valid value (e.g. the "obsolete" option menu item won't be available for selection on the Add, Edit, Task, and Submit pages or when using the Edit Results operation) while still allowing existing records to have the option menu item selected. For more information about marking records obsolete, review the Maintaining Option Menu Items section.
To delete an option menu item:
If any saved queries contain the obsolete value, you will be prompted to select a replacement from the list of option menu items configured for the pulldown field.
To restore a option menu item that was previously deleted or marked obsolete:
Selecting the Default Value for a Field
You can set which value is used as the default when a new record is added or when a field is initialized during the Task operation. You cannot delete a value if it is currently the default value. You must first set another value as the default, and then delete the value.
To change which option menu item is set as the default:
Item Dependencies and Default items
If a pulldown field is configured to be either the child pulldown or the parent pulldown in a Dependent Pulldowns Relationship, the Item Dependencies and Default Items buttons will be displayed above the option menu item list as shown in the figure below.

In the Item Dependencies page for a pulldown menu, you can map parent pulldown option menu items to each option menu item in the child pulldown and vice versa. Instructions on mapping pulldown option menu items can be found in the Dependent Pulldowns Help section.
In the Default Items page, you can select which option menu item in the child pulldown should appear as the default value for each possible option menu item in the parent pulldown. Instructions for selecting defaults for dependencies can be found in the Dependent Pulldowns Help section.
Maintaining Option Menu Items
When Option Menu Items become inactive, you need to decide how to reflect this in Tracker. To deactivate an option menu item, you can either mark it as obsolete or delete it.
Obsolete Option Menu Items
Marking an option menu item as obsolete allows records in Tracker
to contain the obsolete value. This is useful in cases where you want to be able to
perform searches in the Query or Metrics sections which include any obsolete option menu
items as part of the search criteria or results. A preference
is available to allow obsolete option menu items to be used on the Query Page. This preference can be set by
default when new users are added to the workgroup in the
User Preferences section or can be set by each individual
user using the Preferences link available on the Home Page.
When an option menu item is marked obsolete, it cannot be selected when new records are added via the Add or Submit pages or using the Submit via Email feature. The obsolete option menu item will not be displayed as an option on the Edit or Edit Records pages or during the Task operation unless a record already has the obsolete item selected. If the original record contains an obsolete item when using the Add Similar operation to add a record, the newly added record will have the obsolete item replaced with the default value for the pulldown. If the original record contains an obsolete item when using the Cloning operation to copy a record, the clone record will also contain the obsolete item.
If the pulldown field is part of a dependency with another pulldown, when an option menu item is marked as obsolete, any dependencies involving the obsolete item will be removed. For example, let's say that Component is a parent to Sub-Component. The Component field has an option menu item called "Printer", which is related to the option menu items "Paper Tray" and "Toner" in the Sub-Component field. If the option menu item "Printer" is marked obsolete, the items "Paper Tray" and "Toner" will no longer be associated with "Printer".
When an option menu item is marked obsolete, it will still be displayed as part of Knowledge Base articles. Whether the obsolete item is available when the pulldown field is available as a filter on the Search Page depends on what is set for the "Include Obsolete Items" option in the Search Filters properties page.
Deleted Option Menu Items
Deleting an option menu item will remove all references to the item: the deleted item will no longer be displayed
on the Add, Edit, Task, View, Query, Home, Metrics pages. If there are any
existing records that have the item selected, you will have the option to select a replacement for the item
being deleted.
If the pulldown field is part of a dependency with another pulldown, when an option menu item is deleted, any dependencies involving the obsolete item will be removed. For example, let's say that Component is a parent to Sub-Component. The Component field has an option menu item called "Printer", which is related to the option menu items "Paper Tray" and "Toner" in the Sub-Component field. If the option menu item "Printer" is deleted, the items "Paper Tray" and "Toner" will no longer be associated with "Printer".
Deleted items can be restored using the steps in the Restore steps above.
NetResults Tracker © 1997-2009 NetResults Corporation. All rights reserved.