|
||
|
|
The Login Page
Tracker requires that all users first log into the system via a Login page. This page presents the user with a form with a User ID and password field. You can customize the top and bottom of this page with custom HTML (e.g. to add your company logo or other branding or add some instructions) and can set your own color preferences. This allows you to visually integrate Tracker with your company's Intranet look and feel or to provide users with information or an instructional message before logging in.
Customizing the Login Page
To customize the Login Page:

Header Text
Enter text to be displayed at the top of the Login box
(e.g. the header text in the Login Page Sample
is "Tracker Login").
Instruction Text
Enter text to be displayed as instructions above the User ID
and Password fields (e.g. the instruction text
in the Login Page Sample
is "Please enter your User ID"). Up to 255 characters can
be entered for the Instruction Text. Only the first 25 characters
of the instruction text will be displayed in the preview.
Enable Self-Registration
Selecting Yes for this option allows you to use the
Self-Registration feature. Self registration
allows end users to create their own
Tracker user account
without assistance from an Admin user by
clicking on the New User? Register Here
link on the Tracker Login Page.
Information about use of this feature can
be found in the
Self Registration
section.
Custom HTML (Top of Page)
Custom HTML (Bottom of Page)
Enter your own HTML code to customize the area above or below the Login box.
Note that all file references must be fully qualified; relative paths will not work.
Please do not enter any header tags into this area. Some examples of header tags
are <HTML>, </HTML>, <BODY>, </BODY>.
The custom HTML will not be displayed in the preview window. If you wish to display
an image on the Login Page, you could upload the image as a
global file attachment.
Enable Remember Password
Enabling the Remember Password feature will display an option called "Remember
Password" on the Login Page or in the user's
Preferences page. Checking the
box for this option will set a user's browser to remember their password. When
Remember Password is enabled for a user, the password field is automatically
filled in when the user browses to the Login Page.
Enable Reset Password
Selecting "Yes" for this option will allow users to reset their password if it
has been forgotten without intervention by a Tracker Administrator
using the Forgot Your Password? link on the Tracker Login Page.
When enabling this feature, please advise your users that they will need to set
up a security question and answer in the
Preferences section in order to
be able to reset their password at a later time. This option cannot be used to
reset the password for the "Admin" user in the workgroup.
Force Reset Password
To force the user to reset their Tracker password after a certain number of
days, mark the check box and enter in the number of days in the provided field.
When this feature is enabled, your users will be prompted to reset their
password every time the specified number of days has expired. To disable this
feature, uncheck the box. This option cannot be applied to password of the
"Admin" user of the workgroup.
Allowed Bad Password Attempts
This allows you limit how many times a user can attempt to login. If the
user attempts to login with a bad password for more than the number of times
allowed, the user's account is locked for a specified duration.
To use this feature, enter the number of attempts allowed and number of minutes
the account will be locked when the number of attempts is exceeded.
This option cannot be applied to password of the "Admin" user of the workgroup.
Entering "0" for the number of minutes will lock the account indefinitely once the number of
bad password attempts has been exceeded.
To unlock an account, the locked user must wait until the specified duration has expired until they can attempt to login again. A workgroup Administrator can also edit the user's profile to unlock the account. Only a user who is a member of the Admins user group can unlock a user account when "0" is entered for the number of minutes.
Notify Account Lock Information to
When an account is locked after the exceeding the allowed number of attempts, an
automatic email notification regarding the locked account can be sent to user,
as well as a user group or groups. Select the <Login User> for a notification to
be sent to the user. Select the user group or groups, for a notification to be
sent to the members of the group. To select multiple recipients, press the CTRL
key on your keyboard and click on the desired choices. Select <None> to disable
this feature.
Password Content
In creating or changing a password for a user account, various minimum
requirements for the password can be enabled. To disable these requirements,
uncheck the box for each requirement. This option cannot be applied to password
of the "Admin" user of the workgroup.
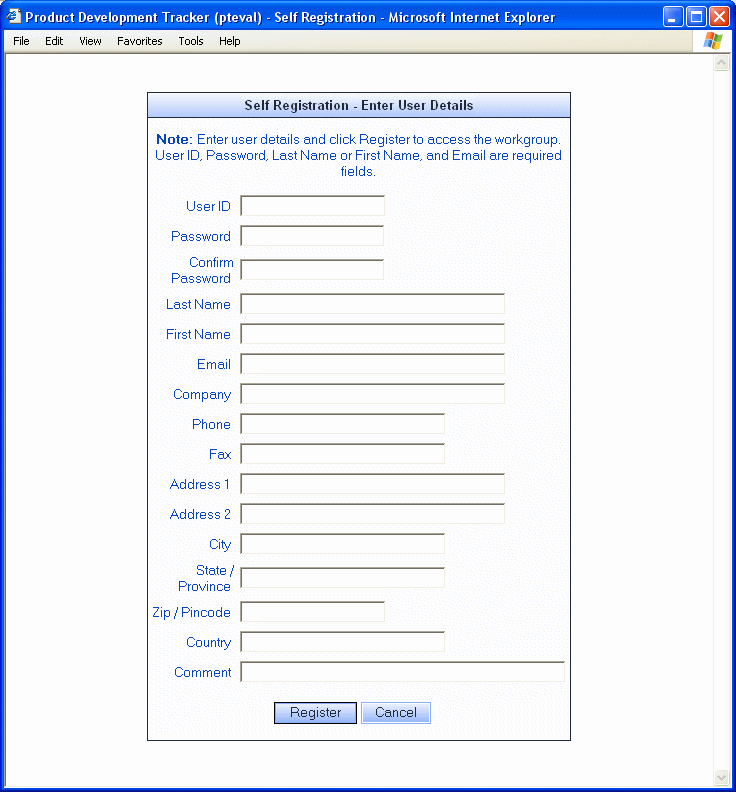
Self Registration is a feature which allows your end users to create their own Tracker user account. This is useful in environments where there is a large number of end users and it is not known which of those end users will need a user account.
When activating this feature, the Tracker Administrator selects the default license type to be applied to all new user accounts created by this feature. Users can self-register provided that there are sufficient licenses available to create the new user accounts. When the license limit is reached, users will be prompted that they cannot self-register and should contact their Tracker Administrator.
To self register, a user browses to the Tracker Login Page and clicks on the "New User? Register Here" link. The user will be required to provide some information to create a user account. After the user account has been created, the user is directed back to the Login Page to enter the User ID and password of their new account. This new account is added to the User Accounts section.
Enabling Self Registration
The following steps are required to enable the Self Registration feature:
Enable the Self Registration feature in the Login Options section
Set Options for Self Registered Accounts
You can make selections for the license type, user type, and user group of
self-registered user accounts as well as provide instructions for end users
and add custom HTML to be displayed at the top and bottom of the
Self Registration form filled out by your end users.
To set the options related to the Self Registration form:
If you selected Static or Floating as the User License Type:
If you selected Restricted as the User License Type:
"<B>Note: </B> Enter user details and click Register to access the workgroup.<BR> User ID, Password, Last Name or First Name and Email are required fields."
Self Registration by End Users
To self-register, an end user should use the steps
listed in the
Self Registration
section of the User Help Guide.
Administer Self-Registered Accounts
After a user has self-registered, the new account will be displayed
in the
User Accounts section.
Access to Tracker can be limited by IP address of the user attempting to access the workgroup. When this feature is enabled, a user will only be able to access the Login Page and other Tracker pages if the user's IP address matches one of the IP addresses or IP Address ranges configured in the Allowed IP Addresses field. If the user's IP Address does not match a configured address or range, they will see an "Access Denied" message that can be customized with any desired wording and HTML code. This option only applies to the Login Page and other Tracker pages excluding the Submit Page for Unregistered Users and Knowledge Base pages as these features have their own sections for configuring IP Address restrictions. IP Address restrictions configured in this section take effect immediately after clicking OK to save the changes.
To enable IP Address restrictions:
For Type select "Single computer" to add a single IP Address or "Range of computers" to add a range of IP Addresses. For IP Address, enter the IP address, then click OK. For IP Address Range, enter the first IP Address in the range, then enter the last IP Address in the range and click OK. At least one IP Address or range must be entered when the this feature is enabled. The IP Address of the login user (the user making these changes) should also be added to the list as a single computer or within a range.
To edit an IP address/range in the Allowed IP Addresses list:
To remove an IP address/range in the Allowed IP Addresses list:
NetResults Tracker © 1997-2013 NetResults Corporation. All rights reserved.
 NetResults Tracker Help
