 NetResults Tracker Help NetResults Tracker Help |
 |
|
|
Moving a Workgroup |  | | |
To move a workgroup, click on the Move button on
the Button Bar. Select a workgroup from the pulldown
menu, select one of the following move operations
described below, then click on the Continue button.
If you have manually applied any custom security to your
workgroups (such as file system permissions or IIS application settings),
you will need to re-apply these changes to this workgroup
after it using one of the move operations described below.
Move Workgroups within the same Web Server machine
This operation should be used if you want to change the physical
location of the workgroup within the web server machine where
the workgroup is currently located:

- Login to the Workgroup Management System
- Click on the Move icon
- Select a workgroup from the pulldown menu,
select the option Move Workgroups within the same web server machine,
then click on the Continue button
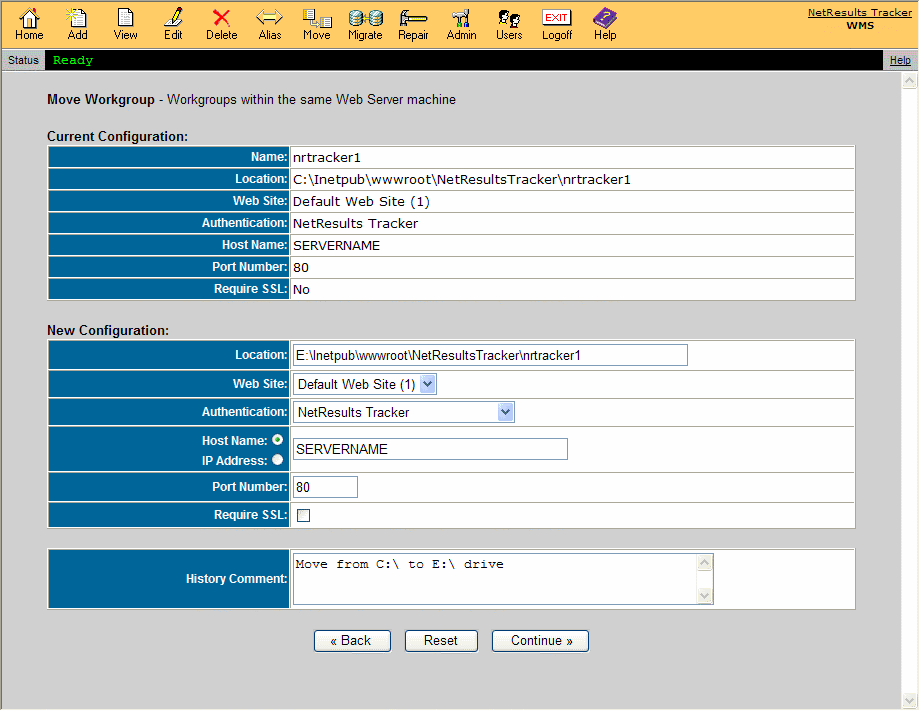
- The workgroup name, location, and web site will be displayed in the
Current Configuration section.
- Enter the path of the new location
into the Location field
and / or select a different Web Site in the New Configuration section.
- Enter the Host Name or IP Address and the Port Number
that corresponds to the web site where this workgroup will be located.
- Enter a History Comment to describe the change you are making.
- Click on the Continue button to proceed.
- A confirmation page will be displayed. Click the Back button
to make any necessary changes to the location and / or web site. Otherwise,
click on the Move Workgroup button, then click on the OK button to
complete the move operation.
Move Database from one machine to another
This option allows you to move the database to another
machine while still keeping the workgroup's web pages
in the same location. This operation cannot be performed for
Access databases.

Click on the link below that corresponds to the database type you are using:
SQL Server
Oracle
SQL Server
- Login to the Workgroup Management System
- Click on the Move icon
- Select a workgroup from the pulldown menu,
select the option Move Database from one machine to another,
then click on the Continue button
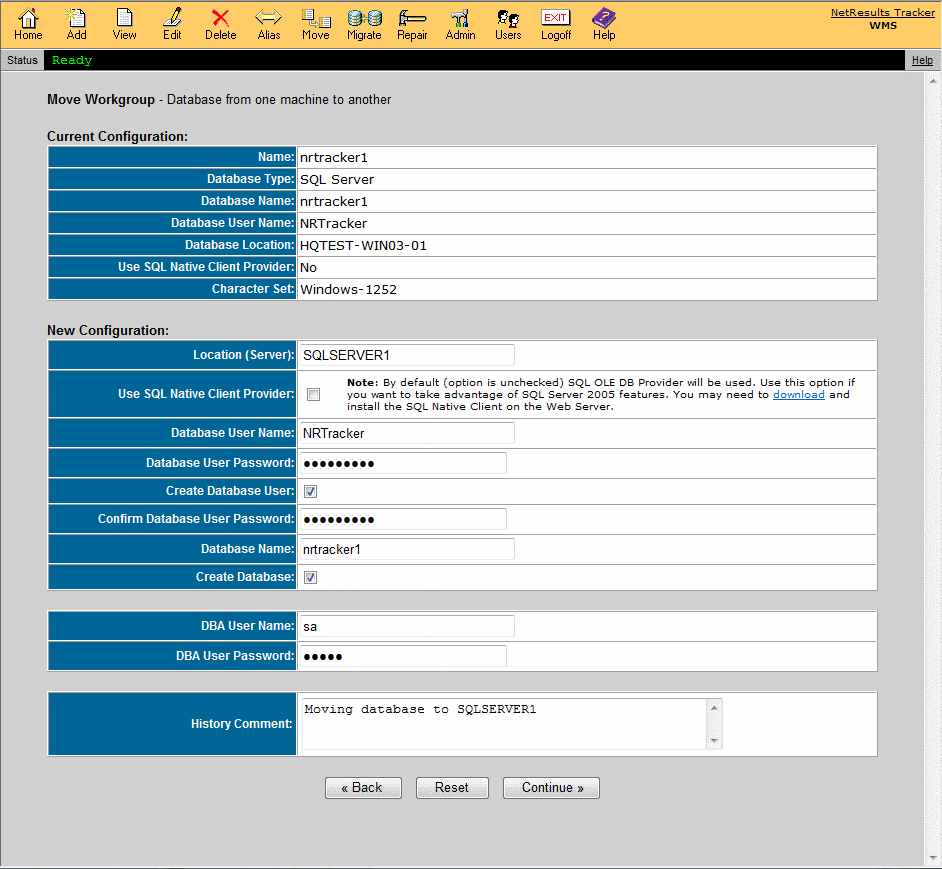
- The workgroup name, database type, database name, and database location
will be displayed in the Current Configuration section.
- Enter new values
for any of the following fields in the New Configuration section:
- Location (Server)
Enter the name of the new SQL Server machine where the data
will be located after the move
- Use SQL Native Client Provider
When enabling this option by checking the box, Tracker will use
SQL Native Client Provider to connect to SQL Server.
By default this property is unchecked so that Tracker will use
SQL OLE DB Provider to connect. This property is optional and can
be used if you want to take advantage of SQL Server features
such as database mirroring. If you are not using SQL Server 2005 or newer,
please *do not* enable this property. Use of this feature is only recommended
in cases where you have an expert SQL Server administrator with detailed knowledge
of SQL Server client configuration. Enabling this property may require you
to download
and install the SQL Native Client on the web server.
- Fail Over Location (Server)
This property will only be displayed when Use SQL Native Client
Provider is enabled.
Specify the name of the "mirror" server that should be used in the event that the
principal server fails. This property is optional and can
be used if you want to take advantage of SQL Server features
such as database mirroring. If you are not using SQL Server 2005 or newer,
please *do not* enter a value for this property.
Use of this feature is only recommended
in cases where you have an expert SQL Server administrator with detailed knowledge
of SQL Server client configuration. Even if you are using SQL Server 2005 or newer,
please leave this property blank if you are not using database mirroring or are not
familiar with database mirroring.
- Database User Name
Enter the User Name of the login that should be used by this workgroup
to connect to the database. "NRTracker" is listed by default. The login
does not need to already exist on SQL Server. You can enter the User
Name for a new login to be created on SQL Server for use with
this workgroup.
- Database User Password
Enter the password for the Database User Name specified above to connect to
SQL Server. If the Database User Name does not exist already on SQL Server,
enter a new password to be used when creating the new login.
- Create Database User
Check the box for this option if you would like to create a new login
on SQL Server for use with this workgroup. Do not check the box for this
option if the login specified in Database User Name already exists on
the new SQL Server.
- Confirm Database User Password
This field will only be displayed if the box for the option Create Database
user is checked. Confirm the password entered in the Database User Password
field above.
- Database Name
By default, this will display the name selected as the workgroup name. You can
change this in the space provided if desired. The database does not need to already
exist on the new SQL Server. You can enter the Database Name for a new SQL Server database
to be created for use with this workgroup.
- Create Database
This option will only be displayed when SQL Server is selected as the Database
Type.
Check the box for this option if you would like to create a new database
on the new SQL Server for use with this workgroup. Do not check the box for
this option if the database specified in the Database Name field already
exists on the new SQL Server installation.
- DBA User Name
This field will only be displayed when the boxes for either Create Database User
or Create Database are checked.
Enter the User Name of a login for a database administrator on the new SQL Server.
"sa" is entered into this field by default.
- DBA User Password
Enter the password for the login specified in the DBA User Name field.
- History Comment
You must enter information into this field to proceed.
- Click on the Continue button to proceed with moving the workgroup. A confirmation
page will be displayed with the following:
- New Database Name
Shows the Database Name as it was entered on the previous page.
- Physical Path
The location of the database files within the new SQL Server will be configured with the
default path. You can enter a different path if desired.
If the path you entered is not synchronized with
the SQL Server installation path, you might get an error while creating the workgroup.
- Max Size
The maximum size of the database. "UNLIMITED" will be set by default.
- File Growth
The percentage by which the database file should grow automatically. "10%"
will be set by default.
- Click on the Continue button.
- A confirmation page will be displayed.
Click the Back button to make any necessary changes to the location
and / or web site. Otherwise, click on the Move Workgroup button,
then click on the OK button to complete the move operation.
- After the workgroup files have been moved, the database needs to be
moved into the new machine using the import / export tool for SQL Server using the
procedure in the following Knowledge Base article:
http://kb.nrtracker.com/Item.asp?id=335
Oracle
- Perform the steps in the
Using Oracle Database
section first to prepare the new server for the move.
- Login to the Workgroup Management System
- Click on the Move icon
- Select a workgroup from the pulldown menu,
select the option Move Database from one machine to another,
then click on the Continue button
- The workgroup name, database type, database name, and database location
will be displayed in the Current Configuration section.
- Enter new values
for any of the following fields in the New Configuration section:
- Click on the Continue button to proceed with moving the workgroup.
If the box for the option Create Database User was not checked, a
confirmation page will be displayed. Skip to the step that starts with
"A confirmation page will be displayed".
If the box for the option Create Database User was checked, a page with
the following fields will displayed:
- Database User Name
Shows the Database User Name as it was entered on the previous page.
- Default Tablespace Name
Select which tablespace in the database should be associated with the new
user. Existing tablespaces for this workgroup will be available for
selection or you can select "<Create new tablespace>".
If you are unsure which tablespace to select, it is recommended that you
either select the "<Create new tablespace>" option or select the
USERS tablespace.
When selecting "<Create new tablespace>", the options below
will be displayed:
New Tablespace Name
Enter a name for the new tablespace. The name entered by default will
match the name of the Database User to be created.
Data File Name
Enter the path where the database file (*.dbf) should be located.
Size
The initial size of the database. "50 MB" is set by default.
The value entered must be at least 50 MB.
Auto Extend
This option determines whether the database should be allowed to grow as needed.
"Yes" is set by default.
- A confirmation page will be displayed.
Click the Back button to make any necessary changes to the location
and / or web site. Otherwise, click on the Move Workgroup button,
then click on the OK button to complete the move operation.
- After the workgroup files have been moved, the database needs to be
moved into the new machine using the import / export tool for Oracle using the
procedure in the following Knowledge Base article:
http://kb.nrtracker.com/Item.asp?id=335
Move / Populate Workgroup based on the PTAdmin Database
This option allows you to move all of the workgroups and settings in
your ptadmin database to another machine. For example, if you need to
move your entire Tracker to a new machine, you can move
your Workgroup Management System information to the new machine without
having to re-enter information. However, this option is generally used as part
of the procedure for moving your installation (not as a stand alone step). Please
click on one of the links below to see the Knowledge Base article
that provides the steps for moving your installation based on the database
type you are using:
Access:
http://kb.nrtracker.com/Item.asp?id=298
SQL Server or Oracle:
http://kb.nrtracker.com/Item.asp?id=330

Complete the following steps before selecting the option to move / populate
workgroup based on the ptadmin database:
- Install Tracker on the new server machine.
When prompted during the installation, do not choose to install the evaluation
workgroup called pteval.
- Copy your ptadmin database from your old server to the
new server. The ptadmin database can be found in your installation
directory. By default, the path is
C:\Inetpub\wwwroot\NetResultsTracker\ptadmin\Database\ptadmin.mdb, where
C:\Inetpub\wwwroot\NetResultsTracker is the installation directory.
- Copy your user management database from your old server to
the new server. The user management database (ptcommon.mdb) can
be found in your installation directory. By default, this is located at
C:\Inetpub\wwwroot\NetResultsTracker\ptcommon\Database\ptcommon.mdb, where
C:\Inetpub\wwwroot\NetResultsTracker is the installation directory.
- Login to the Workgroup Management System
- Click on the Move icon on the Button Bar. Select a workgroup from the pulldown
menu, select the option Move / populate workgroup based on the Workgroup Management
System database, then click on the Continue button.
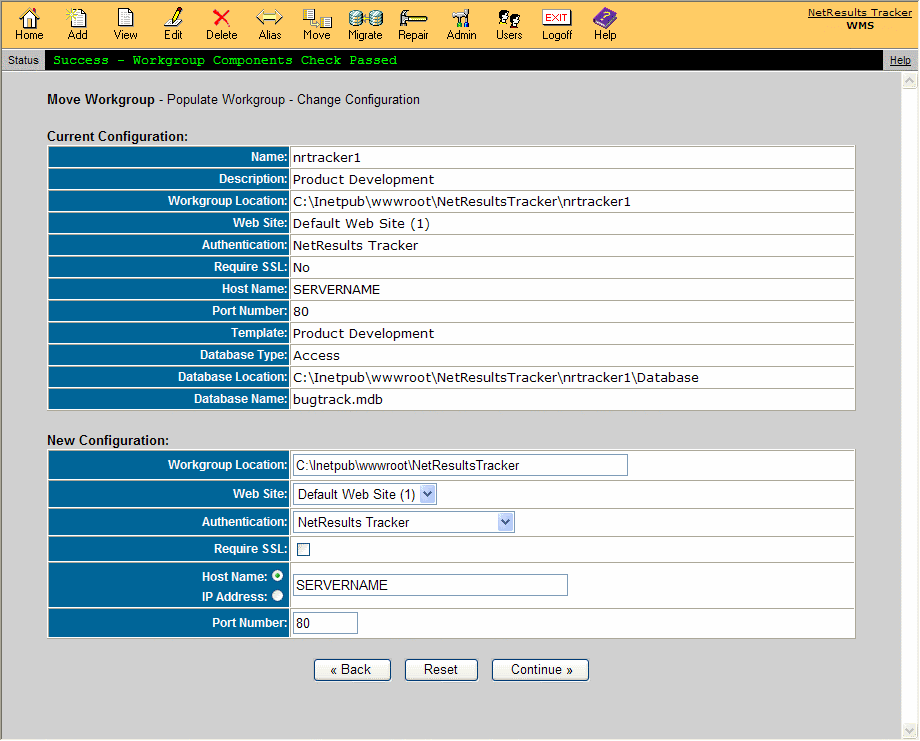
- Existing properties of the selected workgroup will be displayed in the
Current Configuration section. You have an option
to change the workgroup location, virtual web site, host name or IP address and the
port number for this workgroup on the new server. If you don't need to change anything
accept the default values. Click on the Continue button.
- New properties for this workgroup will be displayed in the New Configuration
section. Click on the Move Workgroup button to complete the process.
- Copy the Attachments folder from the old server
to the new server for this workgroup. The Attachments folder can be found in the
installation directory. By default, the path is
C:\Inetpub\wwwroot\NetResultsTracker\workgroup\Attachments where workgroup is
pteval, ptdev, etc.
Important Note:
For workgroups with an Access database, you will need to complete one more additional step:
- Copy the workgroup database file bugtrack.mdb from the old server to the new
server. The workgroup database can be found in your installation directory.
By default, the path is C:\Inetpub\wwwroot\NetResultsTracker\workgroup\Database\bugtrack.mdb where
workgroup is pteval, ptdev, etc. You can also find the database location by
viewing the workgroup information on the old server.
- Repeat the above steps for each of the workgroup that you wish to move to
the new server.
NetResults Tracker © 1997-2015 NetResults Corporation. All rights reserved.


