|
||
|
|
Overview
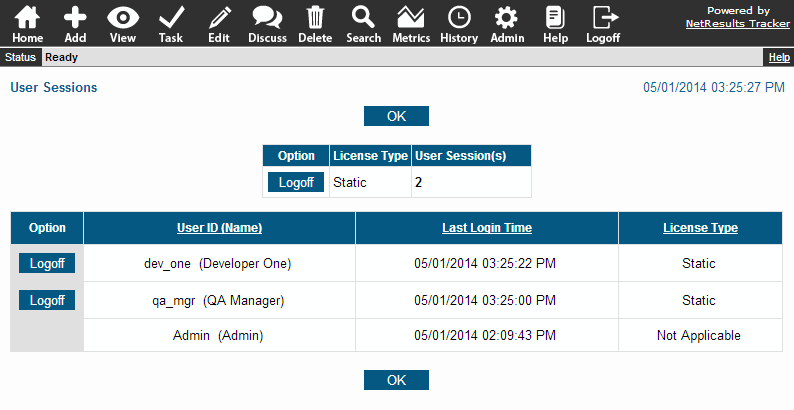
A current snapshot of all user sessions can be found in the User Sessions section in the Admin page. Each user session begins when a user logs in and ends when they click the Logoff icon (or when you close their session, see below). A tally of user sessions by license type as well as total sessions allowed by each license key appears at the top of the page. Please note that the Admin user session is not counted against the license limit.
To see a list of current User Sessions:

Closing User Sessions
A listing of each individual user session is displayed, which includes the User ID and last login time. The license type is listed for each user session. A Logoff button appears for each user session except Admin. You can terminate an individual user session by clicking the Logoff button next to the User ID. To end user sessions by the a particular license type, click the Logoff button next to the license type tally, at the top of the page. This is useful in cases where the limit of active floating user sessions has been reached causing another user to be unable to login. Also, this Logoff functionality can be used to clear out all user sessions when Administrative tasks need to be performed on the database (database backup, making large changes, etc.). When logging off all users of a particular license type, the user ending the sessions will not be logged off even if his/her user account is of the same type being logged off.
Note: A user may only terminate their session by clicking the Logoff icon. Simply exiting their browser will not terminate their session. If a user does exit their browser (or shuts down their machine) without clicking the Logoff icon, they can end their previous session by attempting to login again. At that point they will be offered an opportunity to terminate their previous session. By answering YES to terminating their previous session (and then clicking the Logoff icon at some point after successfully logging in this time), they can remove any "stale" sessions they have created without your assistance. Similarly, if a user browses off to another site without clicking the Logoff icon to end their Tracker session, they can click the Back button on their browser several times to return to the last Tracker page they were on and then click the Logoff icon. Or, they can simply browse back to the login page, login again (in this case no message about a previous session will be displayed as cookie information in their browser lets us know which session they were previously using), then click the Logoff icon on the Home page when it is displayed. Tracker does not allow more than one active session per user account (irrespective of license type), so if a user logs in and then logs off they can always be certain that they have not left any active sessions around. The information above is explained to your users in the Logging In section of the User's Guide, though you may wish to provide an explanation that is more specific to your Tracker configuration.
Session Timeout
A session timeout is configured by default in all Tracker workgroups. This timeout will end a user's session after a certain length of inactivity time (time where the user has not performed any actions in Tracker). The inactivity time is based on last transaction between the user's browser and the web server. A user typing information into the Add page could be counted as inactivity because the browser does not communicate with the web server until the user clicks on the "Add" button to save the information entered on the form.
The session timeout can be adjusted for each workgroup through your web server settings in Internet Information Server. Because the way a user's inactivity is determined does not account for some cases where the user is actively using Tracker, it is recommended that you do not set the session timeout to fewer than 120 minutes.
To adjust the session timeout in IIS 6.0:
NetResults Tracker © 1997-2015 NetResults Corporation. All rights reserved.