 NetResults Tracker Help NetResults Tracker Help |
 |
|
|
Advanced Queries |  | | |
Overview
The Advanced Queries function allows you to build more intricate
queries using operators such as AND, OR, and NOT, multiple selection of
values to match, and grouping (parentheses) of query criteria to generate
more refined results. You can define and save
advanced queries, enabling you to quickly select from a list of
frequently used advanced queries, rather than
re-entering the numerous query parameters that compose this
type of query. You can use either group or personal advanced
queries. You can always save a personal advanced query, and if
you have been given permission by your Administrator, you may also
be able to save an advanced query for use by all users in a
user group.
Advanced queries are managed by the Saved Queries bar which appears on
the Query Page below the status bar.

Using the Saved Queries bar, you can define new advanced queries, edit or remove
existing advanced queries, and run or preview an advanced query. Group level
advanced queries are listed followed by the User Group name in square
brackets (e.g. "Assigned to Me [Users]" denotes
the saved report called "Assigned to Me" is accessible by the user group "Users").
Admin users can access advanced saved queries for all user groups
without having to be a member of each group.
If a user group is not available for selection, you may not be a member of the user
group. If you are a member of the user group or are logged in as a user
with the Admin privilege, the user group may not have visibility to at least one
Project and Form. Only user groups that have visibility to at least one Project
and Form (configured in the Admin section) will be available for selection when
creating group advanced saved queries.
Field Visibility in Advanced Saved Group Queries
Field Visibility is the feature that allows fields to be restricted by user
group in various areas of Tracker such as the Add, Edit,
and View Pages and in reports on the Query and Home Pages. That is to say that
the system can be configured such that each user group may see a different set of fields
in each area of Tracker. Therefore, when creating advanced saved group
queries, all fields may not be displayed depending on field visibility
settings for the group selected.
When a field is not visible to the user group selected in a advanced saved group query, the field
will be set to the default value when the advanced saved group query is run. In most cases,
this default value is "*", which will include all possible values for the field in the advanced saved
group query results.
In the case of the Deleted field, the default is "No" such that all records that have not been
marked as deleted will be included in the advanced saved group query results.
If a personal or group advanced saved query was created before a field was made invisible to a user
group, it is possible for this user group to see an invisible field in a clause in the "Query Phrase" section
of the advanced saved query. Any clause containing a field that is now invisible to the user group
will be "read only". This clause cannot be edited because it contains a field that has been restricted
for the user group. However, the clause can be deleted from the advanced saved query.
Please contact your Tracker administrator if you wish to include a field in an advanced saved
group query that is not visible to the selected user group.
Define an Advanced Saved Query
To define an advanced saved query, follow these steps:
- To start, select a query from the Saved Queries pulldown menu
that will be used as the starting
point (template) for the new saved query. To start with a basic
saved query, select the saved query "Default [Users]".
- Click on the Add button on the Saved Queries bar

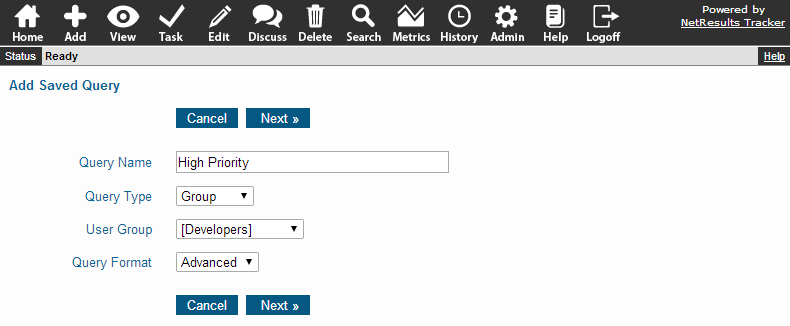
- In the form that appears, enter a query name (this is the name
that you will use to retrieve the query) in the Query Name field.
- In the Query Type field, select whether this is a "Personal" (to create
a saved query that will only be accessible by you) or "Group" (to create a saved query
that will be accessible to members of a particular user group) saved query.
- If you selected "Group" for Query Type, select a user group in the
User Group field to which this saved query should be visible.
You will only be able to select the user groups in which you are a member
(However, the Tracker Administrator can add advanced saved
queries for all user groups).
- Select "Advanced" as the Query Format and click Next to proceed

- Make a selection in the Project field:
This field is only available if you have been given visibility to more
than 1 project in Tracker.
You can limit the query criteria to only those records that belong to
a particular project(s) or select * to match any project.
The selection made in this field will determine the options available in
the Form field. To select multiple projects, hold down the
Ctrl button on your keyboard while clicking on the projects
to select them.
- Make a selection in the Form field:
This field is only available if you have been given visibility to more
than 1 form in Tracker.
You can limit the query criteria to only those records that were
submitted using a particular form(s) or select *
to match any form. The selection made in this field determines which
fields are available for selecting query criteria. To select multiple forms,
hold down the Ctrl button on your keyboard while clicking on the
desired forms to select them. If you have selected
one or more forms, a Get Fields button will be displayed.
Click on the Get Fields button to refresh the page with the fields
that belong to the forms you have selected.
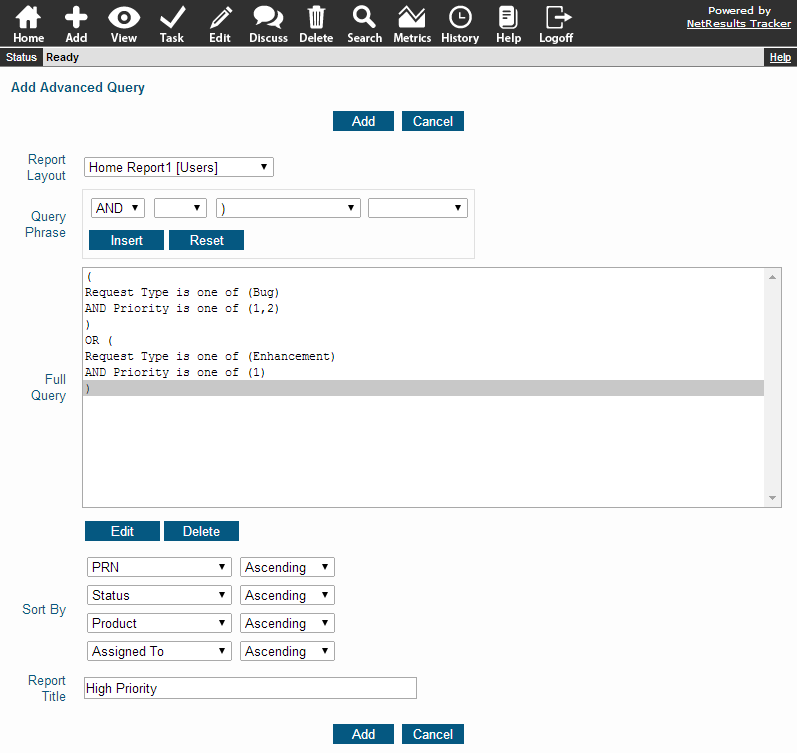
- Phrases will be displayed in the Full Query section based on the saved query you
selected in the Saved Queries pulldown before clicking on the Add button.
To edit or delete an existing phrase, click on the phrase, then click on the Edit or
Delete button
above the Full Query section. Build query phrases by making selections in the
Query Phrase box according to the information in the Query Phrases section.
If you are
creating/editing the first query phrase, "(blank)" must be selected for the first field
of the first row of the Query Phrase section.
- Select values for the rest of the fields in the first row
- If applicable, enter information in the rows 2, 3, or 4. To select
multiple values in row 3, hold down the CTRL button on your keyboard while
clicking on each value you wish to select.
- Click on the Insert button to add the first query phrase or insert a query phrase
into the Full Query section
- Click on the Reset button to clear the Query Phrase section, then construct the
next query phrase
- Repeat the above steps until you have inserted all of the query phrases you wish to
include
- If desired, choose fields and order in the Sort By section to sort the query results.
Select which fields to sort by and choose "Ascending" or "Descending"
as the sort order for the selected fields for the query results.
The Sort By and Sort Order selection are at the bottom of the Advanced Query page.
Link and TextArea type fields cannot be selected in the Sort By options.
Please note that when the preference
Exclude Time From Reports is enabled and a Date field is selected in the
Sort By section, the query results will be sorted by the time in each record
even though the results will not include the time information.
When PRN (Record ID) is selected
for one of the Sort By fields, the records will be ordered according to the numeric component of
the PRN (Record ID) field. The short name of the form will not be used as part of the sorting when
PRN (Record ID) is selected. For example, let's say you have PRNs "REC1" and "REC2". The sorting
will be done using "1" and "2", ignoring the "REC".
- If desired, select a report layout in the Report Layout pulldown menu.
The report layout selected determines which fields will be displayed as the
columns in the query results. More information on Report Layouts can be found
in the Using Saved Queries and Reports
section.
- The text in Report Title will be displayed at the top of the Query Results page.
By default, the Query Name selected above will be entered as the
Report Title. Change the Report Title, if desired.
- Click on the Add button to save your advanced query
Run an Advanced Query
To run an advanced query, follow these steps:
- Click on the pulldown menu in the Saved Queries bar
and select the desired advanced query from the list of options
- Click on the Run button to the right of the Saved Queries pulldown
Building Query Phrases
The procedure for building an advanced query differs from a standard query in that
multiple options for each field can be selected and / or excluded for
advanced queries. This is done by composing various query phrases that will be
combined to generate the query results. These phrases are constructed in the
Query Phrase section of the Advanced Query page.

Logic operators and fields are selected for a query phrase in the first row of the
Query Phrase section. A description of the fields in the first row of the
Query Phrase section:
- The first field is a pulldown that contains
the operators "AND", "OR", and "(blank)". For the first phrase of an
advanced query, "(blank)" is the only possible option for this first field.
- The second field is a pulldown that contains the operators
"NOT" and "(blank)".
- The third field is a pulldown menu that lists all fields within the data
record. In addition, "(" and ")" are options in this pulldown that can be
used to nest (or group together) query phrases within the full query.
- The fourth field will automatically change based on the selection that
was made for the third field. Table 1 shows the possible
values for the fourth field based on the input of the third field:
| 3rd Field Type |
4th Field Displays... |
Type of Information to Enter in Input Box... |
| Assignee |
is one of |
select a user or [User Group] from menu |
| Date |
"before", "on or after" |
date entered in the format that matches the date and time settings in Preferences section (e.g. "mm/dd/yyyy") |
| Date |
"is empty" |
N/A |
| Date |
"within the" |
Select "previous" or "next", enter an integer for the number of increments desired and select a time increment to search within a date range relative to the current date and time |
| Deleted |
is one of |
select Yes or No from menu |
| Float |
<, <=, >, >= and =. |
floating point number |
| Integer |
<, <=, >, >= and =. |
non-negative whole number |
| Link |
"contains" |
text string |
| Link |
"is one of" |
enter a text string to search for items, select item(s) from menu |
| Link |
"matches" |
select a saved query from menu |
| PRN |
<, <=, >, >= and =. |
record number |
| Product (History Pulldown) |
is one of |
select value(s) from menu |
| Pulldown Menu |
is one of |
select value(s) from menu |
| RelNum |
= |
select value from menu for each digit A - D or leave as "*" |
| Reporter |
is one of |
select a user or [User Group] from menu |
| Status |
is one of |
select a State or [State Group] from menu |
| Text or TextArea Field |
"contains" |
text string |
| Text or TextArea Field |
"is empty" |
N/A |
| URL |
"contains" |
text string |
| URL |
"is empty" |
N/A |
| YesNo |
is one of |
select Yes or No from menu |
| <Clone> |
"is" |
true (if record is a clone) or false |
| <Full Text Search> |
"(blank)" |
enter a text string in Search for field, select one or more fields in the in field, select a Search Method in the using field. Review Full Text Search for more details. |
| ( |
"(blank)" |
N/A |
| ) |
"(blank)" |
N/A |
|
The selections made in the pulldowns determine what information should be
entered into the Input box below the pulldowns.
Table 1 describes the type of information that
should be entered.
Once the components of the query phrase have been selected, you can click on the
Insert button to add the query phrase to the Full Query section. To add another
query phrase, click on the Reset button and begin selecting options in the
first row.
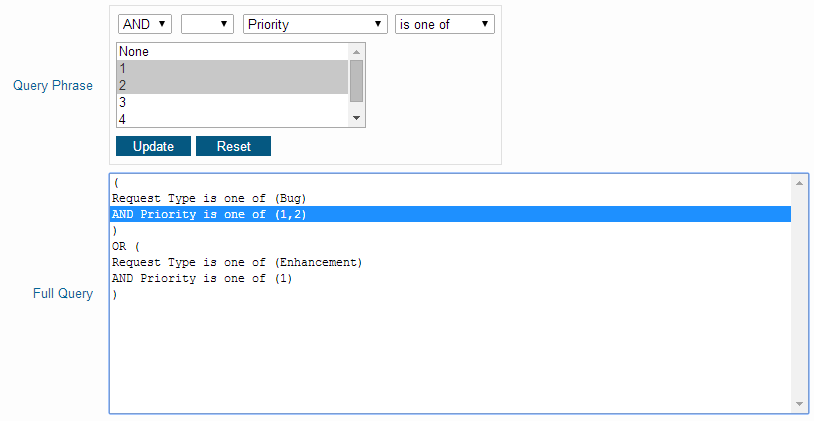
To edit a query phrase that has been inserted into the Full Query section,
click on the query phrase, then click on the Edit button. Modify the
phrase in the Query Phrase section, then click on the Update button.
The query phrase will be updated in the Full Query section.
To delete a query phrase that has been inserted into the Full Query section,
click on the query phrase, then click on the Delete button.
Preview an Advanced Query
Many times you may wish to verify the parameters of
an advanced query before running it or perhaps modify it slightly
before running it.
To preview, optionally modify, and run an advanced query, follow
these steps:
- Select an advanced query in the Saved Queries pulldown, then
click on the Preview button to the right of the Saved Queries pulldown. The parameters
for the advanced query appear in the query dialog below.
- Modify the advanced query parameters if desired
- Click on the Run Query button in the query dialog to submit
the query
Edit an Advanced Query
To edit an advanced query, follow these steps:
- Select the advanced query you would like to edit in the Saved Queries
pulldown, then click on the Edit button to the right of the Saved Queries pulldown.
A page containing
the current advanced query parameters will be displayed.
- In the Full Query section, click on a query phrase you
wish to modify, make the changes in the Query Phrase
section, then click on the Update button. After you are done
making changes to the advanced query, click on the OK button
to save your updates.
Delete an Advanced Query
To delete an advanced query, follow these steps:
- Select the advanced query you would like to remove in the Saved Queries
pulldown, then click on the Delete button to the right of the Saved Queries pulldown
NetResults Tracker © 1997-2015 NetResults Corporation. All rights reserved.


