|
||
|
|
Overview
There are several preferences that are applied to all areas of the Knowledge Base. These preferences include setting the workflow state where Knowledge base articles are published as well as selecting date and time formats.
Topics Covered In This Section
Setting Knowledge Base Preferences
To set the Knowledge Base Preferences:
The preferences that can be set for all Knowledge Base pages are described below:
Knowledge Base Article Form - Select a form that should be used for creating and publishing articles to the Knowledge Base. The forms available for selection are based on the forms that have been created in the Forms section.
Articles from these Projects are visible - This option limits the articles that are published in the Knowledge Base to only those that have belong to one of the selected projects. The projects available are the projects associated with the form selected in Knowledge Base Form. More information can be found in the Projects section.
Articles in these State(s) are visible - Choose a state or a state group as the state(s) where articles are published to the Knowledge Base. When a Knowledge Base article has the Status field set to the state(s) selected for this preference, the article can be viewed using the Search Page -- it is available to all end users searching the Knowledge Base.
Multiple states can be selected for this preference by creating a state group in the Workflows page of the Administration section and selecting the new state group for this preference.
Date Format - Select the date format that should be used when displaying date fields in the Knowledge Base articles and related pages (Search, Results, and Item pages).
Time Format - Select the time format that should be used when displaying date fields in the Knowledge Base articles and related pages (Search, Results, and Item pages). Selecting 12 Hour will display the time using the numbers 1-12 to represent each hour. Choosing 24 hour will display the time using the numbers 0-24 to represent each hour.
Time Zone - Select the time zone that should be used when displaying date fields in the Knowledge Base articles and related pages (Search, Results, and Item pages). The list of available time zones is based on the operating system of the Tracker server machine. The following Help section contains the time zones for the server operating systems supported by Tracker: Windows Time Zones
Adjust to Daylight Saving Time (DST) - Checking the box here will enable the system to adjust the workgroup data to account for daylight saving time. If you selected a time zone for the workgroup where daylight saving time is observed, it is recommended that you enable this option.
Attachments Label - When the option Include Attachments is enabled in the Summary or Body of the Item Page, this is the label that will be displayed for that section of the Item Page. By default, it is set to "Attachments".
Access to Knowledge Base can be limited by IP address of the user attempting to access the workgroup. When this feature is enabled, a user will only be able to access the Knowledge Base pages if the user's IP address matches one of the IP addresses or IP Address ranges configured in the Allowed IP Addresses field. If the user's IP Address does not match a configured address or range, they will see an "Access Denied" message that can be customized with any desired wording and HTML code. This option only applies to the Knowledge Base pages. IP Address Restrictions can be configured for the Login Page and the rest of the Tracker pages as well as the Submit Page for Unregistered Users in their own separate sections. IP Address restrictions configured in this section take effect immediately after clicking OK to save the changes.
To enable IP Address restrictions:
For Type select "Single computer" to add a single IP Address or "Range of computers" to add a range of IP Addresses. For IP Address, enter the IP address, then click OK. For IP Address Range, enter the first IP Address in the range, then enter the last IP Address in the range and click OK. At least one IP Address or range must be entered when the this feature is enabled. The IP Address of the login user (the user making these changes) should also be added to the list as a single computer or within a range.
To edit an item in the Allowed IP Addresses list:
To remove an item in the Allowed IP Addresses list:
You can customize the color scheme of the Knowledge Base pages.
To set the color preferences for the Knowledge Base pages:
Color Preference Options
The following color preferences can be set for the Knowledge Base pages:
Browser Button Settings
These settings determine the colors of the buttons for users using the following browsers: Internet Explorer (IE), Firefox and Safari.
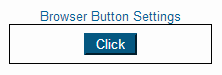
Use Default Buttons (& Inputs) - Checking the box for this option will apply the operating system's default color settings to the buttons. When this option is enabled, the rest of the Browser Button Settings are disabled.
Gradient - Select a method for applying a gradient effect to the button color (e.g. "Bottom to Top" is the method selected in the Browser Buttons Sample). Selecting "None" will not apply the gradient effect to the button color. This option will not be available when the option Use Default Buttons (& Inputs) is enabled.
Background - The color used in the background of the buttons in the Tracker pages (e.g. the light blue color behind the text "Click" on the button in the Browser Buttons Sample). This option will not be available when the option Use Default Buttons (& Inputs) is enabled.
Text - The color of the text in the buttons in the Tracker pages (e.g. the color of the text "Click" in the Browser Buttons Sample). This option will not be available when the option Use Default Buttons (& Inputs) is enabled.
Border - The color of the border of the button in the Tracker pages (e.g. the color of the light blue border around the "Click" button in the Browser Buttons Sample). This option will not be available when the option Use Default Buttons (& Inputs) is enabled.
Error Page Settings
The following settings are applied to the error page should an error occur in the Knowledge Base.
Body Background - The background color of the error page.
Body Title Font - The color of the text displayed at the top (title) of the error page.
Border Background - The color of the border displayed around the error information.
Left Pane Body Text - The color of the text in the left pane of the error page.
NetResults Tracker © 1997-2017 NetResults Corporation. All rights reserved.
 NetResults Tracker Help
