|
||
|
|
The Item Page is the page that will display the information within a Knowledge Base article. Various aspects of the item Page can be customized as described below.
Topics Covered In This Section
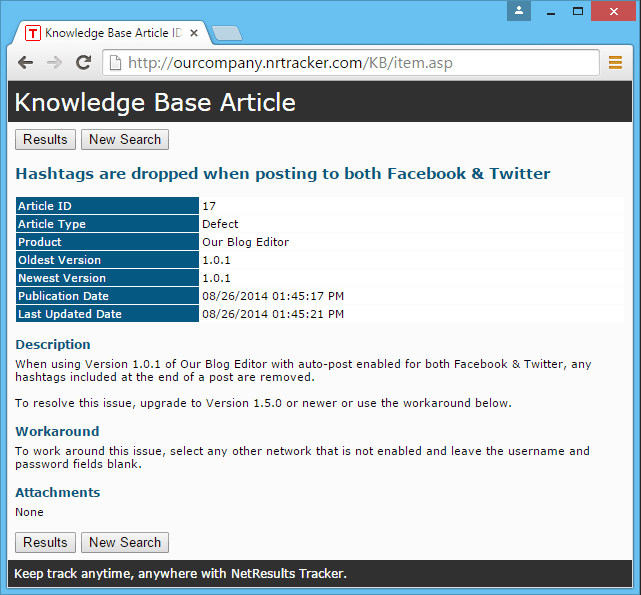
Header or Footer - Click on the Header or Footer button to the left of Item Page on the Knowledge Base Configurations Page to customize the Header or Footer section of the Item Page. You can enter your own custom HTML into the text box provided. You may wish to add your company logo or other branding or instructional text to the page in the custom HTML sections. Click OK to save your changes. Please do not enter any header tags into this area. Some examples of header tags are <HTML>, </HTML>, <BODY>, </BODY>. If you wish to display an image in the Header or Footer, you can upload the file as a global file attachment. The Header is the text "Knowledge Base Article" displayed in the Item Page Sample above. The Footer is the text "Support || Sales" displayed in the Item Page Sample above.
Page Title - Enter up to 80 characters to be displayed as the page title in the browser. The text you enter will be displayed before the browser name. You can use the variables <workgroup> to include the name of the workgroup as part of the Page Title. and <itemlabel> <number> to include the item label (e.g. "Article" or "PRN" or other label for the PRN field) and record number. The Page Title is the text "Knowledge Base Article ID 12" displayed in the Item Page Sample above.
The contents of the Item Page can be customized to determine which fields will displayed in the sections of each article. To customize the contents of the Item Page, click on the Contents button to the left of the Item Page on the Knowledge Base Configurations Page.
To customize the options on the Contents page:
Article Title
Click on the Edit button to the left of Title to select a field that will be used as the title for each article. All fields that are a Text type field will be available to be selected as the Article Title. Information on adding a Text type field to the database can be found in the Fields Help section. Click OK to save your selection.
Summary
Click on the Edit button to the left of Summary to select the fields that will be displayed in the Summary section of the article. All fields created in the Fields section of the workgroup except fields that are TextArea type fields will be available to be displayed in the Summary section. Fields listed in the Selected Items column are the fields that will appear in the Summary section.
To add a field such that it will be displayed in the Summary section of the Item Page:
To edit the order of a field with respect to the others in the Summary section:
To remove a field such that it will no longer be displayed in the Summary section of the Item Page:
The Include Attachments option allows attachments added to the article to be displayed in the Summary section below any fields added to the Selected Items column. The label that will be displayed for this entry in the Summary section is determined by the Attachments Label option in the Preferences section.
Body
Click on the Edit button to the left of Body to select which fields will be displayed in the Body section of each Knowledge Base article. All fields created in the Fields section of the workgroup will be available to be selected for the Body section. Fields listed in the Selected Items column are the fields which will appear in the Body section.
To add a field such that it will be displayed in the Summary section of the Item Page:
To edit the order of a field with respect to the others in the Summary section:
To remove a field such that it will be no longer be displayed in the Summary section of the Item Page:
You can choose to display fields that are TextArea type fields as Text or HTML. By default, the fields will be displayed as Text. To display the fields as HTML, check the box called Display TextArea Fields as HTML. Click OK to save this change.
The Include Attachments option allows attachments added to the article to be displayed in the Body section below any fields added to the Selected Items column. The label that will be displayed for this section is determined by the Attachments Label option in the Preferences section.
The color scheme of the Item Page can be customized.
To set the color preferences for the Item Page:
Color Preferences
The following color preferences can be set on the Item Page.
General Settings
Page Background - The background color of the Item Page. The page background may not always be visible on the Item Page; it depends on how content is displayed in the article's Item Page.
Header Background - The background color of the top section of the Item Page (e.g. the color behind the text "Knowledge Base Article" in the Item Page Sample).
Header Text - The color of the text in the top section of the Item Page (e.g. the color of the text "Knowledge Base Article" in the Item Page Sample).
Footer Background - The background color of the bottom section of the Item Page (e.g. the color behind the text "Support | Sales" in the Item Page Sample).
Footer Text - The color of the text in the bottom section of the Item Page (e.g. the color of the text "Support | Sales" in the Item Page Sample).
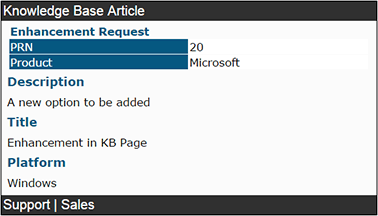
Body Background - The background color of the body of the Item Page (e.g. the color behind the text "A new option to be added" and "Enhancement in KB Page" in the Item Page Sample).
Title Text - The color of the text displayed as the title in the body of the Item Page (e.g. the color of the text "Enhancement Request" in the Item Page Sample).
Error Message Text - The color of the text displayed when no match is found for a Quick Search (e.g. the text "Sorry no match found for your search. Please click here to perform a new search." will be displayed when an invalid article number is entered into the Quick Search field on the Search Page.)
Summary Section
Title Background - The background color of the left column in the Summary section, which displays the field names (e.g. the color behind the text "PRN" and "Product" in the Item Page Sample).
Title Text - The color of the text in the left column in the Summary section, which displays the field names (e.g. the color of the text "PRN" and "Product" in the Item Page Sample).
Text Background - The background color of the right column in the Summary section, which displays the field values (e.g. the color behind the text "20" and "Microsoft" in the Item Page Sample).
Body Text - The color of the text in the right column in the Summary section, which displays the field values (e.g. the color of the text "20" and "Microsoft" in the Item Page Sample).
Body Section
Title Text - The color of the text displayed as the name of each field included in the Body section (e.g. the color of the text "Description", "Title" and "Platform" in the Item Page Sample).
Body Text - The color of the text displayed as the value of each field included in the Body section (e.g. the color of the text "A new option to be added" in the Item Page Sample).
A style sheet is used to determine the size, style and family of the fonts on the Item Page. You can use your own style sheet by placing a copy of your style sheet into the Styles directory of your workgroup's Knowledge Base files. Any color options set in the style sheet will be overridden by the settings in the Color Preferences section for the Item Page. The directory can be found at:
<installation directory>/workgroup/KB/Styles
where <installation directory> is the location where you installed your Tracker files. By default, the <installation directory> is at C:\Inetpub\wwwroot\NetResultsTracker and workgroup is the name of the workgroup used as Knowledge Base.
Click on the Style button to the left of the Item Page to specify the name of your customized style sheet. In the Style Sheet File Name field, enter the name of your style sheet file in the format FileName.Extension as in the example KBStyle6.css, which is the style sheet used by default.
Check the box for the option Apply to all pages to apply the style sheet entered in the Style Sheet File Name field to all pages related to the Knowledge Base. Enabling this option will overwrite any other style sheets specified in the Style section for the Search and Results pages.
Click OK to save your selections.
NetResults Tracker © 1997-2017 NetResults Corporation. All rights reserved.
 NetResults Tracker Help
