|
||
|
|
Each workflow is a set of steps that are used to process a record. Each step can be represented by a state. States can be used in one or multiple workflows. After adding states to a workflow, create transitions, or paths, to move records from one state to another and state groups to create collections of states to be used in reports and workflow settings.
Topics Covered In This Section

Adding a State
To add a new state:
Properties of a State
State Name - Name of the state
Order - The order of the state. This will determine the order in which it appears in the Global States List and a workflow's Available States list. You may wish to order the states according to their place in a workflow process. For example, if Reported is the first state for the default workflow, you may want to specify "0" as the order for this state. States which have the same value specified in the order field will be listed alphabetically.
Transition Label Style - The style of the labels that will be displayed when a transition is displayed in the Task operation. You can choose from three types of label styles:
Instruction Message - The instructional message for this state. The message appears whenever a user performs the Task operation on a record that is in this state. This can be used to instruct the user to select a transition for the state or to provide general information about tasking the record. Up to 255 characters can be entered. The transition image in the Marking a Task Complete section of the User Guide shows an example of the Instruction Message above all the listed Transitions.
Editing a State
To edit a state:
Deleting a State
Before a state can be deleted, Tracker will check if any of the following conditions exist. If any of the conditions exist, you will be prompted to make changes to select a replacement or change the configuration accordingly:
To delete a state:
Select a workflow that was listed in the Used In Workflows column in the Workflows pulldown at the top. The page will be refreshed to display the properties of the selected workflow.
Click on the + icon to the left of a form in the Forms section. Check to ensure that the state you wish to delete is not listed as the Default Add State for the form. If the state is selected as the Default Add State for a form, click on the Manage link to the right of Default Add State Settings. Select another state for Default Add State to replace the one you wish to delete. You may have to apply this change to other values in a pulldown if the Default Add State setting is based on a particular pulldown field. Click OK to save the changes and click OK again to return to the Workflows section. Repeat this step for any other forms which have the state selected as the Default Add State.
Click on the Manage link to the right of States. Click on the state you wish to delete and click on the Remove button. If there are any related items, you will be prompted to delete the items or select a replacement state. Click OK to save the change and click OK to return to the States for a Workflow section. Click OK again to return to the Workflows section. Repeat the above steps for any other workflows that were listed in the Used In Workflows column.
Click on the Global States button
Often when formulating criteria for queries and charts or setting up a workflow, you may wish to limit the criteria or the workflow options to a particular group of states. Tracker allows you to do this by defining State Groups. A State Group is a collection of workflow states that appears as a choice on the Query, Metrics, and Workflow sections. One example of using state groups is to create a state group which contains only those states in which records are considered active (e.g. all records which are not closed, on hold or in any other state where they are not being actively processed). This "Active" state group could be used when running reports to limit the data returned by the report to only "active" records.
By default, a state group called "All", which contains all states, is available. To view the state groups currently available in the workgroup:
Adding a State Group
To add a State Group:
Editing a State Group
To edit a state group:
Adding or Removing States From a State Group
To add or remove states from a state group:
Deleting a State Group
When removing a state group, Tracker will check the following items and ask you to either select a replacement for the state group you are removing or choose to delete the related item:
To delete a state group:
If the state group is selected for the Allowed Add States option in a Workflow Form or is selected for the "Articles in these State(s) are visible" option in the Knowledge Base Preferences, you will be prompted to select a different state group for these options before you can delete the state group. Change the options mentioned and then repeat the above steps to delete the state group
If the state group is selected in any Notification Rules, is selected for "New State" in the Prompt with <State Group> in any transitions, or is selected as part of the criteria in any Saved Queries or Metrics, you will be prompted to either select a replacement or delete the items. Click OK after selecting replacements / deleting related items.
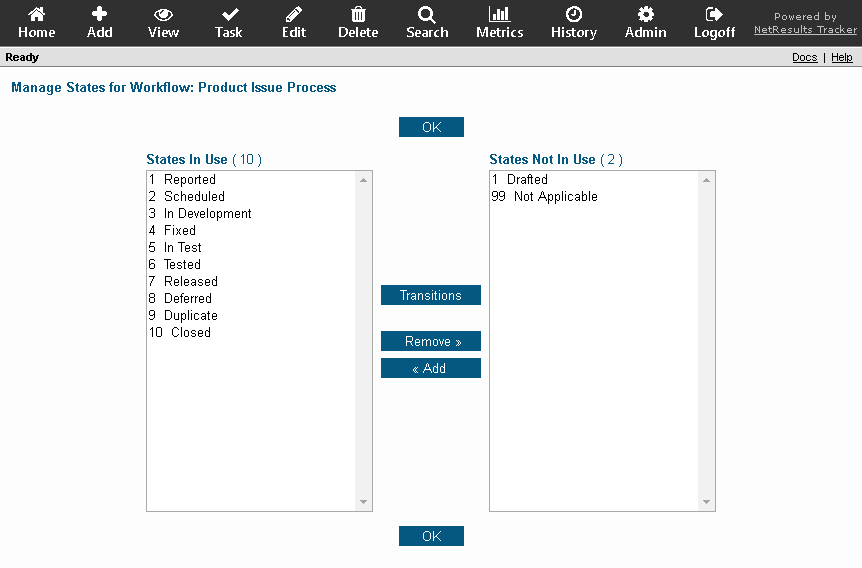
States can be added or removed from a workflow on the Workflows page. Expanding a state listed in the States section for a workflow will display the state's Next States, Transitions, Transition properties, Task Fields and Alerts. Next States are states selected as the "New State" for a transition configured in the selected state. For example, if you have expanded the "Reported" state and it has a transition that will move records to the "Scheduled" state, The Scheduled state will be listed in "Next States" for the Reported state.

To add or remove states from a workflow:
To add a state to the workflow, click on a state in the States Not In Use column, then click on the Add button. To remove a state from the workflow, click on the state in the States In Use column, then click on the Remove button.
NetResults Tracker © 1997-2018 NetResults Corporation. All rights reserved.
 NetResults Tracker Help
