|
||
|
|
Topics Covered In This Section
How to Login to WMS
It is recommended that you temporarily disable any anti-virus software while you perform configuration in the Workgroup Management System (WMS). This is suggested so that your anti-virus software will not prevent WMS from performing operations such as copying files, running scripts, configuring your web server, setting file permissions and registry entries. Your anti-virus software can be reactivated safely after you have completed any necessary WMS configuration.
During installation, Authentication (Basic and Windows Integrated) is configured for the Workgroup Management System login page and Anonymous Access is disabled. This will cause the web server to require that all users (browsers) authenticate themselves. Internet Explorer browsers will use Integrated Windows authentication. Internet Explorer may implicitly authenticate you (if you are already logged in as a user known to the web server) or it may pop up a dialog that asks you to enter your User Name, Password, and Domain. In all cases, you should both be logged in to Windows as a user with local Administrator privileges on the web server machine and, if prompted, enter the User Name of a user with local Administrator privileges on the web server (e.g. Administrator). Domain Administrator privileges may not be sufficient. To ensure you have the necessary rights, right click on the browser icon for the browser you are using to access Tracker and select "Run as Administrator", then enter the corresponding password. If you are not authenticated as a user with local Administrators privileges then you will not be able to perform all operations in WMS (some operations will fail). WMS will warn you about this at login time. If you see this warning, please exit your browser window and try again.
To login to the Workgroup Management System, browse to the following URL:
http://localhost/ptadmin/uwslogin.asp
localhost indicates the web server on the local machine. To access the Workgroup Management System from a remote machine the URL is:
http://servername/ptadmin/uwslogin.asp
servername indicates the TCP/IP name of the machine where Tracker is installed.
In both cases above, you can omit the "/uwslogin.asp" at the end, as we have configured uwslogin.asp (the login page) as the default page for the ptadmin virtual directory.
By default during the installation process, setup configures your web server (IIS) such that the Workgroup Management System (WMS) inherits any IP Address configuration or restrictions set on the web site where you chose to install Tracker. If you wish to apply more security to your Workgroup Management, such as only allowing WMS to be accessed locally, please refer to the following article in our Knowledge Base at:
http://kb.nrtracker.com/Item.asp?id=9
When you are presented with the Workgroup Management System login screen (displayed below), enter ptadmin as the User ID and the corresponding password to log in. If you are presented with a pop-up or other prompt before you see the Login Page, enter credentials for a local user account with Administrator rights. The initial ptadmin user password is "ptadmin". It is recommended that you change this default password during your first login session. Information on changing your password is available in the section WMS User Administration.

On occasion when logging in, you may encounter the error message, "Login Failed - Your previous login session is still active." This message can come up if you were previously logged in to Tracker, but did not click the Logoff icon to finish your session. Select Yes so that the previous session will be closed and a new session will begin and allow you to login. If you select No, you will not be able to login to WMS as only one user is allowed in WMS at a time.
The Home Page
After logging in, the first screen you will see is the Workgroup Management System Home Page.
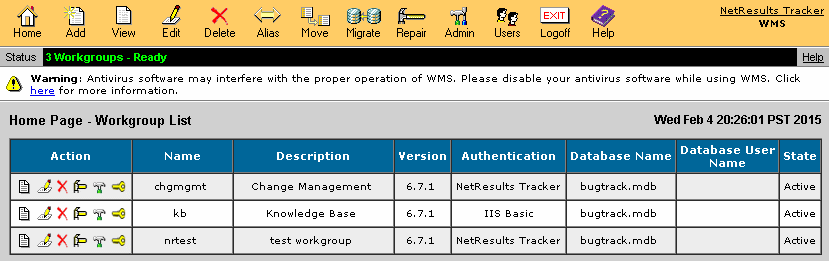
This page will show all workgroups that are currently installed. Certain actions, such as View, Edit, Delete, Login, Repair and Database Tools can be performed using the icons to the left of each Workgroup Name. Other actions can be performed by using the icons in the top Button Bar.
View - Please review the section Viewing a Workgroup for more information.
Edit - Please review the section Editing a Workgroup for more information.
Delete - Please review the section Deleting a Workgroup for more information.
Repair - Please review the section Repairing a Workgroup for more information. This icon will not appear for a workgroup which has not been upgraded to the latest version using one of the upgrade options in the Admin menu.
Workgroup Database Tools - The Database Tools page for a workgroup can be accessed by clicking on the Workgroup Database Tools icon to the left of the workgroup name on the Workgroup Management System Home Page. As the operations in the Workgroup Database Tools page can make irreversible changes to your database, these tools should be used with extreme care and only in accordance with the procedures listed in this Help document or in the Knowledge Base section of the NetResults web site.
Login - To login to a workgroup from the Workgroup Management System Home Page, click on the login icon to the left of the workgroup. A separate window will be launched with the login page for the workgroup.
You can also login to a workgroup by browsing directly to:
http://servername/workgroup/ptlogin.asp
servername indicates the TCP/IP name of the machine where Tracker is installed.
If a workgroup has not been upgraded to the latest version by using one of the upgrade options in the Admin menu, you will not be able to login to the workgroup. The version for each workgroup is displayed in a column on the Home Page.
NetResults Tracker © 1997-2018 NetResults Corporation. All rights reserved.
 NetResults Tracker Help
