|
||
|
|
Alerts are a form of email notification messages that can be triggered by a lack of change in a record's state within a certain time period. For example, a record should not stay within a particular state for longer than 2 days. An alert can be sent if the record is still within the same state after a period of 2 days has passed. Alerts can also be used as a reminder or alarm type feature; they can be triggered relative to any date field in the record or can be set to notify users at a certain date and time after a record has been processed using the Task operation.
Alerts can be configured per record. Each record can have different alert settings including when, how, how often, and to whom the alerts should be sent.
When specifying when to send an alert either for a given record or a transition, a fixed date and time can be entered or a date and time based on a date field within the record can be used. In addition, alerts can be sent once or configured to repeat periodically. Any combination of users and / or user groups can receive alerts for a particular record.
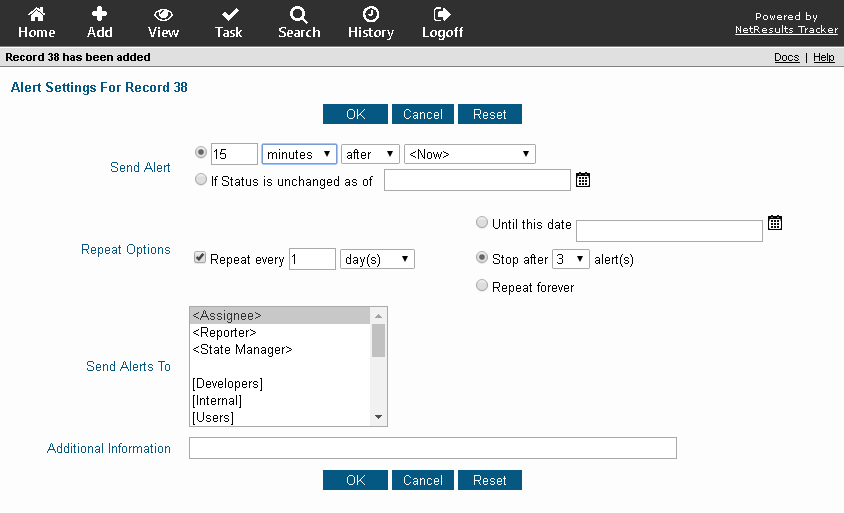
Depending on the product you selected, you may have the option to set an alert for the record you are creating. If you are allowed to set an alert for the record, the box Set Alert will appear at the bottom of the Add form. Check the box if you wish to set an alert for the record. After clicking the Add or Add & Copy button, the Alert settings will be displayed as shown below.

If a date field is selected as the date to generate an alert and this date field has no value in a record, an alert will not be generated. If a date field is selected as the date to generate an alert and this date field is later removed from the record, then <Now> will be set as the date to generate an alert (to replace the date field that was removed).
An absolute time can be selected by choosing the radio button to the left of the option if Status is unchanged as of <Date and Time> where <Date and Time> is any date and time you choose. The <Date and Time> entered should comply with the date and time formats in the user's preferences. For example, if the user has "mm/dd/yyyy" selected as the date format and "12 hour" as the time format, the information entered for <Date and Time> in the alert settings must be of the form "mm/dd/yyyy hh:mm:ss PM". The time component is optional. You can select a date by clicking on the Calendar icon. Click on the day to select the date to be entered into the date field. Click < or > to move backward or forward one month or click << or >> to move backward or forward one year. Click Now to set the date field to be the current date and time. Click on Exclude Time if you want to exclude the time information from being saved in the date field. For a field where the time information has previously been excluded, click Set Time if you wish to include the current time information in the field. Click OK to choose the highlighted date to be entered into the date field. Date will be selected and calendar dismissed when a date is clicked when the time is excluded. Dates displayed in red are non-business days according to the Business Days option in the Preferences section. Click Cancel to dismiss the calendar without saving changes.
These alert settings will be in effect for the newly added record until the state is changed either via the Task or Edit operations or if the alert settings are changed in the Edit Alerts section.
Configuring Alert Settings during Task Operation
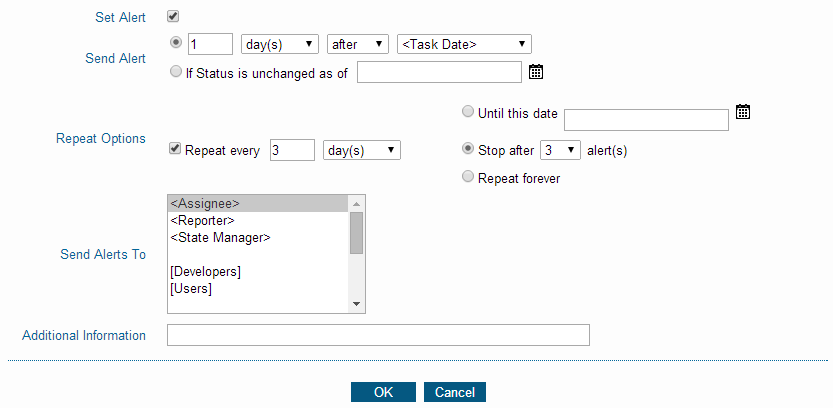
When the task operation is performed on a record, you may be prompted to configure alert settings as shown below.

If a date field is selected as the date to generate an alert and this date field has no value in a record, an alert will not be generated. If a date field is selected as the date to generate an alert and this date field is later removed from the record, then <Task Date> will be set as the date to generate an alert (to replace the date field that was removed).
An absolute time can be selected by choosing the radio button to the left of the option if Status is unchanged as of <Date and Time> where <Date and Time> is any date and time you choose. The <Date and Time> entered should comply with the date and time formats in the user's preferences. For example, if the user has "mm/dd/yyyy" selected as the date format and "12 hour" as the time format, the information entered for <Date and Time> in the alert settings must be of the form "mm/dd/yyyy hh:mm:ss PM". The time component is optional. You can select a date by clicking on the Calendar icon. Click on the day to select the date to be entered into the date field. Click < or > to move backward or forward one month or click << or >> to move backward or forward one year. Click Now to set the date field to be the current date and time. Click on Exclude Time if you want to exclude the time information from being saved in the date field. For a field where the time information has previously been excluded, click Set Time if you wish to include the current time information in the field. Click OK to choose the highlighted date to be entered into the date field. Date will be selected and calendar dismissed when a date is clicked when the time is excluded. Dates displayed in red are non-business days according to the Business Days option in the Preferences section. Click Cancel to dismiss the calendar without saving changes.
These alert settings will be in effect for the record until the state is changed either via the Task or Edit operations or if the alert settings are changed in the Edit Alerts section.
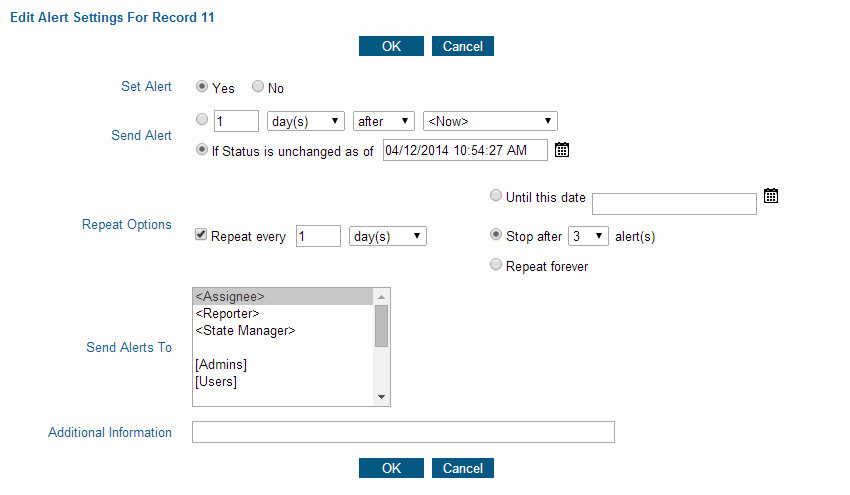
A user can edit the alert settings for a record if they have the required privileges. A user can edit the alert settings for a record by clicking on the Edit icon in the top button bar and entering a record number or by clicking on the Edit icon next to a record number in a report on the Query or Home page. Clicking on the Alerts link in the upper right corner of the Edit Page will display the following alert settings for the record:

An absolute time can be selected by choosing the radio button to the left of the option if Status is unchanged as of <Date and Time> where <Date and Time> is any date and time you choose. The <Date and Time> entered should comply with the date and time formats in the user's preferences. For example, if the user has "mm/dd/yyyy" selected as the date format and "12 hour" as the time format, the information entered for <Date and Time> in the alert settings must be of the form "mm/dd/yyyy hh:mm:ss PM". The time component is optional. You can select a date by clicking on the Calendar icon. Click on the day to select the date to be entered into the date field. Click < or > to move backward or forward one month or click << or >> to move backward or forward one year. Click Now to set the date field to be the current date and time. Click on Exclude Time if you want to exclude the time information from being saved in the date field. For a field where the time information has previously been excluded, click Set Time if you wish to include the current time information in the field. Click OK to choose the highlighted date to be entered into the date field. Date will be selected and calendar dismissed when a date is clicked when the time is excluded. Dates displayed in red are non-business days according to the Business Days option in the Preferences section. Click Cancel to dismiss the calendar without saving changes.
NetResults Tracker © 1997-2018 NetResults Corporation. All rights reserved.