 NetResults Tracker Help NetResults Tracker Help |
 |
|
|
Fields |  | | |
Overview
Tracker allows you to customize forms
to suit your needs by adding and removing
fields as necessary. In addition, you can specify
the name displayed for all fields and other properties of each field such as
whether a field is required or not and on which pages the field
will appear.
The following sections explain how to manage fields:
- Global Field List - information about the global
list of fields and general operations such as adding, editing and deleting
fields
- Field Types and Properties - details of each field type that can be
created and the properties that can be set for each
- Field Visibility - how to configure
which user groups can access each field in the various pages in Tracker
- Fields and Forms - how to configure on which forms
each field will appear and the properties it exhibits on a given form
- Customizing Menu Items - how to define the option menu
items within a pulldown or release number field
- Customizing Pulldown Menu Dependencies - how to
configure a parent-child relationships between pulldown fields
Topics Covered In This Section
Global Field List
A list of the global fields in the workgroup is available in the Fields section. To get to the list:
- Login to the
workgroup
as Admin
- Click on the Admin icon
- Click on the Fields link
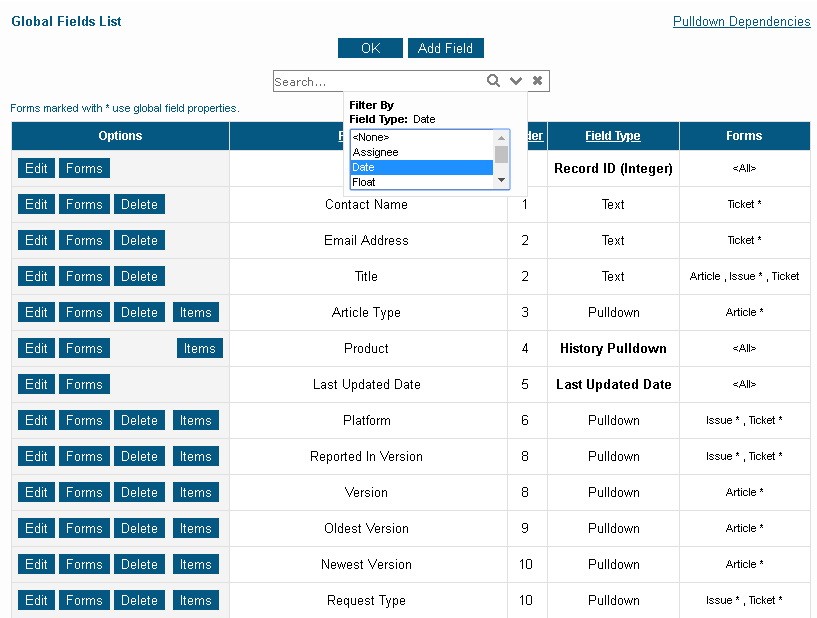
The list provides information such as Field Label (the name of the field),
Order (the order with respect to other global fields), Field Type and the forms on
which the field appears. Fields listed in bold are system required fields
that cannot be deleted will be present on all forms. By default the fields are sorted by the Order field.
The fields can be sorted by the Field Label, Order or Field Type columns. To sort
the list by one of these fields, click on the column heading to sort the fields in ascending order.
Click on the column heading again to sort them in descending order.

Return to Topics List
Field Search
A search function is available in the Fields section to help you quickly
locate a field or set of fields that match certain criteria.
To search for a field or set of fields:
- Login to the
workgroup
as Admin
- Click on the Admin icon
- Click on the Fields link
- Type in any desired criteria into the Search... box
- If you wish to filter the search so that only fields of a certain type(s)
are included in the search results, click on the
 dropdown icon to select by which fields
you wish to filter. Selecting "<None>" will include all field types in the search results
(this is the default selection).
More information
about the different field types can be found in the
Field Types section. To make multiple
selections, hold down the Ctrl button on your keyboard as you
click on the field types you wish to select.
- Click on the
 Search icon to run the search
Click on the  remove icon to remove the search criteria and reset to the defaults
(no key word(s) or phrase in the Search... box, "<None> selected).
Return to Topics List
Pulldown Dependencies
A list of relationships between pulldowns can be accessed by clicking
on the Pulldown Dependencies
link in the upper right corner of the Fields page.
Return to Topics List
Adding Fields
It is often a good idea to
create a backup
of your database
before making major changes such as modifying your fields
as some modifications are irreversible other than by
restoring backup copy of your database.
To add a new field:
- Login to the
workgroup
as Admin
- Click on the Admin icon
- Click on the Fields link
- Click on the Add Field button
- Select the field type you wish to add, then click
Continue
- Make selections for the field's properties.
The properties available for each field type are described
in the Field Types section.
- Click OK to save the field or click Continue
if you are adding a Link type field. If you are adding a Link type field,
make selections for the Reverse Link Field properties,
then click OK to proceed
- A confirmation page will be displayed. Click
on the OK button to return to the Fields
section or click the Add Another Global Field button to add another field or
click Manage Forms for this Field to select which
forms in which the field will be included.
Return to Topics List
Editing a Field So It Has Different Properties on Different Forms
The properties set for a field when created or edited in the Fields
section are known as Global Field Properties.
When a field is added to a form, the field can use its global field properties
or the field can be modified such that it has different properties when it
is used by each form. For example, you may want to configure a field
such that it is required on the Add page on one form, but not required on the
Add page for another form.
Edit a field's properties:
Change a field to have specific properties (instead of global properties) on a form
OR
change specific properties for a form
OR
remove specific properties and change the field to use global properties
- Login to the
workgroup
as Admin
- Click on the Admin icon
- Click on the Fields link
- Click on the Forms button to the left of the field
- The Forms Using This Field column displays any forms
which include the selected field.
Forms marked with a "*" indicate that the form uses the
global field properties for the field. Click on a form in the Forms Using This Field
column, then click on the Edit button.
- The properties of the selected field will be displayed. When the
box for the property Use Global Field Properties is checked,
this indicates that the properties set for the field in the
Fields section will be applied to this field on the selected form.
Unchecking the box for the Use Global Fields Properties option will allow you to set the field's properties
for the selected form. An explanation of the available properties for the fields by field type
can be found in the
Field Types section.
- Click OK to save any changes to the field properties
Return to Topics List
Editing Field Attributes
To edit the attributes for a field:
- Login to the
workgroup
as Admin
- Click on the Admin icon
- Click on the Fields link
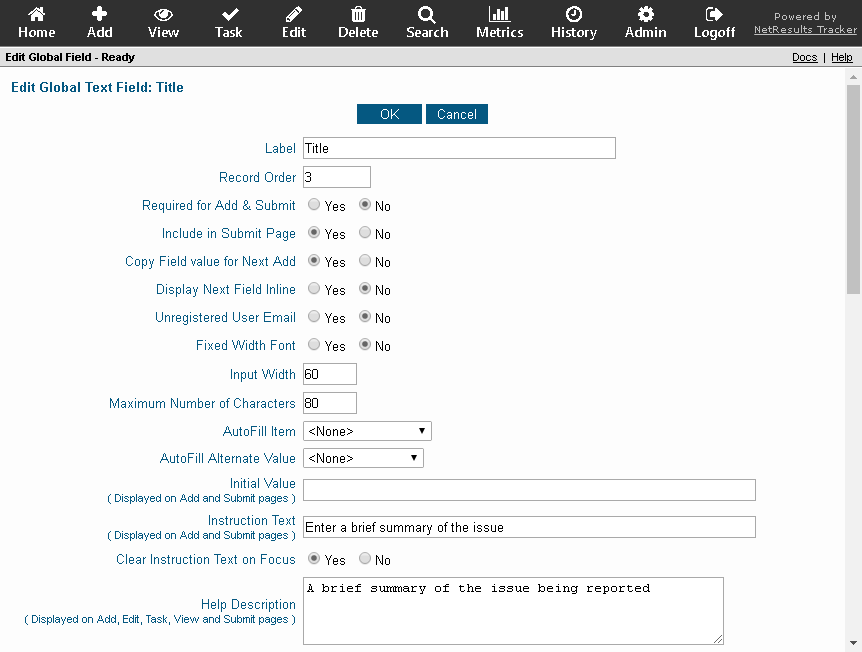
- Click on the Edit button
to the left of the field you wish to modify
- Make changes to the attributes (details of the
available options are explained in the Field Types section)
- Click on the OK button to save your changes

Return to Topics List
Editing Items for a Field
The Assigned To, Reported By, Status fields as well as the Pulldown and Release Number fields
have an Items button available for modifying the options available in those fields.
Details on editing items for Pulldown and Release Number fields are available in the
Customizing Menu Items section.
The Items button for the Assigned To field will display the
User Accounts section. Items listed in the
Assigned To field are the users listed in the User Accounts section. For a user to be
available in the Assigned To field on the Add Page, the user must be a member of a user
group with the privilege "Can Be Assignee For Add". For a user to be available in the
Assigned To field on the Edit Page, the user must be a member of a user group
with the privilege "Can Be Assignee For Edit".
The Items button for the Reported By field will display the
User Accounts section. Items listed in the
Reported By field are the users listed in the User Accounts section.
The Items button for the Status field will display the
Global States List. Items listed
in the Status field are the states created in the Global States List.
Return to Topics List
Deleting Fields
Before you can delete a field, you must first remove it from
any forms in which it is being used. Please review the
Removing
and Re-adding Fields to a Form section for background
and instructions for removing a field from forms and subsequently
deleting it from the workgroup.
Return to Topics List
NetResults Tracker © 1997-2018 NetResults Corporation. All rights reserved.

 dropdown icon to select by which fields
you wish to filter. Selecting "<None>" will include all field types in the search results
(this is the default selection).
More information
about the different field types can be found in the
Field Types section. To make multiple
selections, hold down the Ctrl button on your keyboard as you
click on the field types you wish to select.
 Search icon to run the search
 remove icon to remove the search criteria and reset to the defaults
(no key word(s) or phrase in the Search... box, "<None> selected).
