|
||
|
|
The Search page is the section where reports can be generated. You can generate ad-hoc reports, create and run saved reports, create report layouts to choose which fields will be displayed in report results as well as print, export and edit the report results.
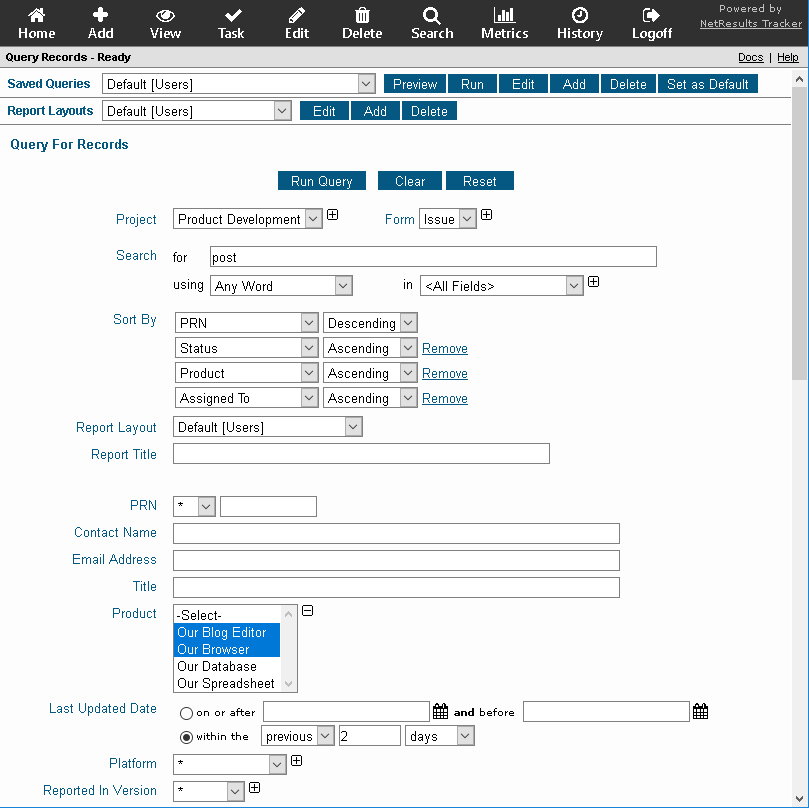
The Search page has several sections with each section operating independently of the others (except for the Preview button in the Saved Queries bar which can be used on both saved and advanced saved queries):
Topics Covered In This Section
To run an ad-hoc query:
Please note:
The Clear button in the Query for Records section can also be used to set the criteria such that the query will return all records. To run a query that returns all records:
A Reset button is available in the Query for Records section, allowing you to restore each query field to the values which were used in the last query that was run. This function is useful if you wish to use a previously executed query as a baseline for further queries.
Query criteria is entered or selected differently for the various field types available in Tracker.
Assigned To
You can select any active user or user group within the system
or select * to match any user.
User groups are denoted as [user group] within the pulldown.
To select multiple users or user groups, click on the " "
to expand the pulldown for multiple selection, hold down the Ctrl button on your
keyboard while clicking on the users or users groups to select them.
You can also search for a key word or phrase in the Assignee field by
using the Full Text Search option.
Clone
You can select "Yes" to match only records that are clones of other records, or select "No" to match only records that are not clones of other records, or select * to match any records irrespective of whether it is a clone.
Date
Select a start date in the On or After field and, if desired, an end date in the AND Before field for the date period you wish to match. To match any value, leave the field blank. You can either type in the date(s) or click on the calendar icon to select a date. In the calendar, click on the < or > to move backward or forward one month. Click on the << or >> to move backward or forward one year. Click Now to set the date field to be the current date and time. Click on Exclude Time if you want to exclude the time information from being saved in the date field. For a field where the time information has previously been excluded, click Set Time if you wish to include the current time information in the field. Click OK to choose the highlighted date to be entered into the date field. Date will be selected and calendar dismissed when a date is clicked when the time is excluded. Dates displayed in red are non-business days according to the Business Days option in the Preferences section. Click Cancel to dismiss the calendar without saving changes.
Another option is to search within a relative date range (e.g. all records reported within the last 2 weeks or all records with a Due Date in the next 3 days). Select the radio button to the left of the option called within the, select "previous" or "next", enter an integer to specify how many increments of time to include in the range and select the time increment desired (days, weeks, months or years). The results will be returned using the current date and time as the reference point. For example, if you run a query on June 15, 2006 12:20:00 PM that will return all records reported in the previous 2 days, the results will include all records that have a Date Reported between June 13, 2006 12:20:00 PM and June 15, 2006 12:20:00 PM.
Deleted
You can select "No" to include only records that are not marked as deleted, or select "Yes" to match only records that are marked as deleted, or select * to match any records irrespective of whether it is marked deleted.
Discussion Subscription
You can select "Yes" to return records that contain a discussion thread to which you are subscribed, or select "No" to return records that do not contain a discussion thread to which you are subscribed, or select * to return any records irrespective of whether it contains a discussion thread to which you are subscribed.
Float (Floating Point Number)
You can specify a value and one of the following conditions: <, <=, >, >= and =. To match any value, select the condition * and leave the value blank. You can also search for a numeric value or phrase in multiple Float fields by using the Full Text Search option.
Integer
You can specify a value and one of the following conditions: <, <=, >, >= and =. To match any value, select the condition * and leave the value blank. You can also search for a numeric value or phrase in multiple Integer fields by using the Full Text Search option.
Link
You can specify one of the following conditions and its associated search criteria:
To select an item in the list, click on the item. To select multiple items, hold down the Ctrl button on your keyboard while clicking on the items to be added. Click on the Add button to add the selected items to the search criteria. To remove an item, click on the item, then click on the Remove button.
PRN
You can specify a value and one of the following conditions: <, <=, >, >= and =. To match any value, select the condition * and leave the value blank. When entering criteria into the PRN field, enter only an integer (don't include the short name of the PRN). For example, if you are trying to locate the record "SUP205", enter "205" into the PRN field. However, unless you make specific selections in the Project and Form fields, this will return any records from other forms that have 205 as part of the PRN (e.g. BUG205, CUS205, etc.). You can also search for a numeric value or phrase in the PRN field by using the Full Text Search option. In in the Full Text Search box, you must enter the short name (if applicable) to return a specific PRN.
Pulldown
You can pick any particular value, or select * to match any value.
To select multiple values within the pulldown, click on the " "
to expand the pulldown for multiple selection, hold down the Ctrl button on your
keyboard while clicking on the values to select them.
When a pulldown is configured as a "Search Pulldown", a Set button will be available to the right of the field. Select * to match any value. Or, to search for values to be included in the criteria, click on the Set button. Type in key word(s) and click on the Find button. Any option menu items that matched your key word(s) will be displayed. To add one of the items in the search results to the pulldown, click on the item, then click on the Add button. To add multiple items, hold down the Ctrl button on your keyboard as you click on the items, then click on the Add button. Any of the items you add can be used as part of the search criteria for an ad-hoc or saved query. Additional items can be added at any time by clicking on the Set button. To remove items, click on the item (or hold down the Ctrl button on your keyboard and select multiple items), then click on the Remove button.
You can also search for a key word or phrase in multiple Pulldown fields, use the Full Text Search option.
Release Number
You can pick any particular value, or select * to match any value in each of the 4 values for Release Number type fields.
Reported By
You can select any user or user group within the system or
select * to match any user.
User groups are denoted as [user group] within the pulldown. To
select multiple users or user groups, click on the " "
to expand the pulldown for multiple selection, hold down the Ctrl button on your
keyboard while clicking on the users or user groups to select them.
If you wish to search for a key word or phrase in the Reported By field,
use the Full Text Search option.
Status
You can select any currently defined workflow state, or a State Group or
select * to match any value.
To select multiple states, click on the " "
to expand the pulldown for multiple selection, hold down the Ctrl button on your
keyboard while clicking on the states to select them. State Groups allow you to define
collections of states to query against. State Groups are denoted as
[state group] within the pulldown. For example, your Administrator could
define a State Group named "Active" that includes all the states except for "Closed".
Check with your Tracker Administrator for information about state groups
that have been created in your workgroup. If you wish
to search for a key word or phrase in the Status field,
use the Full Text Search option.
Text or TextArea
You can enter a key word or phrase you wish to match in a Text or TextArea type field or leave blank to match any value. If you wish to search for a key word or phrase in multiple Text or TextArea fields, use the Full Text Search option.
URL
You can enter a key word or string you wish to match in a URL type field or leave blank to match any value. If you wish to search for a key word or phrase in multiple URL fields, use the Full Text Search option.
YesNo
You can pick "Yes" or "No" or select * to match any value.
A Full Text Search option is available in the sub-section called Search when running ad-hoc queries. To include a full text search as part of your query criteria, enter a key word(s) or phrase into the for text box. Date, Link and Release Number type fields are not available for selection. If you wish to find a subset of query results based on a Date field, you can use the range filtering option. By default, the search will use "All Words" as the search method and include "<All Fields>". Or, you can select specific fields in the "in" list to be included in the search for your key word(s) or phrase. Select the search method you wish to use in the using field.
Search Methods
Search Method Examples
|
Dependent Pulldowns
In some cases, your Tracker Administrator may have configured dependent pulldowns in the system. A set of dependent pulldowns is a pair of pulldown menus where one pulldown is the child pulldown field and the other is the parent pulldown field. The option menu items that are displayed in the child pulldown field are determined by the option menu item that is selected for the parent pulldown field. A simple example to illustrate this functionality:
A system has a pulldown called Product with two option menu items "Our Computer" and "Our Printer". A pulldown called Component has the option menu items "Hard Drive", "Video Card", "Toner", and "Paper Tray". The components "Hard Drive" and "Video Card" correspond to the "Our Computer" option menu item in the Product pulldown field. The components "Toner" and "Paper Tray" correspond to the "Our Printer" option menu item in the Product field. When a user selects "Our Computer" for the Product field, only the options "Hard Drive" and "Video Card" will be displayed in the Component field. The Component pulldown (child) is dependent on the Product pulldown (parent).
By default, these relationships between pulldown fields are not enforced when running queries. If you would like these dependencies between pulldown fields to be enforced when you perform queries (including the queries that display your home page reports), change the setting Enforce Dependency in Query Page to be set to Yes in the Preferences section. To do this,
In some cases, not all of the pulldown fields involved in the dependency chain will be visible on the Search Page. For example, let's say we have the following dependency chain configured:
Pulldown A > Pulldown B > Pulldown C
If Pulldown B is not visible on the Search Page while the "Enforce Dependency in Query Page" option is enabled, Pulldown C will show all possible menu items instead of only those menu items associated with the selection made in Pulldown A.
Obsolete Items
In some cases, your Tracker Administrator may mark some option menu items as obsolete. An obsolete option menu item is a value in a pulldown field that cannot be selected for new records, but may be contained in existing records. When running queries, you may wish to search using obsolete items. If you would like for obsolete option menu items to be available to be used as part of search criteria on the Search Page:
Examples of Queries
|
Query Results
Once you have run a query, you can view, task, edit or view discussion threads to which you are subscribed for any of the records listed in the query results. To see detailed information for a record included in the results, double-click on the row to go to the View Page for that record. You can change the sort order of the Query results at any time by clicking on the field name of the column you wish to sort by. The initial sort order is based on the selections made in the Sort By options of the Query for Records section or in the saved query. The field that is being used as the primary sort field will have an arrow to the right of the field name. If the arrow is pointing down, the results are sorted by that field in a descending order. If the arrow is pointing up, the results are sorted by that field in an ascending order. Clicking once on the field with the arrow will reverse the sort order. Clicking once on any field that does not have the arrow will sort the results in ascending order by that field. Any field except Link and TextArea type fields can be clicked to sort the results by that field.
Please note:
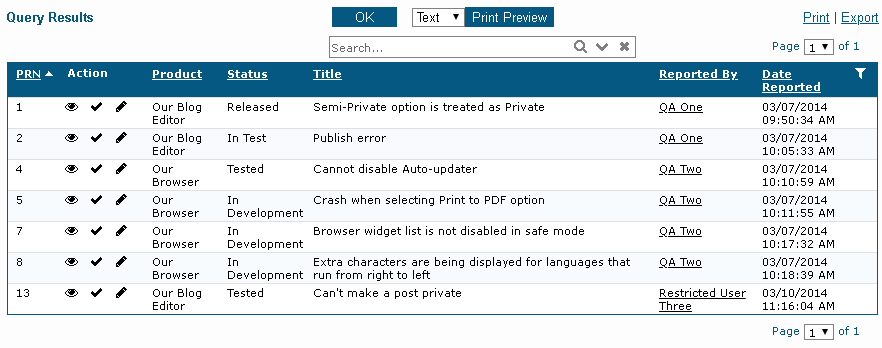
The number of query results displayed per page is based on the value of the field Maximum Records in the Report Settings section of your Preferences page. By default, this is set to display 20 records per page.
Use the page pulldown to go directly to a specific page number.
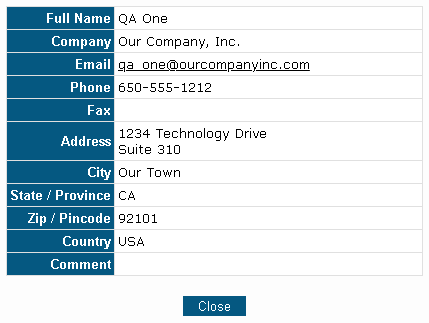
When the "Assigned To" or "Reported By" fields are displayed in the query results and if you have the privilege that allows you to see user profile information, you can click on the user's name to display their profile details as shown below.
 If you have the appropriate privilege, you can click on this icon to view a record in the query results.
 If you have the appropriate privilege, you can click on this icon to task a record in the query results.
 If you have the appropriate privilege, you can click on this icon to edit the fields, attachments or source code
list in a record in the query results.
 If you have the appropriate privilege, you can click on this icon to view the discussion threads to which you are subscribed
within a record in the query results.
 If you have the appropriate privilege, you can click on this icon to view the discussion threads to which you
are subscribed with new messages posted within a record in the query results.
The query results can be formatted for printing as a table or text (text will display the full contents of all fields, table format may truncate long fields based on the settings in the Report Layout you used). To print the query results, select "Text" or "Table" and click on the Print link in the upper right corner of the Search Page. If you wish to see a preview before printing, select "Text" or "Table", then click on the Print Preview button. Please note that when the preference Exclude Time From Reports is enabled and a Date field is displayed in the report layout, the time information will not be included (only the date) when print previewing or printing the query results. If you have performed a search within the query results or have applied a filter, only the records you see when you click on the Print link will be included.
The query results can be exported to a *.CSV file (comma separated values format) by clicking on the Export link in the upper right corner of the Query Results page. Please note that when the preference Exclude Time From Reports is enabled and a Date field is displayed in the report layout, the time information will not be included (only the date) when exporting the query results. If you have performed a search within the query results or have applied a filter, only the records you see when you click on the Export link will be included.
Search Within a Set of Query Results
You can do a text search within the fields displayed in a set of query results using the Search Window available above the results. For example, you may wish to search for any records with "print" in the Title as shown in the sample below.
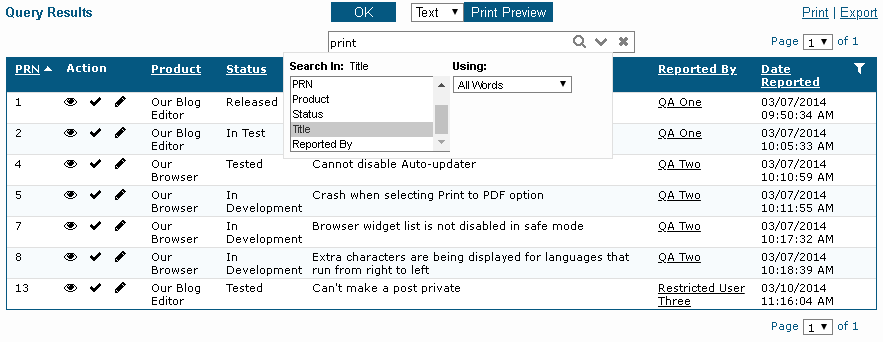
To search within a set of query results:
 dropdown icon to select in which fields
you wish to search:
When searching for a specific PRN, you must enter the full PRN including the short name, if applicable. For example, if you are trying to find the ticket SUP20, entering only "20" will not return this record. You must enter "SUP20" into the Search text box.
When choosing a Release Number field to search within, the value you enter into the Search text box will be searched within each individual digit of the Release Number field. For example, you can search using values like "1", "Beta 2", etc. Basically, you can search for the items that are configured as choices in the Release Number field. However, you cannot search for a combination of multiple digits at once. For example, if you enter "1.2" into the Search text box in an attempt to find records that have values like "1.2.0.None", "1.2.0.Beta 1", "1.2.1.-", you will get 0 matches because it will search for the value "1.2" within each individual digit of the Release Number.
You can choose one of the available search methods: "Any Word", "All Words" (default selection), "Exact Phrase", "Boolean Expression". An explanation of each of these methods is available in the Full Text Search section.
 Search icon to run the search. Any matches
will be displayed.
You can click on the
 remove icon to remove the search criteria
and reset to the defaults (no key word(s) or phrase in Search
text box, "<All in Report>" selected, search method is "All Words").
This will display the original set of query results.
If you choose to run another search while a subset of the query results is displayed, the new search will be done against the entire set of original query results. For example, if a query returns 12 matches and you run a text search that returns 5 matches. If you run another search while those 5 matches are displayed, the new search will search against the original 12 matches (not only within the 5 that matched your last search).
If you have applied any filters, the excluded items will not be included in the results of any searches done within the query results.
Apply a Range Filter to a Set of Query Results
 Range Filters can be applied to show a subset of the query results. Range Filters are available
for Date, Floating Point and Integer type fields. For example, you may wish to see records
that were reported within the last week or records that fall into a certain date range.
Or, you may wish to see records that have a value that is
greater than or less than a certain value in
Floating Point or Integer fields. In the sample below, a filter is being applied to show
only the records which have a value greater than 0.5 and less than or equal to 2.0
in a Floating point field.
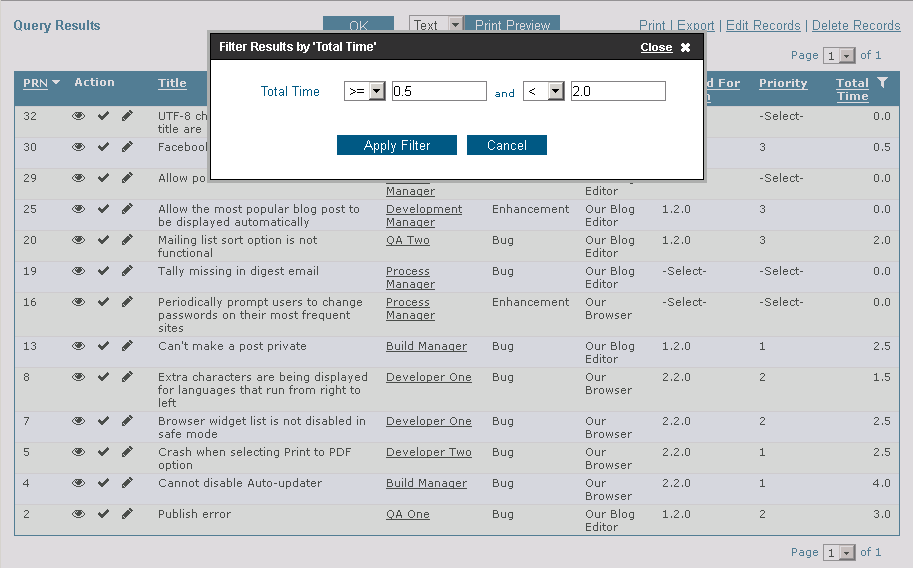
To apply a filter:
 empty filter icon next to the field
name in the column heading.
 calendar icon to select a specific date.
Or, you can select a date relative to the current date and time using the "within the"
option.
For Floating point and Integer fields, you can select one of the conditions (<, <=, >, >= and =) and enter a value. You can also specify a range by selecting another condition and entering a value in the "and" option.
 full filter icon next to the field
name in the column heading.
 Editing or Deleting a Set of Query Results
If you have the appropriate privilege, you may also have the option to edit the set of query results displayed using the Edit Records link in the upper right corner of the Query Results page. The Edit Records option allows you to make changes to all of the records that matched your query in a single edit operation. Please note that using the Edit Records options can make large changes to your database and cannot be undone except by restoring to a backup of your database. As such, it is recommended that you make a backup (or ensure a recent backup is available) of your workgroup database and attachments prior to using this operation.
By default, this option is only available to the Admin user. When using this operation, email notifications are not sent based on the changes that were made to avoid overwhelming the mail server being used by Tracker with a large number of email messages.
To use this operation after running a query, on the page where the query results are displayed, click on the Edit Records link in the upper right corner of the page. The Edit Records link will only be available when one Project and one Form are selected in the query criteria (if you only have access to one Project and one Form, these fields won't be displayed in the criteria and the Edit Records link will be available if you have the appropriate user group privilege). The Edit Records page (also known as the Edit Query Result Set page) will display the fields active in the database. Make changes to the fields you desire, then click OK. Click OK once again to confirm that this will change multiple records and cannot be undone. The image below shows the Edit Records page. If you have performed a search within the query results or have applied a filter, only the records you see when you click on the Edit Records link will be included.
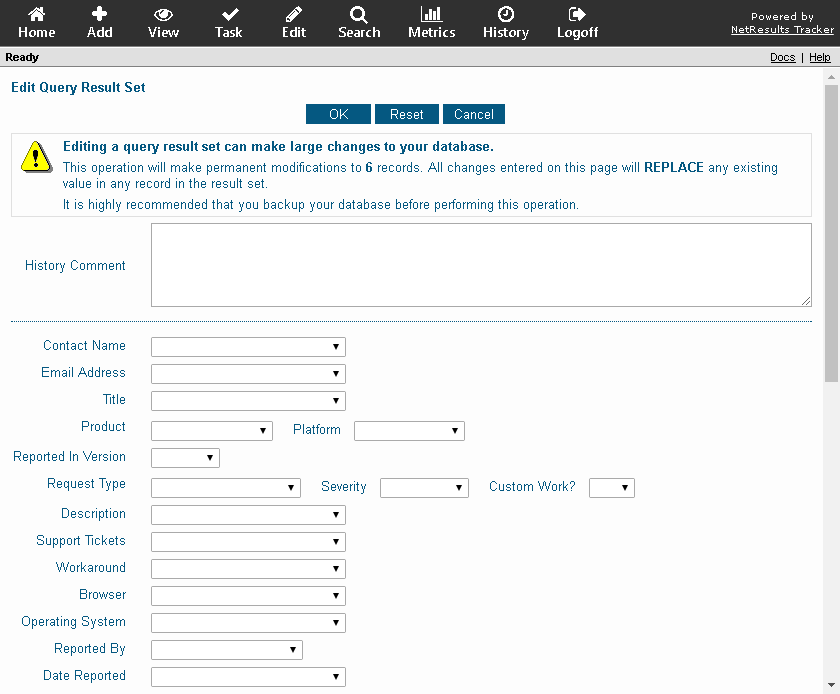
The Edit Records page allows you to modify each of the active fields depending on their field type. For each of the different field types that are displayed on the page, you can specify how the field are to be modified by the Edit Query Results Set action.
For the Assigned To field, you have option of selecting the following choices below
For Date Fields, you can select either of the following
For Float fields, the change entered must include a decimal point (for example, "0.0") and it can be positive or negative.
For Integer fields, the change entered must be an integer and can be positive or negative.
For Pulldowns and Release Number fields on the Edit Results page, any non-obsolete option menu item can be selected.
For the Status field, you have the option of selecting one of the following choices.
For Text, you can select either of the following
For TextArea or URL fields, you have option of selecting one of the following choices:
For YesNo fields, you can choose to change the value to "Yes" or "No".
Alerts: The Edit Records operation can also be used to set the Alerts settings for multiple records that matched your query in a single edit operation. If you wish to delete the alerts settings for all records in the query results, select Delete in the Alerts field at the bottom of the page. If you wish to modify the alerts settings for all records in the query results, select Modify... in the Alerts field at the bottom of the page. Please note when selecting Modify..., you will need to click OK to save any other changes you wish to apply to this set of query results before you make changes to the alerts settings. Then, click OK on the confirmation prompt and another page will be displayed where the alerts settings can be changed. To change a particular setting, click on the check box next to the setting. More information on the available settings can be found in the Editing Alerts Settings section. Modify the alerts settings you wish to change, then click OK to save the changes for all records in the query results.
Record Visibility: You can change the record visibility for a set of records using the Edit Records operation. A list of user groups will be displayed in the field Make Visible to These User Groups. If a user group(s) is selected during the Edit Records operation, the records in the query results will be set such that they are visible only to the user group(s) selected. To make a set of records visible to only the Admins user group, click on the blank space at the bottom of the list in the Make Visible to These User Groups field. Changing the visibility for a set of records will eliminate the visibility settings previously in effect for these records.
Permanently Deleting Records: If you have the appropriate privileges and your system has been configured to use "hard" deletes (deletes which permanently purge records from the database), then you may see a Delete Records link in the upper right corner of the query results page. Clicking this link will (after asking for a final confirmation), permanently delete all records that matched the query you just ran. However, entries will be made to record history for all records deleted in this manner. By default, Tracker is configured to perform only "soft" (recoverable) deletes and only the Administrator is able to perform the Delete Records operation (it requires the same privilege as Edit Records). If you have performed a search within the query results or have applied a filter, only the records you see when you click on the Delete Records link will be included.
NetResults Tracker © 1997-2018 NetResults Corporation. All rights reserved.
Need Support? Chat now...