|
||
|
|
The forms in use by a workflow are managed in the Forms section.
Topics Covered In This Section
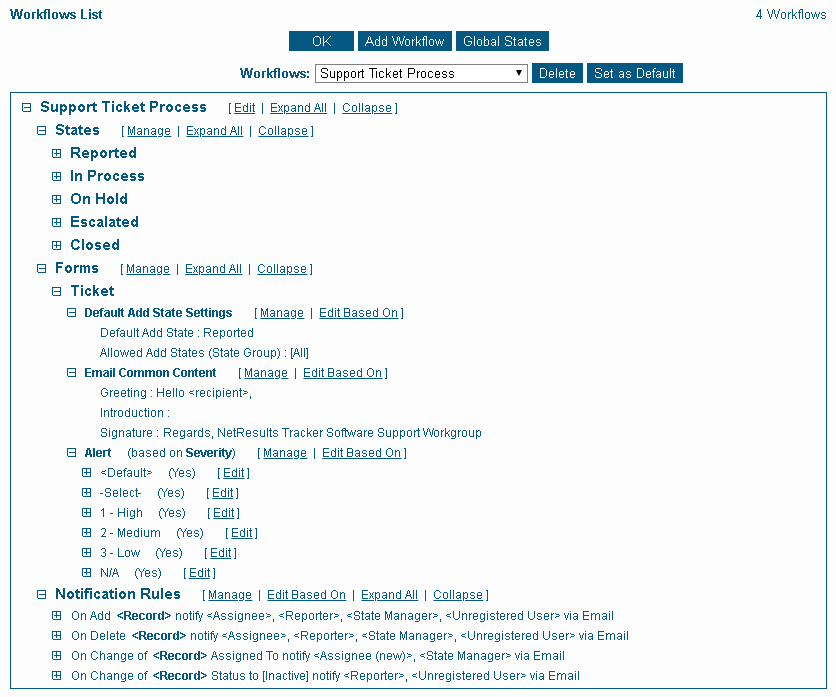
To manage forms:
To add a form to be used by the workflow, click on the form in the Forms Not In Use column, then click on the Add button. To remove a form from being used by the workflow, click on the form in the Forms In Use column, then click on the Remove button.
Properties of Forms
Expanding a form in the Forms section of a workflow will display the form's Default Add State Settings, Email Common Content and Alerts settings. You can configure Default Add State Settings, Email Content and Alerts for the form or configure each section based on each option menu item in a pulldown field.
Default Add State Settings
A form's Default Add State Settings determine what states are available and what state is selected by default in the Status field on the Add form. Default Add State Settings can be configured for a form or based on each option menu item in a particular pulldown.
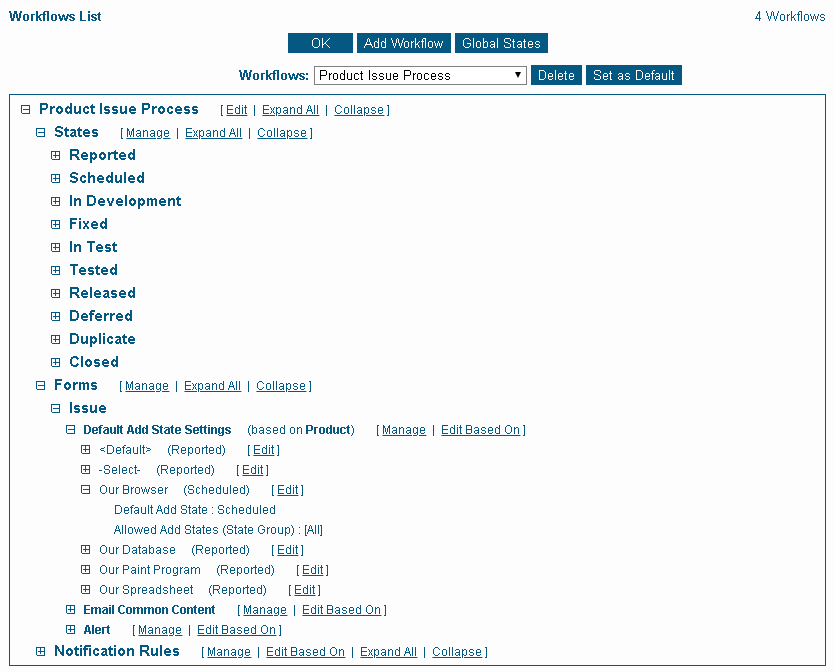
To manage the Default Add State Settings for a form:
If a <Pulldown Name> <Default> Default Add State Settings field is displayed (where <Pulldown Name> is the selected pulldown), this indicates that the default add state settings are set based on the option menu item selected in a particular pulldown field. If the <Pulldown Name> <Default> Default Add State Settings field is not displayed, this indicates that the Default Add State Settings are not different for each option menu item in a pulldown (the Default Add State Settings will be the same for all records added with this combination of Project and Form). The <Pulldown Name> <Default> Default Add State Settings field can be set using the Edit Based On link in the Workflows section.
Select an option in the <Pulldown Name> <Default> Default Add State Settings field to set the Default Add State Settings that will be applied when records are added to Tracker with this option menu item selected. When selecting an option in this field, the page will be refreshed to display the Default Add State Settings that correspond to that selection.
The <Pulldown Name> Values field contains the following options:
The Allowed Add States option allows you to select a state group to limit the states to which a newly record can be routed. When Based On is set to "None" and a record is added using the selected form, the Status field will only display the states that are included in the state group selected in the Allowed Add States option. When Based On is set to a pulldown field and a record is added using the selected form and the option menu item in the <Pulldown Name> values field, the Status field will only display the states that are included in the state group selected in the Allowed Add States option. State Groups can be configured in the Workflow States section.
The Default Add State option allows you to select to which state a newly added record will be routed by default. When Based On is set to "None" and a record is added using the selected form, the default selection in the Status field will be the state selected in the Default Add State option. When Based On is set to a pulldown field and a record is added using the selected form and the option menu item in the <Pulldown Name> values field, the default selection in the Status field will be the state selected in the Default Add State option.
Another way to reach the configuration page for the Default Add State Settings for a form is:
To edit the pulldown that the Default Add State Settings are based on:
To edit the default add state properties for a specific pulldown option menu item:
If you are editing the settings for the option menu item <Default>, the Default Add State Settings displayed will be applied when new option menu items are added to this pulldown (the pulldown selected in the Based On field). The option Apply these settings to other <Pulldown Name> values will be available when editing the settings for <Default>. Checking the box for the option Apply these settings to other <Pulldown Name> values will show a list of the option menu items for the Based On pulldown. Select the option menu item(s) that should inherit the same Default Add State Settings that you have set for <Default>. To select multiple option menu items, hold down the Ctrl button on your keyboard while clicking on the desired option menu items.
If you are editing the settings for an option menu item in the pulldown, the Default Add State Settings displayed will be applied when records are added to Tracker with this option menu item selected. Click on the Load Defaults button if you wish to have the Default Add State Settings configured for <Default> to be filled into the Default Add State Settings for the option menu item selected.
The Allowed Add States option allows you to select a state group to limit the states to which a newly record with the selected option menu item can be routed. The Status field will only display the states that are included in the state group selected in the Allowed Add States option. State Groups can be configured in the Workflow States section.
The Default Add State option allows you to select to which state a newly added record with the selected option menu item will be routed by default. The default selection in the Status field will be the state selected in the Default Add State option.
Email Common Content
Email Common Content are the parts of the email message that will be included in outgoing email notifications sent for records added using the selected form. A Greeting, Introduction and Signature are available in the Email Common Content for each form.
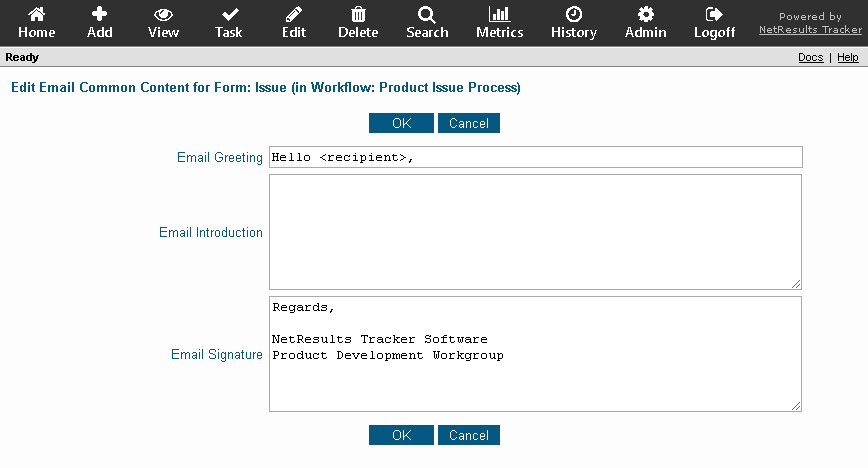
To manage the Email Common Content for a form:
If the <Pulldown Name> <Default> Email Common Content field is displayed (where <Pulldown Name> is the selected pulldown), this indicates that the email common content can be set differently for each option menu item in a particular pulldown field. If the <Pulldown Name> <Default> Email Common Content field is not displayed, this indicates that the Email Common Content settings are not different for each option menu item in a pulldown (the Email Common Content Settings will be the same for all records added with this combination of Project and Form). The <Pulldown Name> <Default> Email Common Content field can be set using the Edit Based On link in the Workflows section.
Select an option in the <Pulldown Name> <Default> Email Common Content field to set the Email Common Content that will be applied when records are added to Tracker with this option menu item selected. When selecting an option in this field, the page will be refreshed to display the Email Common Content that correspond to that selection.
The <Pulldown Name> Values field contains the following options:
Variables can be used when customizing the Email Common Content. The Email Greeting is the first line of the body of email notification message, e.g. "Hello Sue Smith,".
The Email Introduction is a few lines in the body of the email notification message to introduce the email, e.g. a sentence or two to let the user know this is an automated response from Tracker.
The Email Signature is the last section of the body of the email notification message, typically used for the signature at the bottom of the email, e.g. contact information.
Another way to reach the configuration page for the Email Common Content of a form is:
To edit the pulldown that the Email Common Content is based on:
To edit the email common content for a specific pulldown option menu item:
If you are editing the settings for the option menu item <Default>, the Email Common Content settings displayed will be applied when new option menu items are added to this pulldown (the pulldown selected in the Based On field). The option Apply these settings to other <Pulldown Name> values will be available. Checking the box for the option Apply these settings to other <Pulldown Name> values will show a list of the option menu items for the Based On pulldown. Select the option menu item(s) that should inherit the same Email Common Content that you have set for <Default>. To select multiple option menu items, hold down the Ctrl button on your keyboard while clicking on the desired option menu items.
If you are editing the settings for for an option menu item in the pulldown, the Email Common Content settings displayed will be applied when records are added to Tracker with this option menu item selected. Click on the Load Defaults button if you wish to have the Email Common Content configured for <Default> to be filled into the Email Common Content for the option menu item selected.
Variables can be used when customizing the Email Common Content. The Email Greeting is the first line of the body of email notification message, e.g. "Hello Sue Smith,".
The Email Introduction is a few lines in the body of the email notification message to introduce the email, e.g. a sentence or two to let the user know this is an automated response from Tracker.
The Email Signature is the last section of the body of the email notification message, typically used for the signature at the bottom of the email, e.g. contact information.
Alerts
Alert settings for a form determine when alert email notifications will be triggered when records are added to Tracker. The alert settings can also be set based on the option menu item selected in a particular field when a record is added (e.g. Product, Priority, Severity or any pulldown field you customize). The alert settings configured for a form can be applied automatically as records are added to the system or you can allow the end users to view and make changes to the alert settings when adding a record.
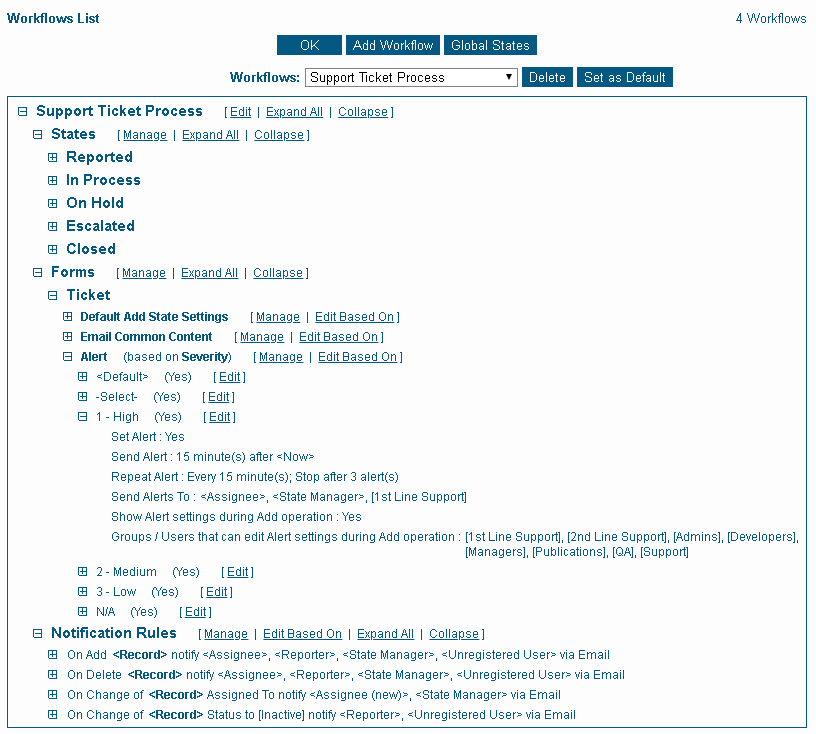
To manage the alert settings for a form:
If a <Pulldown Name> <Default> Alert Settings field is displayed (where <Pulldown Name> is the selected pulldown), this indicates that the Alert settings can be set differently for each option menu item in the selected pulldown. If the <Pulldown Name> <Default> Alert Settings field is not displayed, this indicates that the Alert settings are not different for each option menu item in a pulldown (the Alert settings will be the same for all records added with this combination of Project and Form). The <Pulldown Name> <Default> Alert Settings field can be set using the Edit Based On link in the Workflows section.
Select an option in the <Pulldown Name> <Default> Alert Settings field to set the Alert settings that will be applied when records are added to Tracker with this option menu item selected. When selecting an option in this field, the page will be refreshed to display the Alert settings that correspond to that selection.
The <Pulldown Name> Values field contains the following options:
Set Alert - Selecting Yes indicates an alert should be generated for a newly added record using the selected form and if applicable, the selected pulldown value.
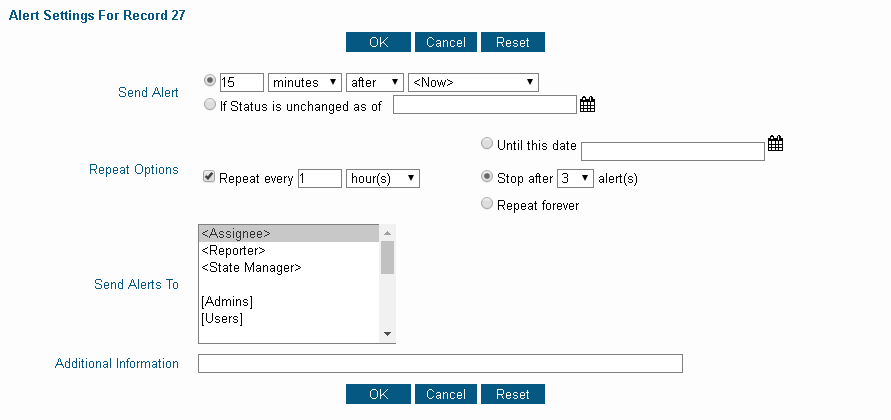
Send Alert - The period of time that should pass before the alert is sent. If you select minutes as the interval, you can enter "15", "30" or "45". For hours/days/weeks/months, you can enter a number from 1 - 99, select the interval, select "before" or "after" as the point of reference for the alert, and a starting point for the time period. The starting point can be "<Now>", or can be based on any of the date fields in the record.
Example 1: By entering "15 minutes after <Now>", the alert will be sent 15 minutes after the record is added.
Example 2: By entering "1 day before <Date Field>", the alert will be sent 1 day before the date entered in the date field selected.
If a date field is selected as the date to generate an alert and this date field has no value in a record, an alert will not be generated. If a date field is selected as the date to generate an alert and this date field is later removed from the record (deleted in the Fields section, then <Now> will be set as the date to generate an alert (to replace the date field that was removed).
Repeat options - Check the box to allow the alert to be sent multiple times after the initial time period (in Send Alert field above) has passed. If you select minutes as the interval, you can enter "15", "30" or "45". For hours/days/weeks/months, you can enter a number from 1 - 99 and select the interval. Then, select how many times the alert should be repeated. Select either Stop after X alerts where X is a number from 1 - 10 or Repeat forever. Repeat forever will continue to repeat the alert periodically until the state of the record is changed.
Send Alerts To - Click on the groups and / or users who should receive the alert messages. To select multiple users and / or groups, hold down the Ctrl button on your keyboard while clicking on each user and group you would like to select.
Show Alert settings during the Add operation - Selecting Yes indicates that the user should be prompted to select alert settings on the Add page when creating a new record.
Groups / Users that can edit alert settings during the Add operation - Click on the groups and / or users that should be allowed to edit the alert settings on the Add page when creating a new record. To select multiple users and / or groups, hold down the Ctrl button on your keyboard while clicking on each user and group you would like to select.
Another way to reach the configuration page for Alert settings for a form is:
To edit the pulldown that the Alert settings are based on:
To edit the alerts settings for a specific pulldown option menu item:
If you are editing the settings for the option menu item <Default>, the Alert settings displayed will be applied when new option menu items are added to this pulldown (the pulldown selected in the Based On field). The option Apply these settings to other <Pulldown Name> values will be available. Checking the box for the option Apply these settings to other <Pulldown Name> values will show a list of the option menu items for the Based On pulldown. Select the option menu item(s) that should inherit the same Alert settings that you have set for <Default>. To select multiple option menu items, hold down the Ctrl button on your keyboard while clicking on the desired option menu items.
If you are editing the settings for an option menu item in the pulldown, the Alert settings displayed will be applied when records are added to Tracker with this option menu item selected. Click on the Load Defaults button if you wish to have the Alert settings configured for <Default> to be filled into the Alert settings for the option menu item selected.
Set Alert - Selecting Yes indicates an alert should be generated for a newly added record with the selected option menu item.
Send Alert - The period of time that should pass before the alert is sent. If you select minutes as the interval, you can enter "15", "30" or "45". For hours/days/weeks/months, you can enter a number from 1 - 99, select the interval, select "before" or "after" as the point of reference for the alert, and a starting point for the time period. The starting point can be "<Now>", or can be based on any of the date fields in the record.
Example 1: By entering "15 minutes after <Now>", the alert will be sent 15 minutes after the record is added.
Example 2: By entering "1 day before <Date Field>", the alert will be sent 1 day before the date entered in the date field selected.
If a date field is selected as the date to generate an alert and this date field has no value in a record, an alert will not be generated. If a date field is selected as the date to generate an alert and this date field is later removed from the record (deleted in the Fields section, then <Now> will be set as the date to generate an alert (to replace the date field that was removed).
Repeat options
Check the box to allow the alert to be sent multiple times after the initial time period (in Send Alert field
above) has passed. If you select minutes as the interval,
you can enter "15", "30" or "45". For hours/days/weeks/months, you can enter a number
from 1 - 99 and select the interval. Then, select how many times the alert should be repeated. Select either Stop
after X alerts where X is a number from 1 - 10 or Repeat forever. Repeat forever will
continue to repeat the alert periodically until the state of the record is changed.
Send Alerts To
Click on the groups and / or users who should receive the alert messages. To select multiple users and / or
groups, hold down the Ctrl button on your keyboard while clicking on each user
and group you would like to select.
Show Alert settings during the Add operation
Selecting Yes indicates that the user should be prompted to select
alert settings on the Add page when creating a new record.
Groups / Users that can edit alert settings during the Add operation
Click on the groups and / or users that should be allowed to edit the alert settings
on the Add page when creating a new record. To select multiple users and / or
groups, hold down the Ctrl button on your keyboard while clicking on each user
and group you would like to select.
Viewing and Editing Alert Settings during the Add Operation
In order for the user to view the alert settings when adding a new record, the alert settings for the form used to submit the record must have Show Alert Settings during Add Operation set to "Yes" and the user must be a member of a group with the View Alerts Settings user group privilege. On the Add page, the user meeting the criteria mentioned above will see the Set Alert field with a check box. Checking the box will allow the user to view the alert settings. When the user clicks OK to add a new record, the alert settings will be displayed, but cannot be modified. The Additional Information field can be modified to add a note or other information to be included in the alert notification message. Click OK to save the information entered.
For a user to edit the alert settings when adding a new record, the alert settings for the form used to submit the record must have Show Alert Settings during Add Operation set to "Yes" and the user (or a group of which the user is a member) must be specified in Groups / Users that can edit Alert Settings during the Add operation. On the Add page, the user meeting the criteria mentioned above will see the Set Alert field with a check box. Checking the box will allow the user to edit the alert settings. When the user clicks Add or Add & Copy to add a new record, the alert settings will be displayed. The user can modify the following settings with respect to alerts. By default, the values displayed here will be the values selected in the alert settings for the form used to submit the record.
NetResults Tracker © 1997-2021 NetResults Corporation. All rights reserved.