Click on the
Add button on the Button Bar to add a new workgroup.
You will be prompted to fill in the following fields
in order to create the new workgroup:
The following fields are Internationalization settings. Please consider the following
information when making your selection for these fields. Once you have added
records to your ProblemTracker database, you will not be able to change the character
set selection. When making your selection, also consider what languages and browsers
you will need to support in the future:
- Character Set
ISO-8859-1, Windows-1252, and UTF-8 are the character sets that are supported
by ProblemTracker.
-
Windows-1252 supports Western European languages including French, Spanish,
Portuguese, Italian, Dutch, German, Danish, Swedish, Norwegian, Finnish,
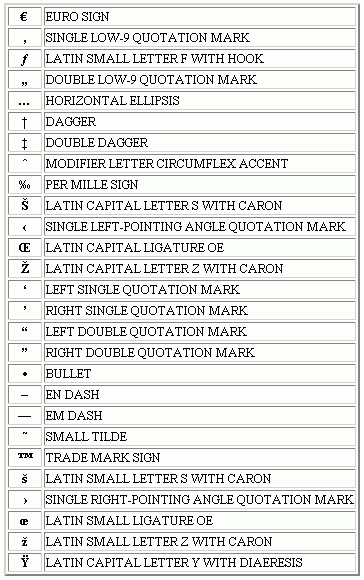
Icelandic, Irish, Scottish and English. Windows-1252 supports
additional European characters such as the Euro sign, tilde, caron, per mille.
The image below displays a set of characters supported by the Windows-1252
character set that are not supported by the ISO-8859-1 character set.

-
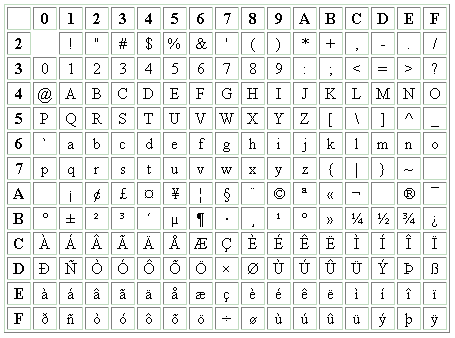
ISO-8859-1 supports the same Western European languages mentioned above for Windows-1252.
This character set is a subset of Windows-1252. ISO-8859-1 is a standard single-byte
character set. The image below displays the set of characters supported by
ISO-8859-1.

-
UTF-8 supports virtually all available languages. For example, Western European
languages mentioned above for Windows-1252 and other
languages including Czech, Hungarian, Polish, Romanian, Russian, Arabic, Greek,
Hebrew, Chinese, Japanese, Korean and others. Internet Explorer 5.0 (or newer) or Netscape 6.2 (or newer)
is required for use with this character set. UTF-8 is an ASCII compatible encoding
method for Unicode (ISO 10646).
When selecting the character set for your workgroup, you should also
consider the users that will be accessing the workgroup. Each user
account has a set of profile information that is displayed within each workgroup.
Each user account has a character set, which is based on the characters
used in the user account's profile information. The User Character Set
must be compatible with the workgroup character set. For example, a user
account with UTF-8 characters in its profile can only be given access to a
workgroup with UTF-8 configured as the workgroup character set.
Some basic guidelines related to user / workgroup character set compatibility:
- If a user account contains only ASCII characters
(supported by ISO-8859-1 character set), this user account can be
given access to any workgroup because all character sets support ASCII
characters.
- If a user account contains non-ASCII characters supported by the Windows-1252
character set, this user account can be given access to any workgroup that
is configured with the Windows-1252 or UTF-8 character set.
- As mentioned above, if a user account contains non-ASCII characters only
supported by the UTF-8 character set, this user account can only be given access
to a workgroup configured with the UTF-8 character set.
To view a user's character set, use the
Edit a User operation in the
License Administration section.
- Email Header Encoding
Email headers must contain only US-ASCII characters. Headers that
contain non US-ASCII characters must be encoded so that they contain
only US-ASCII characters. This process involves using either
"B"(BASE64) or "Q"(Quoted-Printable) to encode certain characters.
The "Q" encoding is recommended for use when most of the characters to
be encoded are in the ASCII character set; otherwise, the "B" encoding
should be used. If you select "Auto", ProblemTracker will automatically
select an encoding option.
- Add Multipart Email
This option determines whether the emails generated by ProblemTracker
will contain text or text and HTML within the messages. Selecting "Yes" for
this option will allow the emails to contain both text and HTML. For example,
if you selected UTF-8 as the character set for a workgroup, email generated
by ProblemTracker may also contain UTF-8 characters. If your email client
cannot display UTF-8 characters, selecting "Yes" for the Email Add HTML Part
option might help. With this option enabled, ProblemTracker will send email
with both text and HTML format. If your email client can display HTML format,
UTF-8 email can be displayed correctly.
- Time Zone
This option determines which time zone will be used for the workgroup data.
The time zone selected will be used in the date-time fields in each of the
following areas of ProblemTracker: Records, Record History, Saved Queries,
Default User Preferences. For a list of available time zones in your operating system,
please refer to one of the following sections:
Windows 2000 and Windows XP Time Zones
Windows NT 4.0 Time Zones
- Adjustment for Daylight Saving Time
This option determines whether the workgroup date is adjusted to observe
daylight saving time. If you have selected a time zone that observes
daylight saving time, it is recommended that you check the box to enable
ProblemTracker to make the appropriate adjustments.
Once you have entered the relevant information to create the new workgroup,
click the Continue button.
If you selected SQL Server or Oracle as the database type,
you will be prompted to provide additional information about the database:
- Database Name
By default, this will display the name selected as the workgroup name. You can
change this in the space provided.
- Location (Server)
Enter the name of the machine where SQL Server or Oracle is located.
- User Name
Enter the user name to be used to connect to SQL Server. It will be
"sa" by default. You will not be prompted for user name if you have chosen
Oracle.
- Password
Enter the password for the user name specified above to connect to
SQL Server. If you are using the login "sa", this will be blank by
default. You may need to check with your system administrator if the password
has been changed. You will not be prompted for the password if you have
chosen Oracle.
- Physical Path
This option is only used when SQL Server is selected as the database type.
Enter the location of the database files within SQL Server. You
can click on the "Get Data" button to connect to the SQL Server
and automatically get the physical path. If the "Get Data"
operation is not successful, check with your system administrator
since the path depends on what was chosen during the SQL Server installation,
and enter the appropriate path. If the path you entered is not in sync. with
the SQL Server installation path, you might get an error while creating the workgroup.
Click on the Continue button to proceed with creating the workgroup.
A Component Check will be done to validate the
information entered for the new workgroup. If the Component Check is
successful, a confirmation of the database information will be shown.
If the Component Check is unsuccessful, details about the components
that failed will be listed. If you wish to save the settings you entered
above to be displayed as the default settings whenever adding future new
workgroups, check the box labeled "Save as default settings".
You can click on the Back button to make any
modifications to the database information. Otherwise, click on the Create
Workgroup button as the final step to create the workgroup.
If you selected SQL Server or Oracle as the database type, click on the Initialize
Tables button that appears after the workgroup has been created.
To login to your new workgroup, go back to the Workgroup Management System Home Page, find
the name of the workgroup you added, then click on the key icon to the left of the
workgroup name. A separate window will be launched with the Login page for your workgroup.
 If you are adding a workgroup using Oracle as your database type,
please perform the procedure outlined in the
Using Oracle 8i (or later) Database Help section.
Once you have completed these steps, return to this section and
follow the procedure listed below.

