| ||
|
|
Adding A Record
 To add a record, click on the Add icon located in the Button Bar. The
Add form will appear in the Dialog Area, allowing you to enter
information about the problem you are reporting.
To add a record, click on the Add icon located in the Button Bar. The
Add form will appear in the Dialog Area, allowing you to enter
information about the problem you are reporting.
ProblemTracker allows your administrator to customize the fields that appear in the bug record. Other requirements such as required fields may also apply.
 The field help icon will be displayed if you have checked the
box for the "Enable Field Help"
personal preference
and your ProblemTracker Administrator has entered information
to described this field. Move your cursor over this icon to see a description
of the field.
The field help icon will be displayed if you have checked the
box for the "Enable Field Help"
personal preference
and your ProblemTracker Administrator has entered information
to described this field. Move your cursor over this icon to see a description
of the field.
As an example of a typical record, the Software Development template (a sample database) included with ProblemTracker has the following fields:
The Difference between the Add Operation and the Add & Copy Operation
Depending on the configuration set by your ProblemTracker Administrator, you may or may not see the "Add & Copy" button.
After entering the information for a new record on the Add page, you have the option to click "Add" or "Add & Copy" to save the new record. Clicking on the Add button will save the new record, then will return to a "blank" Add form so another new record can be added.
Clicking on the Add & Copy button will save the new record, but when returning to the Add form, the contents of some fields will be saved so that another similar record can be added without having to re-enter information into the fields. The fields which are copied to the Add form for the next record are selected by your ProblemTracker Administrator.
Email Notifications
After clicking on the Add button or the Add & Copy button, if your ProblemTracker workgroup is set up to send email notification messages when records are added, you will see a message "Sending Email Notifications...Please wait". This message indicates that the new record has been added to the system and ProblemTracker is sending the email notification messages.
Relationship between the Product, Status, and Assigned To fields
When the Status and / or Assigned To fields are present on the Add page, the values of these fields are automatically selected based on what you have selected for the Product field (when the Product field is also displayed on the Add page). Even though the Status and / or Assigned To fields are set dynamically based on the selection made for the Product field, you can still choose other available values for these fields.
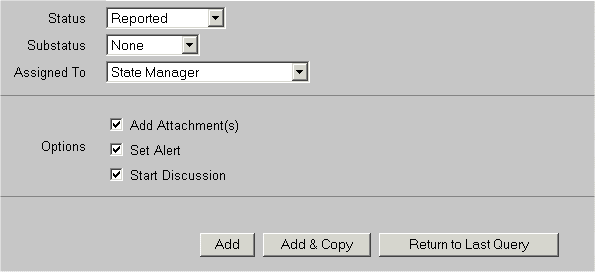
The option "State Manager" may be present in the Assigned To field. This indicates that the record you are adding will be assigned to a user based on what values you have selected in the Product and Status fields. Your ProblemTracker Administrator configures these State Managers when setting up the workflow.
In some cases, your ProblemTracker Administrator may have set up dependent pulldowns. Dependent pulldowns allow the value selected for one pulldown (the parent pulldown) to determine the values displayed in another pulldown (the child pulldown). When dependent pulldowns appear on the Add page, the menu option selected in the parent pulldown will limit the menu options available in the child pulldown.
If record visibility has been enabled, and you are a member of a user group that is allowed to modify the visibility of a record to user groups, a selection list called Make Visible to These User Groups will appear at the bottom of the page. This list allows you to select which user groups can see this record in the various pages like View, Edit, and Query. To select more than one user group, hold down the shift or control key while clicking.
Depending on the privileges you have been assigned, you may see additional options at the bottom of the Add page such as "Add Attachment", "Set Alert", and "Start Discussion". These options are discussed in detail below.
 If you are a member of a User Group that has the Add Attachment privilege,
then you may add an attachment along with the record.
To add an attachment along with the record, please follow the steps
below.
If you are a member of a User Group that has the Add Attachment privilege,
then you may add an attachment along with the record.
To add an attachment along with the record, please follow the steps
below.
After you have added a record (and if you have been given the appropriate privileges by your Administrator), you can add more file attachments and/or edit or delete existing attachments by following the directions in the Record Attachments section of the Help.
 Alerts are email notification messages that can be configured for a record.
You can set an alert to remind you about a particular record at a later date and time.
You can also set an alert to be sent to other users and groups in your organization.
Alerts are email notification messages that can be configured for a record.
You can set an alert to remind you about a particular record at a later date and time.
You can also set an alert to be sent to other users and groups in your organization.
Depending on the product you selected, you may have the option to set an alert for the record you are creating. If you are allowed to set an alert for the record, the box Set Alert will appear at the bottom of the Add form. Check the box if you wish to set an alert for the record. After clicking the Add or Add & Copy button, the Alert settings will be displayed as shown below.
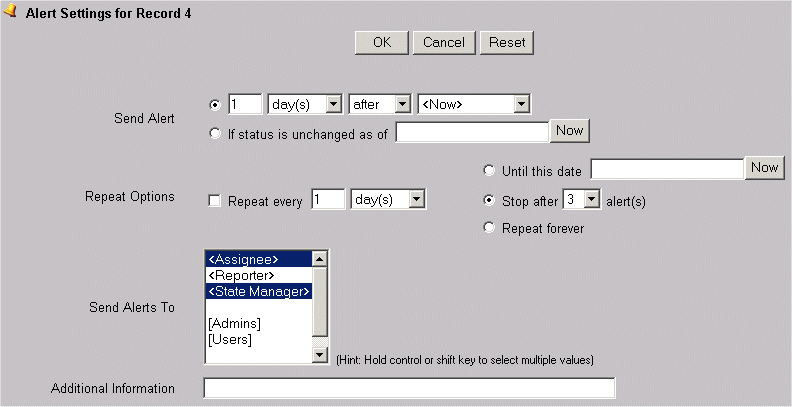
Details on configuring Alert settings during the Add operation can be found in the Alerts section.
 A discussion can be initiated for a record using the Start Discussion
check box at the bottom of the Add page. The Discussion feature
allows users to discuss topics related to a record in parallel to a
record's progress through the workflow. When starting a discussion
for a record, you can invite other users and groups to participate in
the discussion.
A discussion can be initiated for a record using the Start Discussion
check box at the bottom of the Add page. The Discussion feature
allows users to discuss topics related to a record in parallel to a
record's progress through the workflow. When starting a discussion
for a record, you can invite other users and groups to participate in
the discussion.
If you have the user group privileges required to initiate a discussion, check the box for Start Discussion. After clicking on the Add or Add & Copy button to save the new record, you will be prompted with the Discussion settings as shown below:

Details on starting a Discussion during the Add operation can be found in the Discussion section.
 NetResults ProblemTracker

