|
||
|
|
Overview
In order to use Tracker, every user must log in as a registered user. Tracker allows you to enter users and distinguish between internal users and external users like customers or partners. Before a user can begin using Tracker, a user must be created and given access to a workgroup(s) in the User Management System (UMS). After this is done, you can add a user to the User Administration section of your Tracker workgroup. If the UMS Administrator has given you the UMS privileges to do so, you can add, edit and delete user accounts from the User Administration section. Within a workgroup, a user's access rights and privileges are determined by the user groups to which the user belongs.
Definition of Users by License Type
There are three types of licenses available for use with Tracker: Static, Floating, and Restricted.
For all licenses only one user may be logged in to Tracker per license. A static license is defined as one user account (User ID) for each license purchased. Only one user can login to the system with this particular User ID. A floating license is defined as up to 10 user accounts for each license purchased. Only one user per floating license can login to the system at a particular time. Others who try will be denied access until a floating license user logs off (clicks the Logoff icon). A restricted license is defined as one user account (User ID) for each license purchased.
Static licenses are typically used for users who regularly use Tracker and therefore must be guaranteed access at any time (can never be denied access because too many users are already logged in). Floating licenses are typically used for infrequent users if it is acceptable that they may not be able to login to the system some of the time (as all floating licenses may be in use). Restricted licenses are typically used for external users (e.g. customers, vendors, partners) that should have limited access to Tracker operations and data.
Users of static and floating licenses are often referred to as "non-Restricted" users (users that do not use a Restricted license) in the various Help Guides.
For more details on licensing including your License Agreement and the number and type of license(s) you have, please run the License Manager.
System Defined Users
Tracker has 3 pre-defined users. These users all serve a special purpose and are not counted towards the number of users you have licensed. You cannot remove or modify these users:
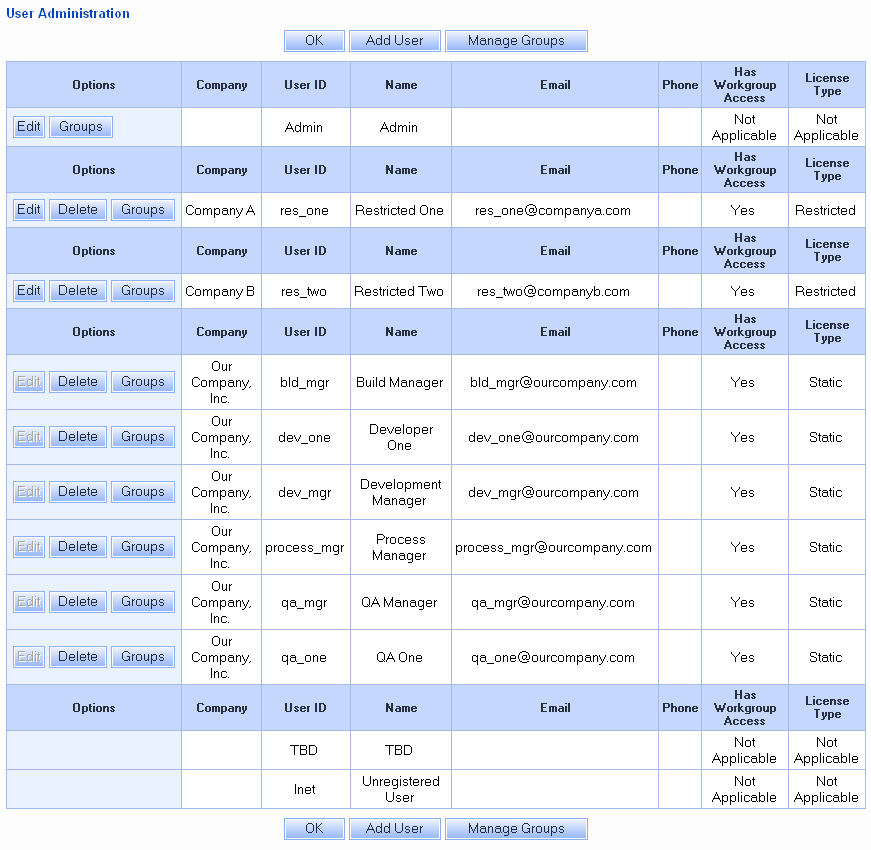
The list on the User Administration page provides information such as Company Name, User ID, Name, Email Address and Phone Number. Workgroup Access lists whether the user account has access to the workgroup (whether a user has access to a workgroup is controlled in the User Management System). License Type shows what type of license (if any) is associated with the user account. The users are grouped by Company Name (with a separate section for the built-in users that cannot be used to login: TBD and Inet).
If there are more than 50 users in a workgroup, the list of users will be broken up into pages. Click on the page pulldown to select a page or click on the Previous or Next arrows to move to another page.
Adding a User
To add a user:
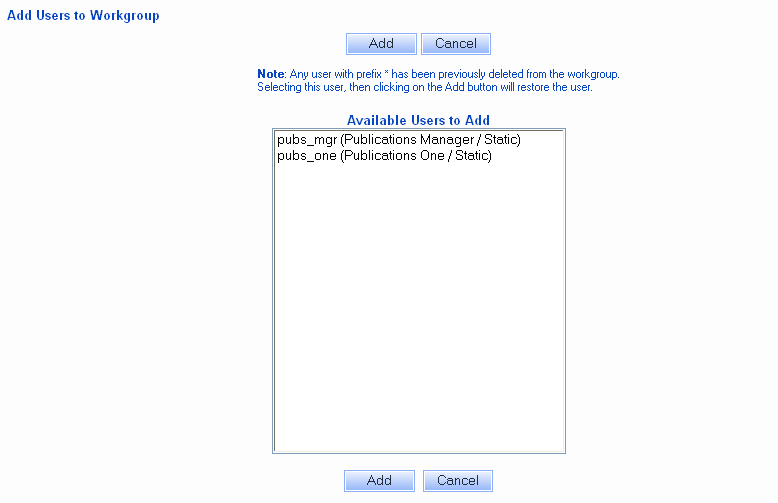
A user will only appear on the list of available users if the user account has been created and given access to the workgroup via the User Management System.
Users that appear on the list of Available Users preceded by "*" are users that were previously deleted from the User Administration section. These users can be restored by clicking on the user, then clicking on the Add button. Review the Restoring a User section for more information about restoring a user.
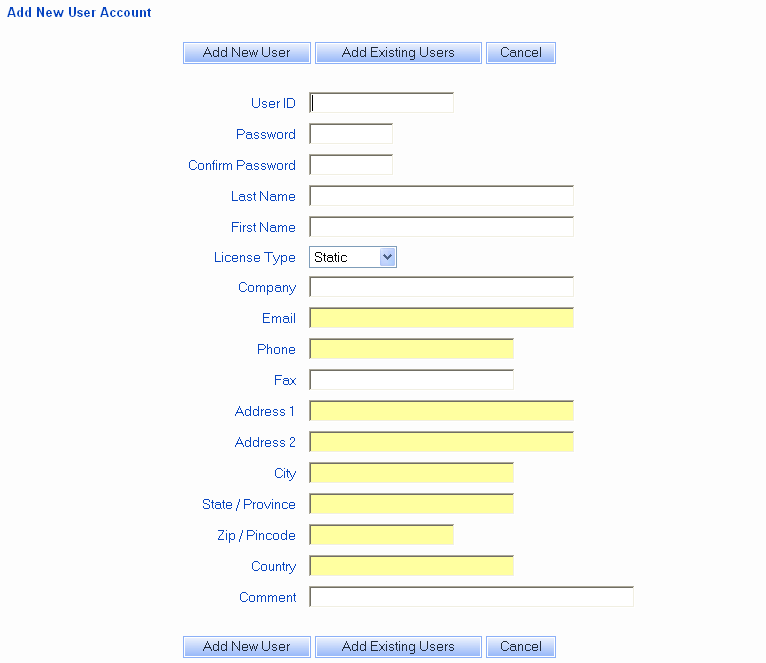
User Profile Information
The following information can be entered when creating a user account. The fields User ID, Password, Confirm Password and First Name are required. Though it is not a required field, it is recommended that you also enter an email address for the new user account so the user can receive email notifications from Tracker.
User ID
Unique identifier for user. May be up to 40 characters long.
Password
Login password for user. May be up to 10 characters long.
The password field is not displayed in a workgroup(s) with Active Directory Integration enabled because the user's Windows user account information will be used for authentication.
Confirm Password
Confirm the login password for user as entered in the Password field above.
The password field is not displayed in a workgroup(s) with Active Directory Integration enabled because the user's Windows user account information will be used for authentication.
Last Name
User's last name
First Name
User's first name
License Type
Can be Static, Floating, or Restricted.
See Definition of
Users by License Type for further information.
Users with Static or Floating selected as the License Type
are also referred to as Unrestricted or Non-Restricted users
in various areas of the Help Guides.
Company
User's company name
Email
Email address of the user. Used by Tracker for
email notification of events.
Phone
User's phone number
Fax
User's fax number
Address 1
First line of user's address
Address 2
Second line of user's address
City
User's city
State/Province
User's state or province
Zip/Pincode
User's zip code or pincode
Country
User's country
Comment
Any other information about the user to be included in
his or her profile information
Deleting a User
To delete a user from a workgroup:
Deleting a user will not affect your existing records. However, before deleting a user it is recommended that you reassign any records currently assigned to that user to TBD or some other user in the system. You can search for all records assigned to the user by using the Query function. And, you can use the Edit Results operation from the query results page to reassign all records at once, rather than individually editing each record.
If you attempt to delete a user who is still the assignee for records within your database, you will be prompted to select a new assignee for the records from a list of internal non-Restricted users in the system. Similarly, if you attempt to delete a user who is a state manager, you will be prompted to select a new state manager from a list of internal non-Restricted users in the system. If you attempt to delete a user who is selected to receive alert email notifications, is specified as criteria in any saved queries or charts, or is specified in any transitions, you will be prompted to either select a replacement user from a list of internal non-Restricted users in the system or delete the relevant alert settings, queries, charts and transitions.
Restoring a User
If a user account is still listed in the "Available Users" list (indicating it is still active in the User Management System and is granted access to the workgroup), you can restore a previously deleted user with the steps below. If you choose to restore the user, the settings in the user's preferences will be preserved as they were at the time the user was deleted from the workgroup's User Administration section. A restored user which has Static or Floating selected as the license type will be only be added as a member of the Users group. A restored user which has Restricted selected as the license type will only be added as a member of the RestrictedUsers group. A user must manually be added to any other user groups after being restored.
To restore a user account:
Editing a User
The user accounts you can edit in the User Administration section depend on the User Management System (UMS) privileges granted to you by the UMS Administrator. You may only be able to edit the profile information for only the Admin account or only users that have access to a single workgroup or any user.
To edit a user account:
Please note: It is not possible to edit a user account containing UTF-8 characters from the User Administration section of a workgroup that is not configured to support UTF-8 characters. Check the Character Set option in General Preferences to see if your workgroup is configured to support UTF-8 characters. If the Character Set option is set to "UTF-8", the workgroup can support UTF-8 characters. If something other than UTF-8 is listed as the character set, the workgroup cannot support UTF-8 characters and you cannot edit the user profile information for any account containing UTF-8 characters via the User Administration section.
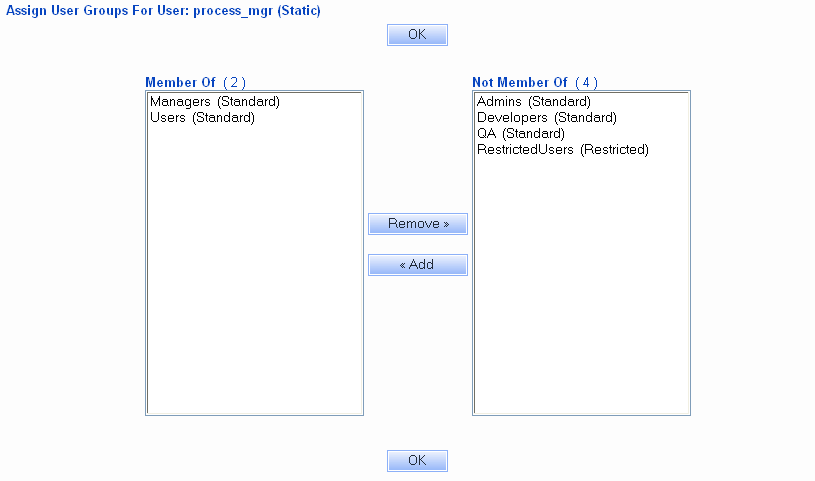
Assigning User Groups
To add or remove a user to/from user groups:
If there are any saved queries or charts created for the user group being removed (or created by the user being modified) and the saved queries/charts only have one project and form selected, you will be prompted to either edit (to select another project/form) or delete these saved queries or charts before you are able to remove the user group. Information on editing or deleting saved queries can be found in the Using Saved Queries and Reports Help section. Information on editing or deleting saved charts can be found in the Metrics section.
As an alternative, you can assign multiple users to a group using the instructions in the User Administration - Groups section.
 NetResults Tracker
