|
||
|
|
Overview
Projects can be defined in Tracker to allow you to associate the forms (fields), workflow, users and user groups related to a particular project.
A Default Project is created in each workgroup. The name of the default project depends on the template that was used to create the workgroup. For example, the Product Development template has the "Product Development Project" created by default and the Help Desk template has the "Help Desk Project" created by default. Information about the default settings in a particular template can be found in the template list in the Putting It All Together section.
If only one Project is defined in Tracker, users will not see the Project field on any of the pages (Add, Edit, Task, Query, Home, etc.) until additional projects are added. Only users that are members of the Admin group (or are members of a user group with the Admin privilege) will see the Project field in the Admin section.
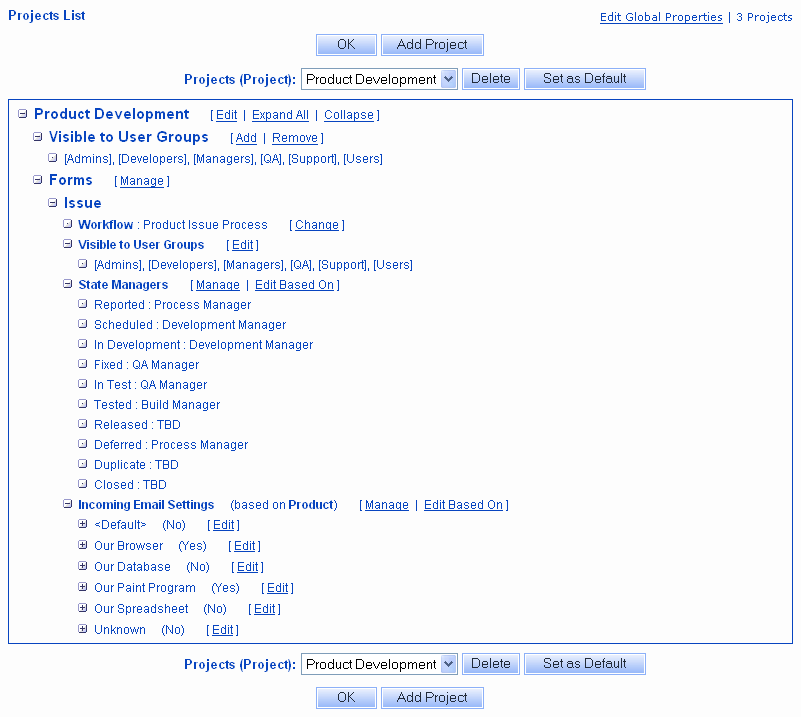
Please note: In the Projects section, a "+" icon is available for expanding sub-sections and a "-" icon is available for collapsing sub-sections.
The following sections explain the different aspects involved in Projects:
Projects - general operations such as adding,
editing and deleting projects
Project Visibility - setting which user groups have access to each
project
Forms in a Project - how to choose which forms
are associated with a project and set the properties for each
Form Workflow - how to select which workflow
will be applied to each form in a project
Form State Managers - configuring the automatic
assignment table applied to each form in a project
Incoming Email Settings - how to configure the
Submit via Email feature for a project
Multiple projects can be created and managed in the Projects section.
To view the properties of a project:
Click on the Expand All link to the right of project name to expand all of the sub-sections in the project. The project properties include the associated forms and their respective workflows, state managers and user group visibility.

Global Project Properties
Global Project Properties allow you to choose the name of the Project field and the Help Description displayed in Tracker pages such as Add, Edit and Task. The Help Description is the text that appears when the user places the cursor over the Help Description icon (yellow question mark to the left of the field).
To set the Global Properties of the Project field:
Adding a Project
To add a project:
Enter an order for the project with respect to other projects in the Order field. This will determine in what order the projects are listed in the Project field on the Add, Edit and Submit pages. Projects with the same order will be displayed alphabetically.
Select a form that can be used to submit records for this project in the Form field. The forms available for selection are the forms that have been created in the Forms section. If you have not yet added the form you wish to use with the project, you can select "<None>" for Form. Selecting <None> for Form will also select "<None>" for Workflow.
Select a workflow that will be applied to records submitted using the selected form for this project in the Workflow field or select "Empty Workflow" if you do not wish to have a workflow applied to records submitted using the selected form in this project. The workflows available for selection are the workflows created in the Workflows section and have been associated with the form selected in the Form field above.
Enter an order for the Form with respect to other forms associated with this project in the Project Form Order field. This will determine in what order the forms are listed in the Form field on the Add, Edit and Submit pages. Forms with the same order will be displayed alphabetically.
Select which user group(s) should be able to add and access records that belong to the new project in the Make Visible (Available) To These User Groups field. Keep in mind that each user needs to be a member of a user group that has access to at least one project in order to be able to login to Tracker. The Admins user group is not available for selection because that user group is given visibility to all projects.
Select a workflow that will be applied to records submitted using the selected form for this project in the Workflow field or select "Empty Workflow" if you do not wish to have a workflow applied to records submitted using the selected form in this project. The workflows available for selection are the workflows created in the Workflows section and have been associated with the form selected in the Form field above. Or, if you would like to add a new workflow to be used with the selected form, select <Create New Workflow>.
Select which user group(s) should be able to add and access records that belong to the new project in the Make Visible (Available) To These User Groups field. Keep in mind that each user needs to be a member of a user group that has access to at least one project in order to be able to login to Tracker. The Admins user group is not available for selection because that user group is given visibility to all projects.
If you selected <Create New Workflow>, you will be prompted to enter a name for the new workflow in the Workflow Name field. You will also need to select the states that should be part of the new workflow in the Include These States field. The states available are the states that have been created in the Global States section.
Select a state group in the Form's Allowed Add States field. The Allowed Add States are the group of states that will be available in the Status field on the Add page when adding a record for the selected Project and Form.
Select a state in the Form's Default Add State field. The Default Add State is the state selected in the Status field by default when adding a record for the selected Project and Form.
Editing a Project
A project's name or order can be edited from the Projects page.
To edit a project:
Deleting a Project
Before attempting to delete a project, you must remove any forms from the project (and, as a result, remove any records added using the combination of Project and Form).
To delete a project:
Setting a Default Project
You can select which project you would like to see by default when you go to the Projects page in the Admin section.
To set the default project:
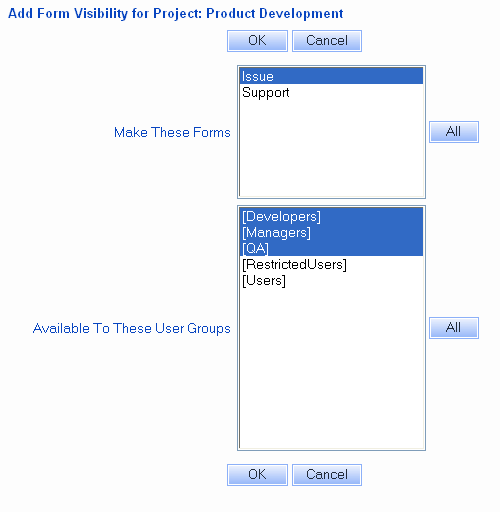
A project can be made visible to certain user groups and forms. This allows you to select which projects and forms a user groups can access such that users can only see projects and forms that are applicable to their role in the project. Each user must be a member of a user group with visibility to at least one Project in order to login to Tracker. Users who do not have visibility to at least one project will be prevented from logging into Tracker.
To add user groups or forms to the list of groups/forms to which the project is visible:
All user groups available in the workgroup will be displayed in the Available To These User Groups field. To select a user group, click on the user group. To select multiple user groups, hold down the Ctrl button on your keyboard while selecting user groups. To select all user groups, click on the All button to the right of the user group list.

To remove user groups or forms from the list of groups/forms to which the project is visible:
All user groups available in the workgroup will be displayed in the Unavailable To These User Groups field. To select a user group, click on the user group. To select multiple user groups, hold down the Ctrl button on your keyboard while selecting user groups. To select all user groups, click on the All button to the right of the user group list.
If there are any saved queries or charts created for the user group being removed (or created by users that are members of that user group) and the saved queries/charts only have this combination of project and form selected, those saved queries/charts will be deleted. Saved queries that have this project and form selected in addition to others will be modified to remove the project and form from the query criteria.
If the Users group is being de-selected (removed), any system defined queries that only have this combination of project and form selected must be edited to select * or another combination of Project and Form. Similarly, if the Users group is being de-selected (removed), any system defined charts that only have this combination of project and form selected must be edited to select * or another combination of Project and Form.
NetResults Tracker © 1997-2009 NetResults Corporation. All rights reserved.