|
||
|
|
Overview
Submit via Web for Unregistered Users, also known as the Submit Page, is a form used to submit records to Tracker without having to login (a Tracker user account is not needed). After submitting a record, the user is provided with the record number of the newly added record by Tracker. The Submit Page is useful in Support and Help Desk environments, as it allows unregistered or otherwise infrequent users to submit a ticket or request. The Submit Page can be configured to gather the user's email address in case you wish to send them email notifications as their request is processed. For example, you may want to send the user a confirmation that their request was submitted and also notify them when their request has been scheduled or released in a new version of your product.
However, since an unregistered user does not have a user account, the Reported By field will be set to "Unregistered User", the user cannot log in to Tracker to view the status of the issue they reported and cannot have issues assigned back to them for verification (e.g. to sign off on the resolution of the issue). To have access to those features, the user must have a Tracker user account.
The Submit Page can be customized with custom HTML and configured with your desired color preferences so that you can do some branding on the page.
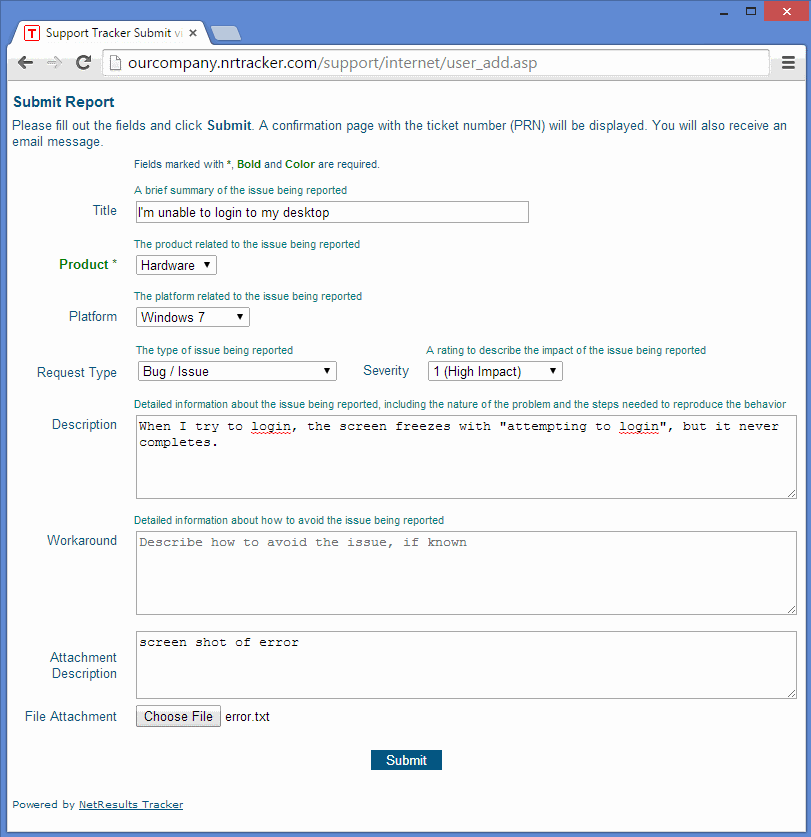
A sample Submit Page is displayed below.

Topics Covered In This Section
To set up the Submit Page for use by unregistered users, perform the following steps:
Create a User Group to Apply Privileges to the Submit Page - Use the steps in the User Groups section to create a user group(s) that will be used to grant privileges and allow forms to be displayed on the Submit Page.
Enable the Submit Page in the General Preferences section
Configure the Fields - Add or remove fields from the Submit Page.
Configure Other Submit Page Options - Set the properties in the Submit Page Options section to customize the instruction text, colors and other settings available on the page.
Test the Submit Page - Submit some test records and make any necessary adjustments.
The URL for the Submit Page for a given workgroup is:
http://servername/workgroupname/internet/user_add.asp
where servername is the TCP/IP host name of the machine where Tracker is installed and workgroupname is the name the workgroup you are trying to access. For example, to reach the workgroup called myworkgroup installed on the server called myServer, you would browse to
http://myServer/myworkgroup/internet/user_add.asp
You can customize which fields are available on the Submit Page form and which option menu items are available in each pulldown field. Browse to the Submit Page to see which fields and pulldown option menu items are currently displayed.
To change whether a field is displayed on the Submit Page:
OR
If the field you wish to modify does not have a * next to it, it is using form specific properties. Click on the field, then click on the Edit button.
To add a field to be displayed on the Submit Page, set the option Include in Submit Page to "Yes". To remove a field from being displayed, set this option to "No".
Check the value of the Record Order option for this field. This field determines the order in which the fields are displayed on the Add and Submit Pages.
Check the setting of the option Required for Add & Submit. If this option is set to "Yes", this field will also require a user to enter a value for this field or select a value other than the default when submitting a record via the Submit Page. Required fields can be displayed in a particular color, in bold or with a special character via the Required Field Highlights option in the General Preferences section.
For date fields, check the setting of the option Initialize On Add. If this option is set to "No", the date field will not be set with the current date and time by default. If this option is set to "Yes", the date field will be set with the current date and time when the record is submitted via the Submit Page. This will be done irrespective of whether the field is displayed on the Submit Page. In certain cases, it may be desirable for a date field to be initialized with the current date and time without the field being displayed on the Submit Page. For example, you may want the Date Reported to be initialized with the current date and time without allowing the user submitting the form to be able to change the value of the Date Reported field.
To create a new field to be displayed on the Submit Page, use the information in the Fields section.
Customize the pulldown options displayed on the Submit Page - For the pulldown fields displayed on the Submit Page, you can limit the option menu values available for selection. For example, if a pulldown field called Priority is displayed on the Submit Page and you do not want unregistered users to select the value "1", you can set the value such that it is not displayed in the Priority field on the Submit Page.
Submit Page Option Menu Items
To set whether a pulldown option menu item is displayed on the Submit Page:
NetResults Tracker © 1997-2018 NetResults Corporation. All rights reserved.
Need Support? Chat now...