 NetResults Tracker Help NetResults Tracker Help |
 |
|
|
Viewing a Workgroup |  | | |
To view a workgroup, click on the View button on the
Button Bar, select a workgroup from the pulldown
menu, then click on the View button below the
pulldown menu. You can also click on the View icon
to the left of a workgroup name from the Home Page.
Details of the workgroup will be displayed including
general workgroup and database information as well as
information about IP Address restrictions, global attachments,
aliases, Internet Information Services (IIS) settings and history.
Topics Covered In This Section
General Information
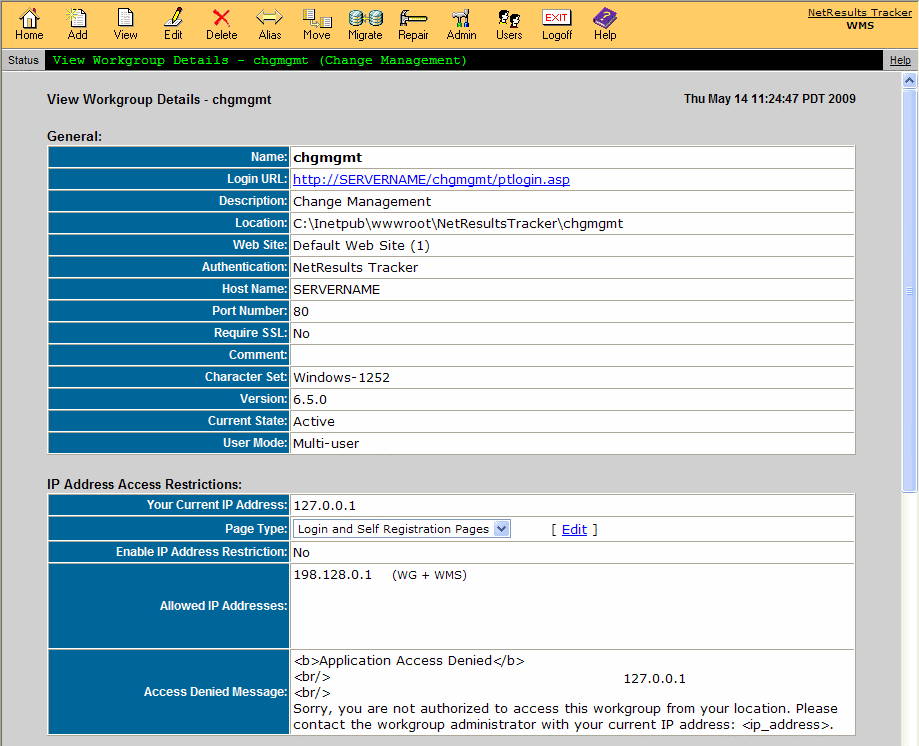
The following information about the workgroup is displayed in the General section.
- Name - The name of the workgroup.
- Login URL - The URL of the workgroup's Login Page. Click on the link to browse to the workgroup.
- Description - A short description of the workgroup.
- Location - The path where the workgroup files are located.
- Web Site - The web site where the workgroup is located.
- Authentication - The form of authentication configured for this workgroup. Information about the types
of authentication can be found in the Editing
a Workgroup section.
- Host Name - The host name or IP address that corresponds to the web site where the workgroup is configured.
- Port Number - The port number that corresponds to the web site where the workgroup is configured.
- Require SSL - Lists whether the use of Secure Socket Layer (SSL) is required for this workgroup.
- Comment - Lists the text entered into this field when the workgroup was added or last edited.
Can be used to enter additional details relevant to the workgroup.
- Character Set - The character set selected for the workgroup when it was created; this determines which languages are supported
in the workgroup.
- Version - The Tracker version of the workgroup.
- Current State - Describes whether the workgroup is "Active" (accessible to users) or "Blocked" (not accessible to users).
The workgroup's state can be changed in the
Block/Unblock Workgroups section.
- User Mode - Describes whether the workgroup is in "Single-user" or "Multi-user" mode. If the workgroup is in Single-user mode,
the user who changed it to this mode
and the date and time it was changed will be listed. A link "Switch to Multi-user" is available to
change the mode.
Return to Topics List
Changing the User Mode for the Workgroup
When a workgroup is in
Single-user mode, only the user listed is able to login and access
the workgroup. There is the option to change the workgroup back to Multi-user mode on the WMS View Page,
allowing other users to access the workgroup.
To switch the workgroup back to Multi-user mode:
- Login to the
Workgroup Management System
- Click on the View icon in the Button Bar
- Locate the User Mode section
- If the workgroup is in Single-user Mode, a Switch to Multi-user link will be present
- Click on the link to change the workgroup back to Multi-user mode
- Click OK to confirm. "(Switched Successfully)" will be displayed in the User Mode field to
confirm that the mode was switched back to Multi-user mode.
Return to Topics List
IP Address Access Restrictions
Access to a workgroup can be limited by restricting access to only certain IP addresses (physical location).
When this feature is enabled, a user will only be able to access the
workgroup if the user's IP address matches one of the
IP addresses or IP Address ranges configured in the Allowed IP Addresses field.
If the user's IP Address does not match a configured address or range, they will see an
"Access Denied" message that can be customized with any desired wording and HTML code.
Restrictions can be configured for accessing the Login and Self-Registration pages
and other pages used when logged into the workgroup, the
Submit Page for Unregistered Users
and the Knowledge Base. The configuration can be set here in the Workgroup Management
System (WMS) or can be set in the workgroup
sections for configuring Login and Self-Registration pages,
the Submit Page
and the Knowledge Base.
The option "WMS Only" is available to configure IP Address restrictions here in WMS such that any
entries with that option set are not visible by workgroup Administrators.
IP Address restrictions
configured in this section take effect immediately after clicking on the Save button.
To add an IP address/range in the Allowed IP Addresses list:
- Login to the Workgroup Management System
- Click on the View icon in the Button Bar
- Select the workgroup you wish to view, then click on the View button
- In the IP Address Access Restrictions section, make a selection for the Page Type
option. Login and Self-Registration pages
refers to the workgroup Login Page, Self-Registration page,
and all pages that can be found within the workgroup.
Submit via Web refers to the
form outside of the workgroup that can be used to submit records without logging in.
Knowledge Base refers to all of the Knowledge
Base pages that a user can access without logging into the workgroup.
- Click on the Edit link to the right of Page Type
- The workgroup Name and Description and Your Current IP Address
will be displayed.
- Click on the Add button to add an IP address or range of addresses.
For Type select "Single computer" to add a single IP Address or
"Range of computers" to add a range of IP Addresses. For IP Address,
enter the IP address, then click OK. For IP Address Range, enter
the first IP Address in the range, then enter the last IP Address in the range. For
Visible To select "WMS Only" if the IP address/range should only be displayed in the Allowed
IP Addresses list when viewed in WMS; any IP address/range with this option selected will
not be displayed in the Allowed IP Addresses list when viewed in the workgroup. Select
"Workgroup (WG) + WMS" to display the IP address/range in the Allowed IP Addresses list
in both the workgroup and WMS. Click OK to save the IP address/range.
- Enter any desired text or HTML into the Access Denied Message to customize
what a user will see if they are denied access to the workgroup because their IP Address
is not configured in the Allowed IP Addresses list. Do not use the tags <HTML>,
</HTML>, <BODY>, </BODY> or any other header tags in
this field.
- Click on the Save button to save the changes
To edit an IP address/range in the Allowed IP Addresses list:
- Login to the Workgroup Management System
- Click on the View icon in the Button Bar
- Select the workgroup you wish to view, then click on the View button
- In the IP Address Access Restrictions section, make a selection for the Page Type
option. Login and Self-Registration pages
refers to the workgroup Login Page, Self-Registration page,
and all pages that can be found within the workgroup.
Submit via Web refers to the
form outside of the workgroup that can be used to submit records without logging in.
Knowledge Base refers to all of the Knowledge
Base pages that a user can access without logging into the workgroup.
- Click on the Edit link to the right of Page Type
- Click on the IP address/range you wish to modify and click on the Edit button.
Make any desired changes, then click OK.
- Click on the Save button to save the changes
To remove an item in the Allowed IP Addresses list:
- Login to the Workgroup Management System
- Click on the View icon in the Button Bar
- Select the workgroup you wish to view, then click on the View button
- In the IP Address Access Restrictions section, make a selection for the Page Type
option. Login and Self-Registration pages
refers to the workgroup Login Page, Self-Registration page,
and all pages that can be found within the workgroup.
Submit via Web refers to the
form outside of the workgroup that can be used to submit records without logging in.
Knowledge Base refers to all of the Knowledge
Base pages that a user can access without logging into the workgroup.
- Click on the Edit link to the right of Page Type
- Click on the IP address/range you wish to remove and click on the Remove button
- Click on the Save button to save the changes
Return to Topics List
Database
Information about the workgroup's database is available in this section.
- Type - The type of database being used (Access, MySQL, SQL Server or Oracle).
- Name - The name of the database. For Access, this is bugtrack.mdb. For MySQL,
SQL Server or Oracle, this is the name of the database created for this workgroup.
- Location - The location of the database. For Access, this is a path in the web server's file system.
For MySQL, SQL Server and Oracle, this is the host name of server where the database is located.
- Use SQL Native Client Provider - Whether the workgroup is configured to use
SQL Native Client Provider. This property
does not apply to workgroups using Access, MySQL or Oracle.
- Database User Name - The user name on the database server that is associated with the database for this workgroup.
This property does not apply to workgroups using Access.
- Template - The template selected when the workgroup database was created.
- Physical Path - The physical location of the SQL Server database files for the workgroup. This property
does not apply to workgroups using Access, MySQL or Oracle.
Return to Topics List
Aliases
Any aliases created for the workgroup will be displayed
in this section, along with the URL to login to the workgroup using the alias.
Return to Topics List
IIS Application
Settings for the workgroup's IIS application are displayed in this section. These settings are
automatically configured by Tracker when the workgroup is added, edited, repaired or upgraded.
Return to Topics List
History
This section provides detailed information about actions performed on the workgroup such as when the workgroup
was added, edited, moved or upgraded. Each entry has a date and time stamp and a history comment.
Tracker appends a history comment automatically for certain actions like adding or
upgrading the workgroup. Other actions such as editing or moving a workgroup allow the user performing
the action to enter a history comment.
Return to Topics List
NetResults Tracker © 1997-2018 NetResults Corporation. All rights reserved.