 NetResults Tracker Help NetResults Tracker Help |
 |
|
|
Adding a Workgroup |  | | |
To start using Tracker, create a workgroup. Each workgroup consists of a database and a set of Tracker web pages. You can choose a template for your intended use, which includes a pre-defined project, form, fields and workflow so you have a basic setup that can be used right away.
Topics Covered In This Section
Adding a Workgroup
If you are adding a workgroup using Oracle as your database type,
please perform the procedure outlined in the
Using Oracle Database Help section.
Once you have completed these steps, return to this section and
follow the procedure listed below.
Click on the
Add button on the Button Bar to add a new workgroup.
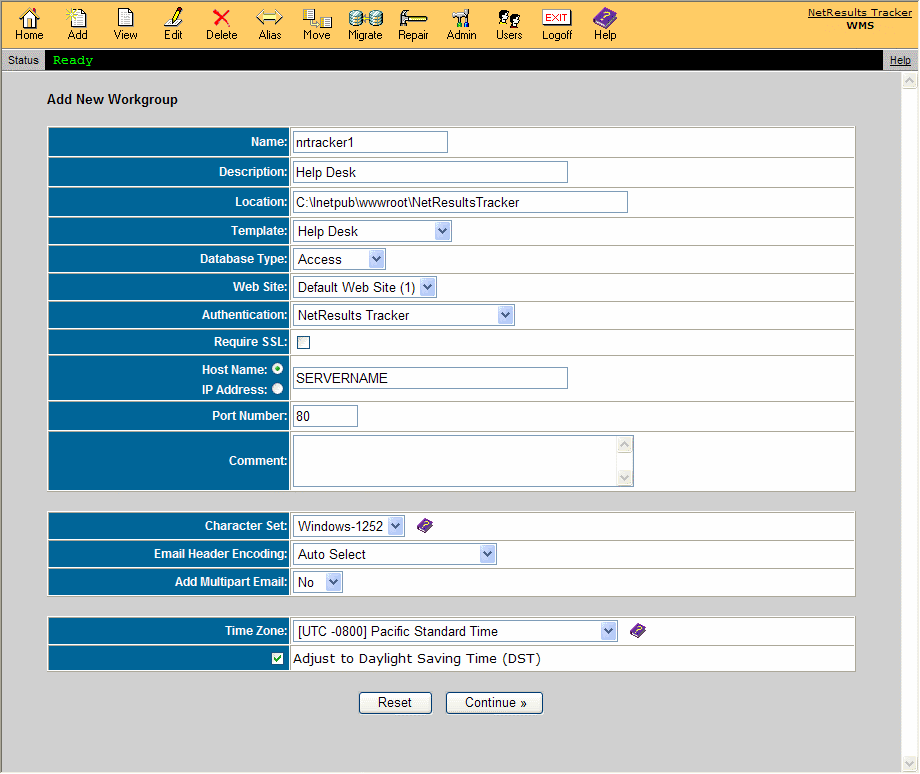
You will be prompted to fill in the following fields
in order to create the new workgroup:
- Name - A brief name to identify the workgroup. Example: productX
- Description - A description of the workgroup.
- Location - The path where the workgroup files will be located. We recommend you maintain
this directory to be within your installation directory.
By default, the installation directory is C:\Inetpub\wwwroot\NetResultsTracker.
WMS will create a directory similar to the workgroup name under this location.
Example: If the workgroup name is productX, and the location is
C:\Inetpub\wwwroot\NetResultsTracker, then WMS will create the following
directory C:\Inetpub\wwwroot\NetResultsTracker\productX and create workgroup
files under this directory.
- Template - Select the template type that corresponds to the environment where
Tracker will be used. Each template comes with
a basic set of fields and workflow steps modeled for the environment
where it will be used. The following templates are available:
- Product Development - The Product Development template is intended for a product (software,
hardware, service) development process. An explanation is available in the
Product Development template
section of the Administration Help Guide.
- Web Site Development - The Web Site Development template is intended for a web site
development process. An explanation is available in the
Web Site Development template
section.
- Knowledge Base - The Knowledge Base template is intended for the process of publishing
articles to a searchable Knowledge Base available to external users.
An explanation is available in the
Knowledge Base template
section.
- Help Desk - The Help Desk template is modeled for a process where internal
users are supported by a Help Desk.
An explanation is available in the
Help Desk template
section.
- Support - The Support template is geared for a process where external users
are supported by a Customer Support team.
An explanation is available in the
Support template
section.
- Base - The Base template is a database with minimal configuration.
If the rest of the template choices do not match with how you plan to use Tracker choose this template.
It will allow you to set up your fields and process
without having to change or remove extra fields, workflow and other configuration
that you don't plan to use.
An explanation is available in the
Base template
section.
- Change Management - The Change Management template is geared for a process where changes must be approved
by a Change Control board.
An explanation is available in the
Change Management template
section.
- Database Type - Select the database type for this workgroup from the pulldown menu options.
Access, MySQL, SQL Server, and Oracle database types are supported.
If you are adding a workgroup using MySQL, SQL Server or Oracle as your database type,
please complete the
Preparations
required for the version of MySQL, SQL Server or Oracle you are using listed in the "Database Driver Software on Web Server
Machine" and "Database Server Software" sections of that page.
Additionally, for workgroups using Oracle, before adding a
new workgroup please perform the procedure outlined in the
Using Oracle Database Help section.
Once you have completed these steps, return to this section to create a new
workgroup using Oracle as the database type.
- Web Site - Select the web site where the workgroup should be installed.
- Authentication - Select the type of authentication that should be set for the workgroup. "NetResults
Tracker" will be selected by default. NetResults Tracker is authentication performed by
the Tracker application itself using a Login web page which requests the user's
Tracker User ID and Password. The Microsoft IIS web server will be configured to allow
"Anonymous" access (no authentication is performed by IIS itself).
All other forms of
authentication use the Microsoft IIS web server and Windows operating system to authenticate
the user before they are given access to any Tracker web pages. The Tracker
Login Page is not displayed. However, a user's web browser may display a
pop-up to request the user's credentials (Windows user name, password, and, in some cases,
domain) if it needs this information (or is configured to always request this information) in
order to complete authentication with the IIS web server.
Selecting "IIS Basic", "IIS Integrated Windows" or "IIS Basic and Integrated Windows"
authentication enables single sign-on capability provided by the Microsoft IIS web server.
If one of those authentication mechanisms is selected, the IIS web server and Windows operating
system will authenticate the user and then verify that the user should be given access to
the Tracker web pages (using the Windows file system permission settings on the web pages).
If the Windows authentication and access control checks pass, then IIS will pass the request on
to Tracker. Tracker will then search its own user account list for a matching
entry (Windows User name matches Tracker User ID) to verify that
the user should be given access to the workgroup before displaying the user's Home Page.
A summary of the reasons why you might select one form of authentication over another is provided
below. If after reading it, you are still not sure which one to pick, we recommend using "NetResults
Tracker". You can use the Edit Workgroup function in WMS to change it later.
Generally speaking, NetResults Tracker authentication is the simplest for you to set up and has the
lowest Windows Server licensing costs. However, it
does require that your users maintain a separate user account for Tracker and for Windows
(if they are using Windows). If they routinely change their password, they will have to change their
Windows password and their Tracker password. NetResults Tracker authentication works with
all supported browsers running on any operating system.
If you use one of the three forms of IIS authentication, your users will not need to maintain a
separate password (authentication will be done by IIS using their Windows user account) and you can
use Windows to enforce password policies. However, it is generally harder to configure and maintain
(especially if you are using IIS Integrated Windows or IIS Basic and Integrated Windows). It may cost
more for your Windows Server licensing to use Windows authenticated users (contact your Microsoft
reseller and ask about Windows authenticated users accessing the IIS web server).
IIS Basic Authentication works with all supported web browsers on any operating system. However,
it sends Windows passwords in "clear text", so it should only be used in conjunction with SSL.
IIS Integrated Windows does encrypt passwords (even without SSL), but can not be used with any
browser other than Internet Explorer.
Also, IIS Integrated Windows (or "IIS Basic and Integrated Windows") can not be used in
an environment where there is a (hardware or software) firewall or proxy server between your end
users (their web browsers) and the web server. Though it may appear to work in some cases, it will
(sometimes intermittently) have situations where the browser requests the users credentials over and
over. Keep in mind that software which acts as a firewall or proxy server may not label itself as such.
It may be labeled as "intrusion prevention" software or "web acceleration" software. Some "pop-up
blocker" software packages also use a proxy server. If you were using IIS Integrated Windows
authentication and one or more of your users suddenly starts complaining that they are being repeatedly
asked to enter their user name and password or are getting an "access denied" error, odds are that they
are now using a firewall or proxy server (perhaps installed on their browser machine or in
their network).
If you wish to use one of the IIS authentication mechanisms, we recommend using IIS Basic
combined with SSL. This will allow your users to use any supported browser (including Firefox)
and will work through firewalls and proxy servers.
For further details on the differences between
these choices, please consult the Microsoft Authentication documentation:
- Windows Domain or Computer Name - This option will only be available if something other than "NetResults Tracker"
has been selected for the Authentication field. Enter the name of the Windows domain
that contains the users that should be allowed to access the workgroup. The web
server machine on which Tracker is installed must be a member of this domain.
If the web server machine is not a member of a Windows domain or you only wish to allow
access using local (to the web server machine) Windows user accounts, then you can specify
the Windows computer name of the machine on which Tracker is installed instead of
a Windows domain name. In that case, only local user accounts from that web server machine
will be given access. This information will be used to fill in the choices on the
Authentication Details page.
- Require SSL - Check the box for this option if you have configured SSL (Secure Socket Layer)
encryption for communications with the web site selected above. Please ensure you have
entered a valid Server Certificate on your web server in order
to apply the Secure Communications feature to your workgroup.
Enabling this option will require your users to use https://
instead of http:// when browsing to this workgroup.
- Host Name or IP Address - Select the radio button to specify either Host Name or IP Address that corresponds
to the web site selected for the workgroup. This information will be used to
configure the URL used to access this workgroup.
- Port Number - If applicable, enter the port number associated with the web site you
selected above. This information will be used to configure the URL for this
workgroup.
- Comment - This field can be used to add any information to describe the new workgroup.
The following fields are Internationalization settings. Please consider the following
information when making your selection for these fields. Once you have added
records to your Tracker database, you will not be able to change the character
set selection. When making your selection, also consider what languages
you will need to support in the future.
- Character Set - ISO-8859-1, Windows-1252, and UTF-8 are the character sets that are supported
by Tracker. UTF-8 is the default and recommended selection for character set since it supports
virtually all available languages. UTF-8 is the only option available for workgroups using a MySQL database.
-
UTF-8 includes
support for all Western European languages mentioned below for ISO-8859-1 and
Windows-1252 as well as other languages such as Arabic, Chinese, Czech, Greek,
Hebrew, Hindi, Hungarian, Japanese, Korean, Polish, Romanian, Russian, Tamil
and many others.
UTF-8 is an ASCII compatible encoding method for Unicode (ISO 10646).
Even though UTF-8 supports the widest range of languages,
each user must have all of the necessary fonts installed on their
desktop (web browser) machine in order to view all characters.
When selecting the character set for your workgroup, you should also
consider the users that will be accessing the workgroup. Each user
account has a set of profile information that is displayed within each workgroup.
Each user account has a character set, which is based on the characters
used in the user account's profile information. The User Character Set
must be compatible with the workgroup character set. For example, a user
account with UTF-8 characters in its profile can only be given access to a
workgroup with UTF-8 configured as the workgroup character set.
Some basic guidelines related to user / workgroup character set compatibility:
- If a user account contains only ASCII characters
(supported by ISO-8859-1 character set), this user account can be
given access to any workgroup because all character sets support ASCII
characters.
- If a user account contains non-ASCII characters supported by the Windows-1252
character set, this user account can be given access to any workgroup that
is configured with the Windows-1252 or UTF-8 character set.
- As mentioned above, if a user account contains non-ASCII characters only
supported by the UTF-8 character set, this user account can only be given access
to a workgroup configured with the UTF-8 character set.
To view a user's character set, use the
Edit a User operation in the
User Management System section.
-
ISO-8859-1 (also known as Latin1) is a standard single-byte character set that supports Western
European languages including:
English, Basque, Catalan, Danish, Dutch, Finnish, French, German, Icelandic,
Irish, Italian, Norwegian, Portuguese, Scottish, Spanish, and Swedish.
The ISO-8859-1 character set is a subset of the Windows-1252 character set.
The image below displays the set of characters supported by ISO-8859-1.

-
Windows-1252 is a single-byte character set that supports all of the
characters in ISO-8859-1, plus some additional European characters including:
the Euro sign, tilde, caron, and per mille.
The image below displays the additional characters which are in Windows-1252
(but are not in ISO-8859-1). If you require the use of any of these characters,
then you can not use the ISO-8859-1 character set.
- Email Header Encoding - Email headers must contain only US-ASCII characters. Headers that
contain non US-ASCII characters must be encoded so that they contain
only US-ASCII characters. This process involves using either
B (Base 64) or Q (Quoted-Printable) to encode certain characters.
The Q encoding is recommended for use when most of the characters to
be encoded are in the ASCII character set; otherwise, the B encoding
should be used. If you select Auto, Tracker will automatically
select an encoding option.
- Add Multipart Email - This option determines whether the emails generated by Tracker
will contain text or text and HTML within the messages. Selecting Yes for
this option will allow the emails to contain both text and HTML. For example,
if you selected UTF-8 as the character set for a workgroup, email generated
by Tracker may also contain UTF-8 characters. If your email client
cannot display UTF-8 characters, selecting Yes for the Email Add HTML Part
option might help. With this option enabled, Tracker will send email
with both text and HTML format. If your email client can display HTML format,
UTF-8 email can be displayed.
- Time Zone - This option determines which time zone will be selected for users by default to view
the workgroup data. Irrespective of the setting you choose for the default here,
each user can select their own time zone setting in the
Preferences section.
For a list of available time zones,
please refer to Windows Time Zones section.
- Adjustment for Daylight Saving Time - This option determines whether the workgroup date is adjusted to observe
daylight saving time. If you have selected a time zone that observes
daylight saving time, it is recommended that you check the box to enable
Tracker to make the appropriate adjustments.
Once you have entered the relevant information to create the new workgroup,
click on the Continue button. The next page displayed depends on the options that were selected:
Authentication Details
If you selected an option other than "NetResults Tracker" for the
Authentication field, you will be prompted to provide additional information
for the authentication configuration:
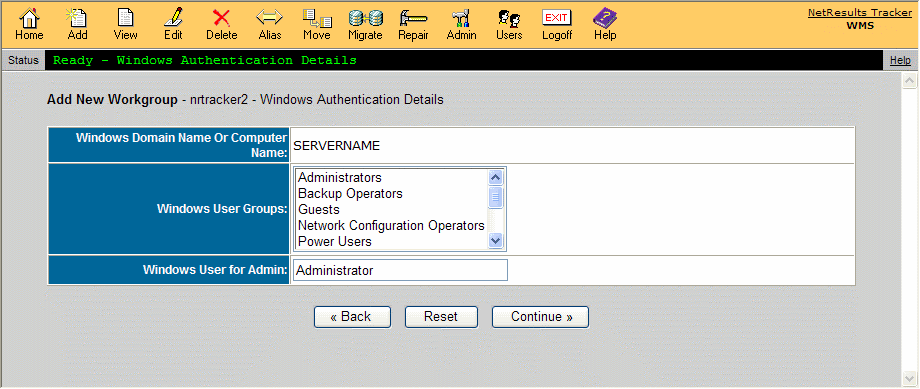
- Windows Domain Name or Computer Name - The Windows domain or computer name selected on the Add Workgroup
page will be displayed. When you use one of the Microsoft IIS authentication schemes,
user authentication and access control will be performed as follows. First, the Microsoft
IIS web server in conjunction with the web browser and (in most cases) your Windows domain
server will authenticate the user which is trying to access a web page in the workgroup.
That authentication may be implicit (user will not see it happen) or it may be explicit
(user may see a pop-up displayed by their browser requesting Windows user name, password,
and, in some cases, domain) depending on the browser configuration, web server configuration,
and your domain configuration. If the end user successfully authenticates to Windows/IIS, the
IIS web server will then perform access control by comparing the Windows user account to the
Windows file system permission on the web page being accessed. If that access control check
passes, the web page request will then be passed on to Tracker. Tracker
will then check its user account information to see if that
user account exists in Tracker and has access to the workgroup. If so, the
Home Page for that user will be displayed and the user's login session will be started.
If the user was browsing to the Knowledge Base page or the
Submit via Web for Unregistered Users page, then the last check will not be performed because
those pages do not require that the user has a Tracker user account.
- Windows User Groups - The Windows user groups available in the selected domain or computer will
be listed. Select the Windows user group(s) that should be allowed to access this workgroup.
To select multiple user groups, hold down the Ctrl button on your keyboard as you
select the user groups.
The Windows file system permissions on the Tracker web pages for this workgroup
will be modified to allow access by each User Group which you select.
Note: Tracker
only adds to or modifies your existing Windows file system permissions for the selected User Groups.
It does not remove or modify any existing entries for other User Groups which you did not select.
In other words, the file system permissions will be set to guarantee that users in the selected User
Groups will pass the IIS access check. They will not be set to make sure that all other users will
fail the IIS access check. If Tracker did that, it might remove access for users who may
not need to browse to the web pages, but do need access to the files themselves (such as local
administrators, backup operators, etc.).
So, for example, if you have installed the workgroup in a Windows folder which has access for Everyone,
then the IIS web server will give Everyone (who successfully authenticates with a valid Windows
user account) access to the Tracker web pages. However, Tracker will still
reject access for users who do not have a Tracker user account (excluding Knowledge Base
and Submit via Web for Unregistered Users pages which don't require a Tracker user account).
If you wish to narrow this list (so that more IIS access control is performed), then you should set
the file system permissions on the folder that you selected as the Location in the first Add
Workgroup page before you create (Add) the workgroup. Otherwise you may inadvertently remove
file system permissions which Tracker added so that your workgroup can properly function.
Also, be careful to not remove access that may be needed by users/tools which run on the web
server machine (such as for the Administrators of the server, the user accounts that are used by the
backup tool(s) which you use, etc.).
After creating the workgroup, you must still add a Tracker
user account with the User ID that
matches the Windows user account for each user who will use the workgroup.
Please note that changes made to the user profile information in the user
accounts in Tracker will not be reflected in Active Directory (and vice versa).
- Windows User for Admin - Enter the Username of the Windows user account that will be authenticated as the Tracker
Admin user account for the workgroup. The user selected must be a member of one of the groups
selected for Windows User Groups above and in the Windows Domain or Host Name selected
above. This allows you to associate any Windows user with the Tracker Admin user account
(so that you do not have to create a Windows user account with the user name Admin).
Once you have entered the relevant information for the Authentication settings, click on the
Continue button. The next page depends on the Database Type selected:
MySQL Database Details
If you selected MySQL as the database type,
you will be prompted to provide additional information
to connect to MySQL:
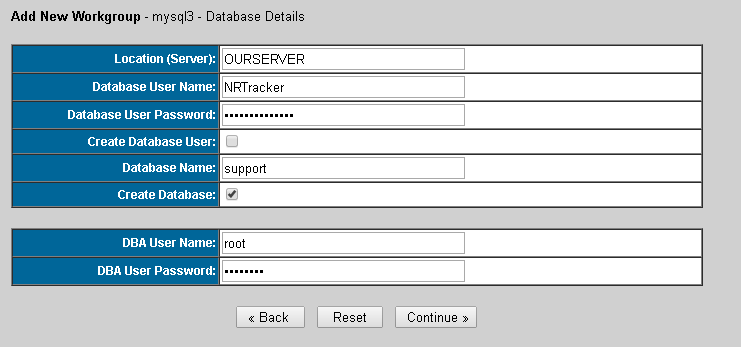
- Location (Server) - Enter the name of the machine where MySQL is located.
- Database User Name - Enter the User Name should be used by this workgroup
to connect to the database. "NRTracker" is listed by default. The user
does not need to already exist on MySQL. You can enter the User
Name for a new user to be created on MySQL for use with
this workgroup.
- Database User Password - Enter the password for the Database User Name specified above to connect to
MySQL. If the Database User Name does not exist already on MySQL,
enter a new password to be used when creating the new user.
- Create Database User - Check the box for this option if you would like to create a new user
on MySQL for use with this workgroup. Do not check the box for this
option if the user specified in Database User Name already exists on MySQL.
- Confirm Database User Password - This field will only be displayed if the box for the option Create Database
user is checked. Confirm the password entered in the Database User Password
field above.
- Database Name - By default, this will display the name selected as the workgroup name. You can
change this in the space provided, if desired. The database (schema) does not need to already
exist on MySQL. You can enter the Database Name for a new MySQL database (schema)
to be created for use with this workgroup.
- Create Database - This option will only be displayed when MySQL is selected as the Database
Type.
Check the box for this option if you would like to create a new database (schema)
on MySQL for use with this workgroup. Do not check the box for
this option if the database (schema) specified in the Database Name field already
exists on your MySQL installation.
- DBA User Name - This field will only be displayed when the boxes for either Create Database User
or Create Database are checked.
Enter the User Name for a database administrator on MySQL.
"root" is entered
into this field by default.
- DBA User Password - Enter the password for the user specified in the DBA User Name field.
Click on the Continue to proceed with creating the workgroup. The next page will be a
workgroup confirmation page will be displayed.
SQL Server Database Details
If you selected SQL Server as the database type,
you will be prompted to provide additional information
to connect to SQL Server:
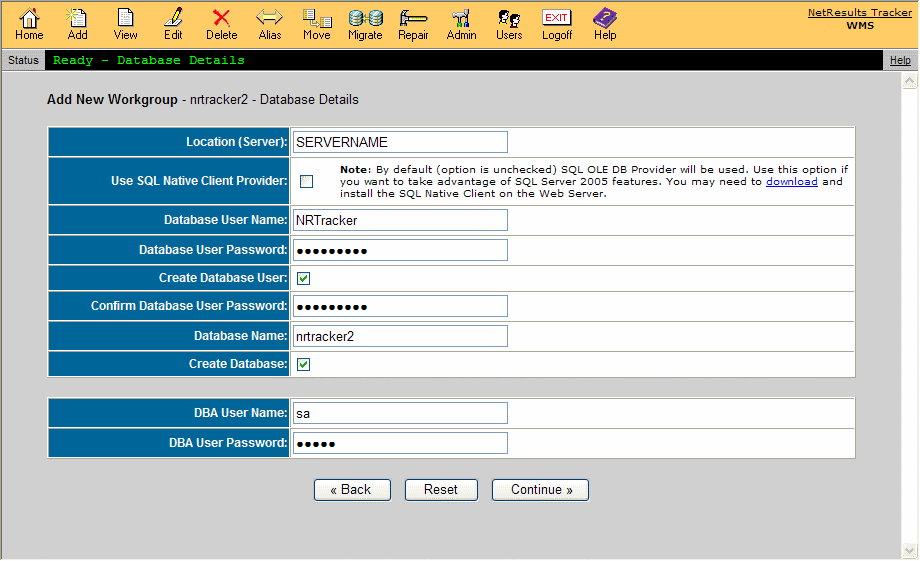
- Location (Server) - Enter the name of the machine where SQL Server is located.
- Use SQL Native Client Provider - When enabling this option by checking the box, Tracker will use
SQL Native Client Provider to connect to SQL Server.
By default this property is unchecked so that Tracker will use
SQL OLE DB Provider to connect. This property is optional and can
be used if you want to take advantage of SQL Server features
such as database mirroring. Use of this feature is only recommended
in cases where you have an expert SQL Server administrator with detailed knowledge
of SQL Server client configuration. Enabling this property may require you
to download
and install the SQL Native Client on the web server.
- Fail Over Location (Server) - This property will only be displayed when Use SQL Native Client
Provider is enabled.
Specify the name of the "mirror" server that should be used in the event that the
principal server fails. This property is optional and can
be used if you want to take advantage of SQL Server features
such as database mirroring in a version of SQL Server where it is supported. Use of this feature is only recommended
in cases where you have an expert SQL Server administrator with detailed knowledge
of SQL Server client configuration. Please leave this property blank if you are not using database mirroring or are not
familiar with database mirroring. Click
here for more information about database mirroring.
- Database User Name - Enter the User Name of the login that should be used by this workgroup
to connect to the database. "NRTracker" is listed by default. The login
does not need to already exist on SQL Server. You can enter the User
Name for a new login to be created on SQL Server for use with
this workgroup.
- Database User Password - Enter the password for the Database User Name specified above to connect to
SQL Server. If the Database User Name does not exist already on SQL Server,
enter a new password to be used when creating the new login.
- Create Database User - Check the box for this option if you would like to create a new login
on SQL Server for use with this workgroup. Do not check the box for this
option if the login specified in Database User Name already exists on
SQL Server.
- Confirm Database User Password - This field will only be displayed if the box for the option Create Database
user is checked. Confirm the password entered in the Database User Password
field above.
- Database Name - By default, this will display the name selected as the workgroup name. You can
change this in the space provided if desired. The database does not need to already
exist on SQL Server. You can enter the Database Name for a new SQL Server database
to be created for use with this workgroup.
- Create Database - This option will only be displayed when SQL Server is selected as the Database
Type.
Check the box for this option if you would like to create a new database
on SQL Server for use with this workgroup. Do not check the box for
this option if the database specified in the Database Name field already
exists on your SQL Server installation.
- DBA User Name - This field will only be displayed when the boxes for either Create Database User
or Create Database are checked.
Enter the User Name of a login for a database administrator on SQL Server.
"sa" is entered
into this field by default.
- DBA User Password - Enter the password for the login specified in the DBA User Name field.
Click on the Continue button to proceed with creating the workgroup. A confirmation
page will be displayed with the following:
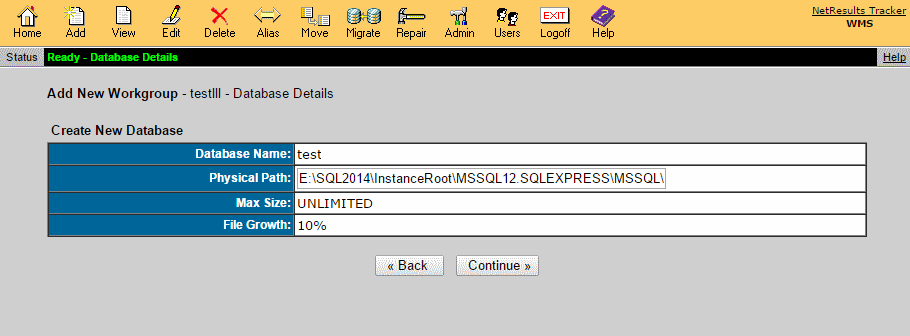
- Database Name - Shows the Database Name as it was entered on the previous page.
- Physical Path - The location of the database files within SQL Server will be configured with the
default path. You can enter a different path if desired.
If the path you entered is not synchronized with
the SQL Server installation path, you might get an error while creating the workgroup.
- Max Size - The maximum size of the database. "UNLIMITED" will be set by default.
- File Growth - The percentage by which the database file should grow automatically. "10%"
will be set by default.
Click on the Continue to proceed with creating the workgroup. The next page will be a
workgroup confirmation page will be displayed.
Oracle Database Details
If you selected Oracle as the database type, you will be prompted to
provide some additional information to connect to Oracle.
If you are adding a workgroup using Oracle as your database type, you must first
create the database using the procedure outlined in the
Using Oracle Database Help section.
Once you have completed these steps, return to this section to create a new
workgroup using Oracle as the database type.

Click on the Continue button to proceed with creating the workgroup. If
the box for the option Create Database User was not checked, a
workgroup confirmation page will be displayed.
If the box for the option Create Database User was checked, a confirmation
before creating the Database User will be displayed with the following:
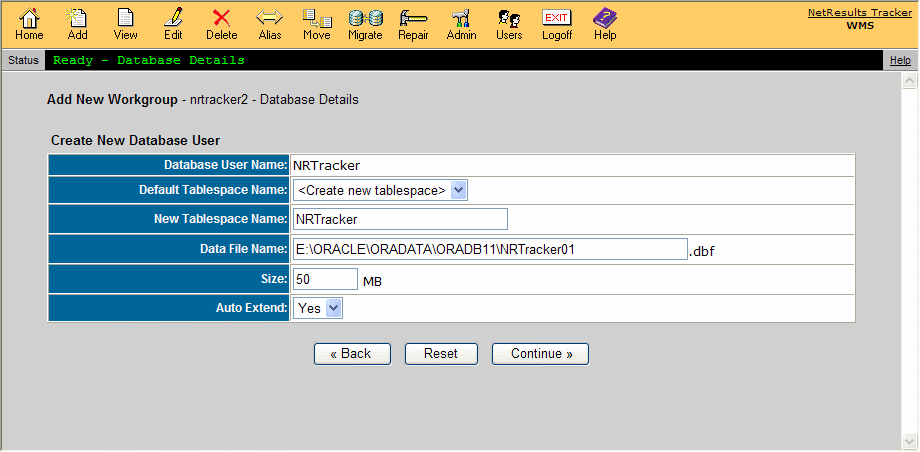
- Database User Name - Shows the Database User Name as it was entered on the previous page.
- Default Tablespace Name - Select which tablespace in the database should be associated with the new
user. Existing tablespaces for this workgroup will be available for
selection or you can select "<Create new tablespace>".
If you are unsure which tablespace to select, it is recommended that you
either select the "<Create new tablespace>" option or select the
USERS tablespace.
When selecting "<Create new tablespace>", the options below
will be displayed:
New Tablespace Name - Enter a name for the new tablespace. The name entered by default will
match the name of the Database User to be created.
Data File Name - Enter the path where the database file (*.dbf) should be located.
Size - The initial size of the database. "50 MB" is set by default.
The value entered must be at least 50 MB.
Auto Extend - This option determines whether the database should be allowed to grow as needed.
"Yes" is set by default.
Click on the Continue to proceed with creating the workgroup.
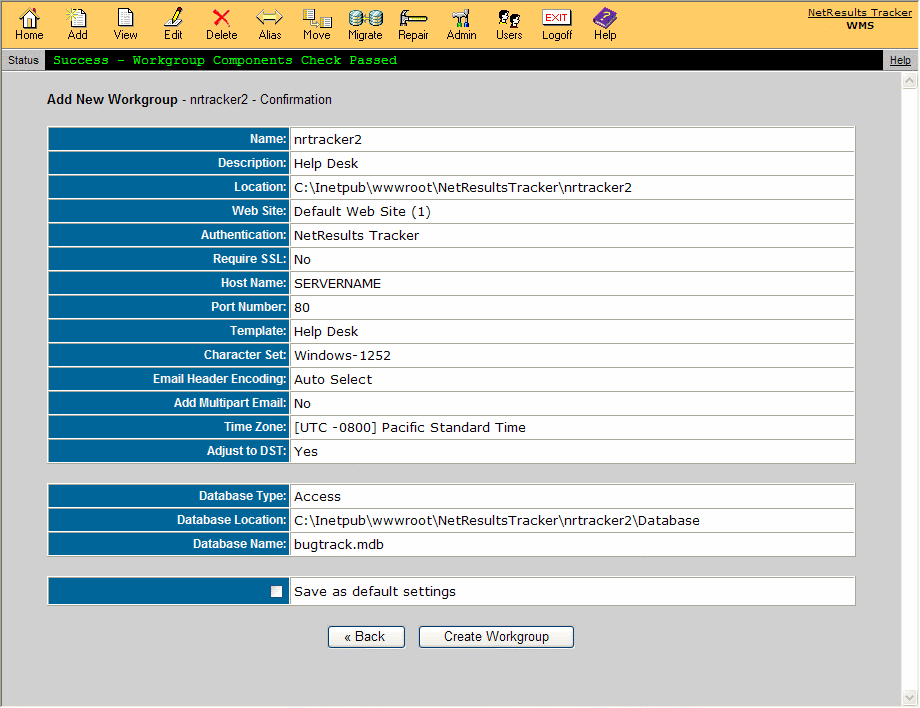
Confirmation Page
A Component Check will be done to validate the
information entered for the new workgroup. If the Component Check is
successful, a confirmation of the database information will be shown.
If the Component Check is unsuccessful, details about the components
that failed will be listed. If you wish to save the settings you entered
above to be displayed as the default settings whenever adding future new
workgroups, check the box labeled Save as default settings.
You can click on the Back button to make any
modifications to the database information. Otherwise, click on the Create
Workgroup button as the final step to create the workgroup.
If you selected MySQL, SQL Server or Oracle as the database type, click on the Initialize
Tables button that appears after the workgroup has been created.
To login to your new workgroup, go back to the Workgroup Management System Home Page, find
the name of the workgroup you added, then click on the key icon to the left of the
workgroup name. A separate window will be launched with the Login page for your workgroup.
Or, you can launch a browser window and enter the following URL to reach your workgroup:
http://servername/workgroupname/
where servername is the TCP/IP host name of the machine where you
installed Tracker and workgroupname is the name of
the workgroup you created.
Return to Topics List
Backing Up Workgroup Data
Note: It is important to make regular
backups of your installation especially the database and attachments for each workgroup.
If you are using MySQL,
SQL Server or Oracle as the database type for your workgroup(s), a simple file
copy or a simple file backup to tape is not sufficient for backing up MySQL,
SQL Server or Oracle database files because they are not standard files.
More information on backing up your Tracker installation
can be found in the
Database Administration
section.
Return to Topics List
Active Directory Integration
Tracker workgroups can be configured to authenticate
users via Active Directory. When a workgroup is configured
to authenticate users via Active Directory, the users do not see
the Tracker login page when attempting to
login.
To configure a new workgroup to use
Active Directory for authentication:
- Choose a form of Authentication other than
"NetResults Tracker" when adding the workgroup
- Ensure that each user that needs to access Tracker
has a user account created in the
User Management System.
The User ID for the Tracker user account must match
the User ID for their Windows user account in Active Directory
that belongs to one of the Windows user groups you selected in
the Authentication Details when creating the workgroup.
Please note that changes made to the user profile information in the user
accounts in Tracker will not be reflected in Active Directory (and vice versa).
To configure an existing workgroup to use Active Directory for
authentication:
- Edit the workgroup
to select a form of Authentication other than "NetResults Tracker"
- Ensure that each user that needs to access Tracker
has a user account created in the
User Management System.
The User ID for the Tracker user account must match
the User ID for their Windows user account in Active Directory
that belongs to one of the Windows user groups you selected in
the Authentication Details when editing the workgroup
Please note that changes made to the user profile information in the user
accounts in Tracker will not be reflected in Active Directory (and vice versa).
User Passwords
For workgroups where a method of authentication other than NetResults Tracker
has been selected, the Password entered for a user's Tracker account
will be ignored because the password for the user's Windows
account will be used for authentication. Entering a password when
creating a user account in the User Management System (UMS)
is still required in case the Authentication settings for the workgroup is ever changed
to use NetResults Tracker.
Return to Topics List
Database Mirroring with SQL Server
Tracker supports the use of Database Mirroring on SQL Server.
Database Mirroring should only be used if you have an expert SQL Server administrator with
detailed knowledge of SQL Server client configuration. Please consult the following references
on Microsoft's web site about configuring database mirroring:
In order to use database mirroring, you must set the properties "Use SQL Native Client Provider" and
"Fail Over Location (Server)" for the workgroup when adding the workgroup (or edit an existing one).
However, simply setting these properties for the workgroup is not sufficient to use database mirroring.
If you are not familiar with database mirroring or SQL Server client configuration, please do not
attempt to use this feature.
Return to Topics List
NetResults Tracker © 1997-2020 NetResults Corporation. All rights reserved.