Before a user can login and begin using Tracker,
the user must be given access to the workgroup(s) using the steps listed
below and must be added to the workgroup's
User Accounts section.
There are two ways to grant a user access to a workgroup. Click on the link
to see the detailed instructions for each method:
Topics Covered In This Section
Edit a Workgroup's List of Users
To select a workgroup and edit the list of users that have access to the workgroup:
- Login to the
User Management System (UMS).
- Click on the Access icon in the top button bar
- Select the radio button to the left of the Workgroups
pulldown, select a workgroup, then click on the Edit
button

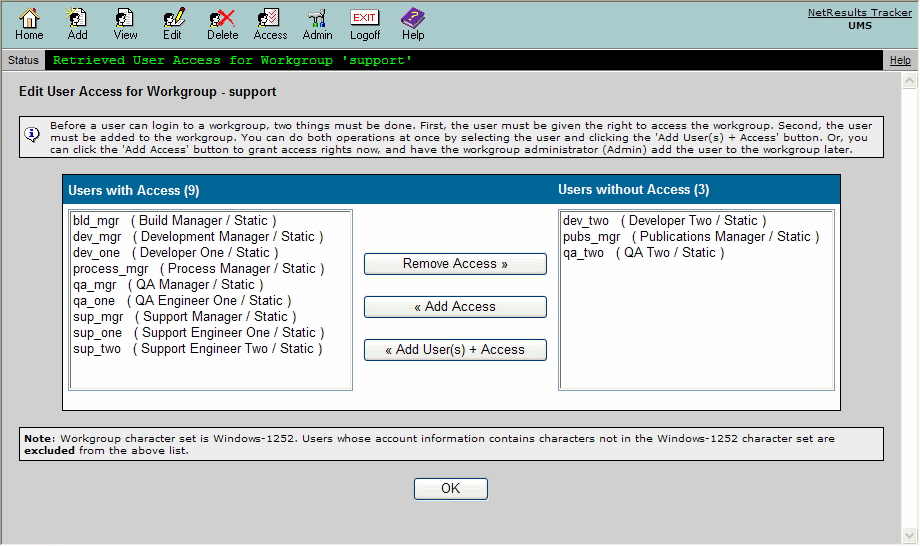
- The left column called Users with Access displays any
users which have already been given access to the workgroup. It also
includes a count of the number of users
displayed in the column. The right column called
Users without Access displays users that do not have
access to the workgroup and has a count of the number of users
displayed in the column.
You can perform one of the following actions. To select
multiple users for any of the actions below, hold down the
Ctrl button on your keyboard as you select the users:
- You can give a user(s) access to the workgroup by
selecting a user(s) in the Users without Access column,
then clicking on the Add Access button. This
will only give the user(s) access to the workgroup. As mentioned in further detail in the
Note below, a user will only be able to log into a workgroup after they have been
given access AND added to a workgroup's
User Accounts section.
- You can give a user(s) access to the workgroup and add the user(s) to the
workgroup's
User Accounts section
by selecting a user(s) in the Users without Access column, then
clicking on the Add User + Access button.
- You can remove a user's access to a workgroup by selecting a user(s)
in the Users with Access column, then clicking on the Remove Access
button
Return to Topics List
Edit a User's Access to Workgroups
To select a user and edit the list of workgroups that the user can access:
- Login to the
User Management System (UMS).
- Do one of the following:
- Click on the Access icon to the left of the user account on the
UMS Home Page.
- Click on the Access icon to the left of the user account in the
User Search results.
- Click on the Access icon in the
top button bar, select the radio button to the left of the Users
pulldown, select a user and click on the Edit button.

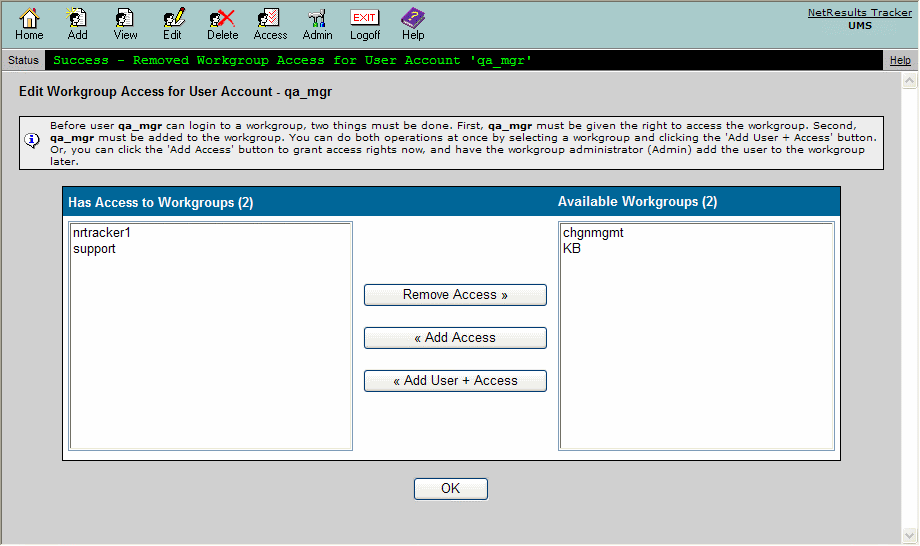
- The left column called Has Access to Workgroups displays any workgroups
to which the user has already been given access. It also includes a count of the number of workgroups
displayed in the column. The right column called Available Workgroups
displays workgroups to which the user does not have access. It also includes a
count of the number of workgroups displayed in the column.
You can perform one of the following actions. To select multiple workgroups
for any of the actions below, hold down the Ctrl button on your
keyboard as you select the workgroups:
- You can give a user access to a workgroup(s) by selecting a workgroup(s) in the
Available Workgroups column, then clicking on the Add Access button. This
will only give the user access to the workgroup(s). As mentioned in further detail in the
Note below, a user will only be able to log into a workgroup after they have been
given access AND added to a workgroup's
User Accounts section.
- You can give a user access to a workgroup(s) and add the user to the
workgroup's
User Accounts section
by selecting a workgroup(s) in the Available Workgroups column, then
clicking on the Add User + Access button.
- You can remove a user's access to a workgroup(s) by selecting a workgroup(s)
in the Has Access to Workgroups column, then clicking on the Remove Access
button
Note: Users with access
rights to a workgroup may still not be able to login
to the workgroup if the workgroup administrator has never added the user to the
workgroup's
User Accounts section.
A user must both have access rights to the workgroup and be a part
of the workgroup (the workgroup administrator must use the
Add User operation from within the workgroup).
This two step process is typically used if the UMS administrator and the workgroup
administrator are not the same person (that way both people must agree that the
user is allowed to access the workgroup before the user can log in).
If you would like to both give a user access rights and add them to the workgroup
at the same time, you can do so by clicking on the Add Users + Access
button instead of the Add Access button after you've selected the workgroup(s).
Even if you have used the Add Users + Access operation, you may still
wish to login to each workgroup as Admin and
configure the User Groups for the
user (by default they will only be made a member of the Users
or RestrictedUsers User Group according to their license type).
Return to Topics List
Character Sets and Workgroup Access
If the user you selected has characters in their user profile information (name,
address, etc.) that cannot be displayed in an ISO-8859-1 or Windows-1252
workgroup, then the list of workgroups displayed in the Available Workgroups
column may not include all workgroups for which the user does not have access rights
(and similarly for the Users without Access column when you
are editing a workgroup's list of users).
Any workgroup which cannot display the full user information will not be listed.
If you have selected a user with such characters, a note will be displayed at the
bottom of the Available Workgroups column warning you that not all workgroups
may be listed here (and a similar note can be displayed for the
Users without Access column when you
are editing a workgroup's list of users).
Some basic guidelines related to user / workgroup character set compatibility:
- If a user account contains only ASCII characters
(supported by ISO-8859-1 character set), this user account can be
given access to any workgroup because all character sets support ASCII
characters.
- If a user account contains non-ASCII characters supported by the Windows-1252
character set, this user account can be given access to any workgroup that
is configured with the Windows-1252 or UTF-8 character set.
- If a user account contains non-ASCII characters only
supported by the UTF-8 character set, this user account can only be given access
to a workgroup configured with the UTF-8 character set.
For information on checking a workgroup's character set, review the
Viewing a Workgroup section.
To check a user's character set, use the
Viewing a User operation.
To see a list of characters supported by each character set,
review the information in the
Adding a Workgroup section.
Return to Topics List
NetResults Tracker © 1997-2021 NetResults Corporation. All rights reserved.

