 NetResults Tracker Help NetResults Tracker Help |
 |
|
|
User Groups |  | | |
Overview
A user group is a collection of zero or more users.
Each group is assigned rights and privileges to the
system, and all members of the group inherit those
rights and privileges. For example, any user that
is a member of the Admins group inherits the ability
to access the Admin features of Tracker.
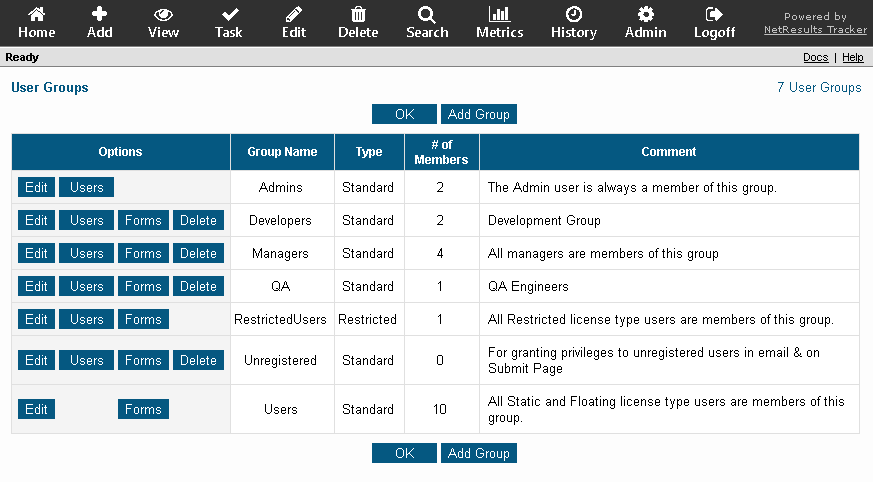
You can assign each user to one or more user groups,
and the privileges of each user is the sum of all
the privileges for all of the groups in which he or she
is a member. There are some restrictions:
- All
non-Restricted
users are a member of the Users group
- All
Restricted
users are a member of the RestrictedUsers group
- The Admin user is always a member of the Admins
group
- A Standard user group can contain Static or Floating users as members.
Restricted users cannot be members of a Standard user group
- A Restricted user group can contain Restricted, Static or Floating users
as members.

Topics Covered In This Section
Adding a User Group
To add a new user group:
- Login to the
workgroup
as Admin
- Click on the Admin icon
- Click on the User Accounts link
- Click on the Manage Groups button
- Click on the Add Group button
- Enter a name for the user group in the Group ID
field
- Enter some information to describe the purpose of the
user group in the Description field
- In the pulldown, select the Type of user group
you are creating.
- Select Standard if the members of
this user group will be Static or Floating users.
Restricted users cannot be members of a Standard user
group
- Select Restricted if the members
of this user group will be Restricted users. Non-Restricted
users can be members of either Standard or Restricted user
groups
- In the Visible Forms field, select which forms and projects
the user group will have access to. To select multiple forms, hold down the CTRL
button on your keyboard while clicking on the desired forms. If "<None>"
is selected, no project or form will be selected for the user group and visibility
can configured at a later time. Review the Making Projects and
Forms Visible to the User Group help section.
- Click on the Add Group button
- By default, some privileges will be enabled for the user group.
If you are adding a Standard user group, the privileges enabled by default
will be all of the privileges currently enabled for the Users group.
If you are adding a Restricted user group, the privileges enabled by
default will be all of the privileges currently enabled for the RestrictedUsers
group.
To enable other privileges,
check the box next to the privilege. To disable a privilege, uncheck the box.
Details of the privileges
available for each type of user group can be found in
the following sections:
- After enabling all of the desired privileges, click on the
OK button to save the user group
- Click OK to return to the User Group section
or click on the Add Another Group button
to create another user group
Return to Topics List
Making Projects and Forms Visible to the User Group
Giving the user group visibility to the Projects and Forms will ensure that the
members of the new user group can utilize the privileges you enable for the
group. This allows you to either add or remove the
Project and Form visibility for the user group.
To add visibility of a form, or forms in a particular project:
- Login to the
workgroup
as Admin
- Click on the Admin icon
- Click on the User Accounts link
- Click on the Manage Groups button
- Click on the Forms button to the left of the user group
- Click on the Add Forms link next to the desired project
- In the Make These Forms
Available field, select the forms the user group will be able to access. To
select multiple forms, hold down the CTRL button on your keyboard while
clicking on the desired forms. Click on the All button to select all
forms of this project.
- Click OK to save the changes
- Click OK to confirm the change
- Click OK to return to the Set Visibility for User Group page
To remove visibility of a form, or forms in a particular project:
- Login to the
workgroup
as Admin
- Click on the Admin icon
- Click on the User Accounts link
- Click on the Manage Groups button
- Click on the Forms button to the left of the user group
To remove visibility of a single form:
- Click on the Remove link next to the desired form under the appropriate project.
- A warning will be displayed to note that by removing the user group's
visibility to the form, all saved queries and charts belonging to this group and
were created using this form, will be permanently removed. Click OK to
proceed.
- Click OK to return to the Set Visibility for User Group page
To remove visibility of one or more forms:
- Click on the Remove Forms link next to the desired project
- In the Make These Forms Unavailable field, select the forms the user group will be able to access.
To select multiple forms, hold down the CTRL button on your keyboard while
clicking on the desired forms. Click on the All button to select all
forms of this project.
- Click OK to save the changes
- Click OK to confirm the change
- A warning will be displayed to note that by removing the user group's
visibility to the form, all saved queries and charts belonging to this group and
were created using this form, will be permanently removed. Click OK to
proceed.
- Click OK to return to the Set Visibility for User Group page
Adding and removing visibility of projects and forms can also be done in
the Projects section. For information about configuring user group visibility
in the Projects section, review the Project
Visibility Help section.
Return to Topics List
Editing a User Group
To edit a user group:
- Login to the
workgroup
as Admin
- Click on the Admin icon
- Click on the User Accounts link
- Click on the Manage Groups button
- Click on the Edit button to the left of the user group
you wish to modify
- You can update the group name, description, or privileges.
The "Type" property for each group cannot be edited.
Click OK to save your changes.
Return to Topics List
Deleting a User Group
To delete a user group:
- Login to the
workgroup
as Admin
- Click on the Admin icon
- Click on the User Accounts link
- Click on the Manage Groups button
- Click on the Delete button
- Click OK to confirm the operation.
If there are any saved queries or charts that have a project and form selected
that is only visible to the group being deleted,
those reports will be deleted. Any saved queries that have other
projects and forms selected in addition to the combination that is
only visible to the affected user group will be modified to remove that project
and form from the query criteria.
If there are any
notification rules
where this user group is selected
as a recipient, you will be prompted to either choose a user group
to replace the user group being deleted or remove the user group from the
notification rules.
If there are any transitions
where this user group is selected in
the properties, you will be prompted to either select a user group
to replace the one being deleted or delete the transitions.
If there are any alerts settings
where this user group is selected as a recipient or in the "Show Alerts during Add/
Task" privilege list, you will be prompted to choose a user group to replace
the user group being deleted or delete the alert settings.
- Click OK to proceed. Click OK on the confirmation page.
Return to Topics List
Assigning Users to a User Group
To assign users to a user group:
- Login to the
workgroup
as Admin
- Click on the Admin icon
- Click on the User Accounts link
- Click on the Edit Groups button
- Click on the Users button
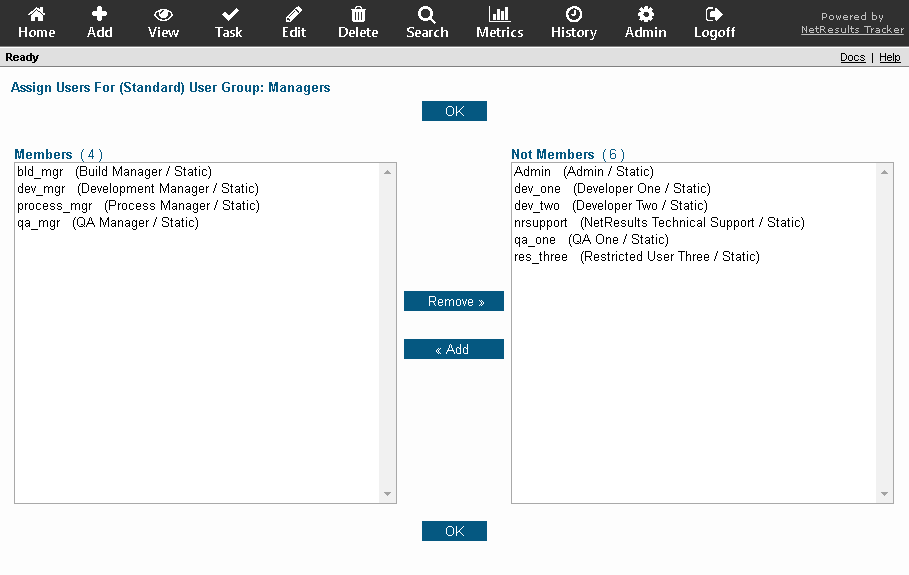
- To add a user as a member of the user group, click
on the User ID in the Not Members column,
then click on the Add button.
To remove a user as a member of the user group, click
on the User ID in the Members column,
then click on the Remove button.
To select multiple users, hold down the CTRL
button on your keyboard while clicking on the desired
users.
Removing a user from a group that is associated with a
user pulldown field
will cause the user to be
marked as an obsolete item
in that field.
If there are any saved queries or charts created for the user
being removed
and the saved queries/charts only have project(s) and form(s) selected
that are only visible to this user group,
these queries/charts will be deleted. Any other saved queries that
have other projects and forms selected in addition to the project(s)
and form(s) only visible to the affected user group will be modified
to remove the project(s) and form(s) that are only visible to the user group.
For a Standard user group, only non-Restricted
users will be listed in the Not Members column
as available users to be added to the user group.
For a Restricted user group, Restricted and
non-Restricted users will be
listed in the Not Members column to be added to
the user group.

Return to Topics List
NetResults Tracker © 1997-2021 NetResults Corporation. All rights reserved.

