|
||
|
|
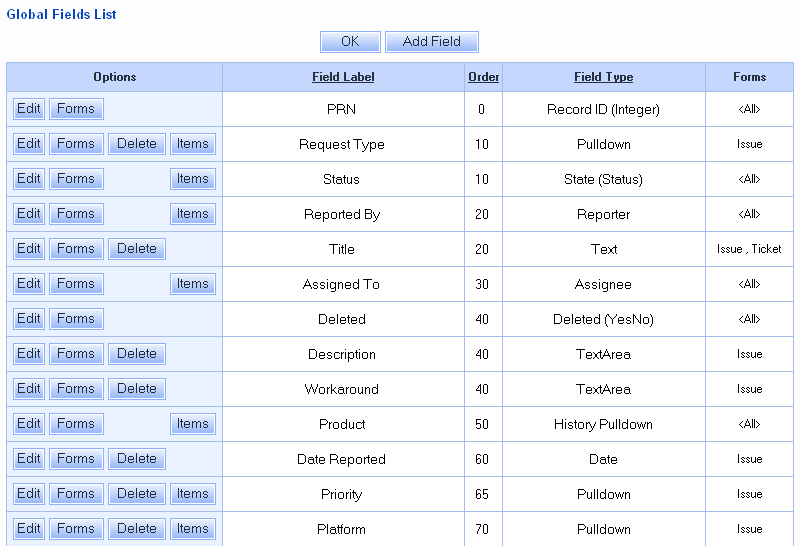
Overview
Tracker allows you to customize forms to suit your needs by adding and removing fields as necessary. In addition, you can specify the name displayed for all fields and other properties of each field such as whether a field is required or not and on which pages the field will appear.
The fields listed can be sorted by Field Label, Order or Field Type by clicking on the corresponding column heading on the Global Fields List.
It is often a good idea to create a backup of your database before making major changes such as modifying your fields as some modifications are irreversible other than by restoring backup copy of your database.
To add a new field:
Deleting Fields
Before you can delete a field, you must first remove it from any forms in which it is being used.
To delete a field:
Removing and Re-adding Fields to a Form
When a field is removed from a form, all values in that field in the records created using that form will be removed. If later the field is re-added to the form, the field's value in all records created using the form will be set to its default (the old values from before the field was removed will not be preserved). Values of the field in records created using other forms will not be affected.
Effects on Existing Records when Adding and Removing Fields
When you add a field, all existing records will be given an initial value. For pulldown menus and release numbers, the current default value (refer to the Customizing Menu Items Help section) for the pulldown or release number is used as the initial value. For Date, Text, TextArea, and URL fields, the initial value is blank (no value). For integer and float fields, it is zero. For YesNo fields, it is the current default value (see Editing Field Attributes).
Fields that are removed from Tracker are no longer displayed, but they actually remain in the database. Additionally, when a field is removed, any references to the field (in Saved Queries, Report Layouts, and Task Fields) are removed. Records which are added after you have removed a field do not get a value for the removed (inactive) field.
If you have configured Dependent Pulldowns, removing one of the pulldowns removes the relationship between the two pulldown fields. If a parent pulldown is removed, the child option menu items become independent, and thus, are no longer limited by the value entered in the parent pulldown.
If you wish to have all records in the system start with the same value for this newly added field (for example, you have a special value to note that the value wasn't actually set when the record was first created), you can use the Edit Results function to update all records after you add the field. The Query Results Help section of the User Help Guide has for more information on the Edit Results function.
If a field is renamed (the Label property for the field is changed), there is no impact to existing data. The labels on the various pages (Add, Edit, Task, View, Query, etc.) will change to use the new label.
Editing Field Properties
The properties set for a field when created or edited in the Manage Fields section are known as Global Field Properties. When a field is added to a form, the field can use its global field properties or the field can be modified such that it has different properties when it is used by each form. For example, you may want to configure a field such that it is required on the Add page on one form, but not required on the Add page for another form.
To edit a field's properties from the Set Forms section:
Editing Field Attributes
To edit the attributes for a field:
A field must be added to at least one form in order to be in use in Tracker. The fields PRN, Status, Reported By, Assigned To, Deleted and Product are required for all forms. The Forms option is not available for these fields in the Manage Fields section.
To set the forms for a field:
To add the field to a form, click on the form in the Available Forms column, then click on the Add button. To remove a field from a form, click on the form in the Forms Using This Field column and click on the Remove button.
The Assigned To, Reported By, Status fields as well as the Pulldown and Release Number fields have an Items button available for modifying the options available in those fields. Details on editing items for Pulldown and Release Number fields are available in the Customizing Menu Items section.
The Items button for the Assigned To field will display the User Administration section. Items listed in the Assigned To field are the users listed in the User Administration section. For a user to be available in the Assigned To field on the Add Page, the user must be a member of a user group with the privilege "Can Be Assignee For Add". For a user to be available in the Assigned To field on the Edit Page, the user must be a member of a user group with the privilege "Can Be Assignee For Edit".
The Items button for the Reported By field will display the User Administration section. Items listed in the Assigned To field are the users listed in the User Administration section.
The Items button for the Status field will display the Global States List. Items listed in the Status field are the states created in the Global States List.
Field Types
Tracker has the following field types available. Click on the field type to see the description and the global field properties that can be set for each field type. Fields marked with * are system required fields that cannot be deleted and will be present in all forms. Any number of non-system global fields can be created, but only a limited number can be used per form (see each field type below for the allowed number).
One Assignee field is available. This field cannot be deleted. Non-restricted users present in the User Administration section can be displayed as options in this field. Which users are available in this field when performing various operations depend on the workflow settings and user group privileges.
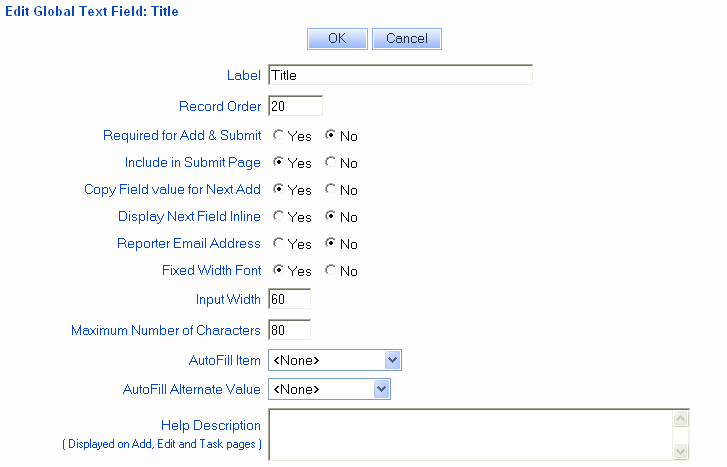
Label
The name displayed for this field.
Record Order
Integer specifying the order that the record should
be presented relative to the other fields on the pages on
which the field is displayed. For
example, a field displayed on the Add page
with a value of 5 will be listed
before a field with a value of 100.
Include in Submit Page
Specifies whether the field should be presented
on the
Submit Page.
Copy Field Value for Next Add
When adding a new record using the Add page, a
user has the option to click Add or Add & Copy
to save the new record. Clicking on the Add button
will save the new record, then return to the Add page
with a "blank" form (all fields returned to default or blank
values). Clicking on the Add & Copy button
will save the new record, then return to the Add page
with the values of the fields "copied" from the last
record added. This allows the user to add another record
with similar information as the last record added without
having to re-type information into the fields. In order to have
a field's value copied into the Add form after clicking on the
Add & Copy button, the attribute
Copy Field Value For Next Add must be set to Yes.
Note: If all of the fields on a
form have the
"Copy Field Value For Next Add" attribute set to No,
then the "Add & Copy button" button will not be
displayed on the Add page.
Display Next Field Inline
Select "Yes" if you would like the next field
in the record to be displayed on the same line
as the field you are editing. The next field is
determined by value of
Record Order attribute for each field.
This attribute will be applied to the fields
on the Add, Edit, Query, Task, Edit Query Results,
and Submit pages and is only applied
to fields that are visible to the user.
The field "Severity"
has this property set to "Yes" in the
Add Page Sample.
Help Description
Enter a description of the field to be displayed on the
Add, Edit, Task, and Submit pages of Tracker
(in the cases where the field is set to be visible on these pages).
The field help icon will be displayed when a user
has the option Display Field Help enabled in their
preferences
settings. The user can move the cursor over the field help icon to
see more detail about the field (the detail is the information entered here
in the Help Description option). This option can also be enabled in the default
preferences set in the
User Preferences section.
 When a user has the Display Field Help option
enabled, the field help icon will be displayed next to
the fields on the Add, Edit, and Task pages. The user
can move the cursor over the field icon to the left of the to
see a description of the field. All of the fields in the
Add Page Sample have Field Help
configured.
When a user has the Display Field Help option
enabled, the field help icon will be displayed next to
the fields on the Add, Edit, and Task pages. The user
can move the cursor over the field icon to the left of the to
see a description of the field. All of the fields in the
Add Page Sample have Field Help
configured.
Add Page Visibility
Edit Page (Update) Visibility
Edit Page (Read Only) Visibility
View Page Visibility
Home/Query Page Visibility
Email Message Visibility
These options are for the
Field Visibility feature; they
determine whether a field is available for each user group in the various
areas of Tracker. Review the
Field Visibility section for more
information about configuring these options.
A string of the format MM/DD/YYYY HH:MM:SS AM/PM (US Default). Other formats can be used based on the end user's Preferences. The default value for this field type is controlled by the "Initialize On Add" option below. Maximum of 10 Date fields can be used per form.
Label
The name displayed for this field.
Record Order
Integer specifying the order that the record should
be presented relative to the other fields on the pages on
which the field is displayed. For
example, a field displayed on the Add page
with a value of 5 will be listed
before a field with a value of 100.
Required for Add & Submit
Specifies whether the field is required to be
modified by the user when it appears on the Add
or Submit pages. For Date fields this means that a blank value will
not be allowed.
You may wish to highlight required fields on the Add or Submit pages with a particular color, bold type or with a special character (e.g. "*"). This can be done by configuring the Required Field Highlights option in the General Preferences section. The fields "Title" and "Description" are set as Required in the Add Page Sample.
When this attribute is set to "Yes", the field visibility set for this field must be set such that the field is visible on the Add page to at least one user group.
Initialize on Add
Specifies that
if the date field appears on the Add page,
it should be automatically initialized to the
current date/time when the Add button is clicked
to save the new record. Fields with this attribute
set to Yes will also be initialized if
Add Similar
operation is used to create a new record.
Include in Submit Page
Specifies whether the field should be presented
on the
Submit Page.
Copy Field Value for Next Add
When adding a new record using the Add page, a
user has the option to click Add or Add & Copy
to save the new record. Clicking on the Add button
will save the new record, then return to the Add page
with a "blank" form (all fields returned to default or blank
values). Clicking on the Add & Copy button
will save the new record, then return to the Add page
with the values of the fields "copied" from the last
record added. This allows the user to add another record
with similar information as the last record added without
having to re-type information into the fields. In order to have
a field's value copied into the Add form after clicking on the
Add & Copy button, the attribute
Copy Field Value For Next Add must be set to Yes.
Note: If all the fields that are active (present in the
"In Use" column) have the
"Copy Field Value For Next Add" attribute set to No,
then the "Add & Copy button" button will not be
displayed on the Add page.
Display Next Field Inline
Select "Yes" if you would like the next field
in the record to be displayed on the same line
as the field you are editing. The next field is
determined by value of
Record Order attribute for each field.
This attribute will be applied to the fields
on the Add, Edit, Query, Task, Edit Query Results,
and Submit pages and is only applied
to fields that are visible to the user. In the Query Page,
Date fields will always be displayed on a separate line
because of the additional options available for selecting
date criteria.
The field "Severity"
has this property set to "Yes" in the
Add Page Sample.
Help Description
Enter a description of the field to be displayed on the
Add, Edit, Task, and Submit pages of Tracker
(in the cases where the field is set to be visible on these pages).
The field help icon will be displayed when a user
has the option Display Field Help enabled in their
preferences
settings. The user can move the cursor over the field help icon to
see more detail about the field (the information entered here in the Field
Help section). This option can also be enabled in the default
preferences set in the
User Preferences section.
When a user has the Display Field Help option
enabled, the field help icon will be displayed next to
the fields on the Add, Edit, and Task pages. The user
can move the cursor over the field icon to the left of the to
see a description of the field. All of the fields in the
Add Page Sample have Field Help
configured.
Add Page Visibility
Edit Page (Update) Visibility
Edit Page (Read Only) Visibility
View Page Visibility
Home/Query Page Visibility
Email Message Visibility
These options are for the
Field Visibility feature; they
determine whether a field is available for each user group in the various
areas of Tracker. Review the
Field Visibility section for more
information about configuring these options.
One Deleted (YesNo) type field called "Deleted" is available and it cannot be deleted. This field can be used to mark records as deleted by setting its value to "Yes" (soft delete).
Label
The name displayed for this field.
Record Order
Integer specifying the order that the record should
be presented relative to the other fields on the pages on
which the field is displayed. For
example, a field displayed on the Add page
with a value of 5 will be listed
before a field with a value of 100.
Include in Submit Page
Specifies whether the field should be presented
on the
Submit Page.
Copy Field Value for Next Add
When adding a new record using the Add page, a
user has the option to click Add or Add & Copy
to save the new record. Clicking on the Add button
will save the new record, then return to the Add page
with a "blank" form (all fields returned to default or blank
values). Clicking on the Add & Copy button
will save the new record, then return to the Add page
with the values of the fields "copied" from the last
record added. This allows the user to add another record
with similar information as the last record added without
having to re-type information into the fields. In order to have
a field's value copied into the Add form after clicking on the
Add & Copy button, the attribute
Copy Field Value For Next Add must be set to Yes.
Note: If all the fields that are active (present in the
"In Use" column) have the
"Copy Field Value For Next Add" attribute set to No,
then the "Add & Copy button" button will not be
displayed on the Add page.
Display Next Field Inline
Select "Yes" if you would like the next field
in the record to be displayed on the same line
as the field you are editing. The next field is
determined by value of
Record Order attribute for each field.
This attribute will be applied to the fields
on the Add, Edit, Query, Task, Edit Query Results,
and Submit pages and is only applied
to fields that are visible to the user.
The field "Severity"
has this property set to "Yes" in the
Add Page Sample.
Display Style
This field determines how the choices within the field are displayed and
has different options depending on the field type.
For a Pulldown type field, the choices are "Pulldown", "Radio"
and "Vertical Radio". For a YesNo type field,
the choices are "Pulldown" and "Checkbox".
Default Value
Specifies the default value for a YesNo type field.
The values that can be selected are "Yes" or "No".
Help Description
Enter a description of the field to be displayed on the
Add, Edit, Task, and Submit pages of Tracker
(in the cases where the field is set to be visible on these pages).
The field help icon will be displayed when a user
has the option Display Field Help enabled in their
preferences
settings. The user can move the cursor over the field help icon to
see more detail about the field (the information entered here in the Field
Help section). This option can also be enabled in the default
preferences set in the
User Preferences section.
When a user has the Display Field Help option
enabled, the field help icon will be displayed next to
the fields on the Add, Edit, and Task pages. The user
can move the cursor over the field icon to the left of the to
see a description of the field. All of the fields in the
Add Page Sample have Field Help
configured.
Add Page Visibility
Edit Page (Update) Visibility
Edit Page (Read Only) Visibility
View Page Visibility
Home/Query Page Visibility
Email Message Visibility
These options are for the
Field Visibility feature; they
determine whether a field is available for each user group in the various
areas of Tracker. Review the
Field Visibility section for more
information about configuring these options.
A floating point number. The default value for this field is "0.0". However, if the field is set to be required on the Add page, the default value when it appears on the Add page is "(blank)". This field type will accept positive and negative values. Maximum of 5 Float fields can be used per form.
Label
The name displayed for this field.
Record Order
Integer specifying the order that the record should
be presented relative to the other fields on the pages on
which the field is displayed. For
example, a field displayed on the Add page
with a value of 5 will be listed
before a field with a value of 100.
Required for Add & Submit
Specifies whether the field is required to be
modified by the user when it appears on the Add
or Submit pages. For Float fields this means that a blank value will
not be allowed.
You may wish to highlight required fields on the Add or Submit pages with a particular color, bold type or with a special character (e.g. "*"). This can be done by configuring the Required Field Highlights option in the General Preferences section. The fields "Title" and "Description" are set as Required in the Add Page Sample.
When this attribute is set to "Yes", the field visibility set for this field must be set such that the field is visible on the Add page to at least one user group.
Include in Submit Page
Specifies whether the field should be presented
on the
Submit Page.
Copy Field Value for Next Add
When adding a new record using the Add page, a
user has the option to click Add or Add & Copy
to save the new record. Clicking on the Add button
will save the new record, then return to the Add page
with a "blank" form (all fields returned to default or blank
values). Clicking on the Add & Copy button
will save the new record, then return to the Add page
with the values of the fields "copied" from the last
record added. This allows the user to add another record
with similar information as the last record added without
having to re-type information into the fields. In order to have
a field's value copied into the Add form after clicking on the
Add & Copy button, the attribute
Copy Field Value For Next Add must be set to Yes.
Note: If all the fields that are active (present in the
"In Use" column) have the
"Copy Field Value For Next Add" attribute set to No,
then the "Add & Copy button" button will not be
displayed on the Add page.
Display Next Field Inline
Select "Yes" if you would like the next field
in the record to be displayed on the same line
as the field you are editing. The next field is
determined by value of
Record Order attribute for each field.
This attribute will be applied to the fields
on the Add, Edit, Query, Task, Edit Query Results,
and Submit pages and is only applied
to fields that are visible to the user.
The field "Severity"
has this property set to "Yes" in the
Add Page Sample.
Help Description
Enter a description of the field to be displayed on the
Add, Edit, Task, and Submit pages of Tracker
(in the cases where the field is set to be visible on these pages).
The field help icon will be displayed when a user
has the option Display Field Help enabled in their
preferences
settings. The user can move the cursor over the field help icon to
see more detail about the field (the information entered here in the Field
Help section). This option can also be enabled in the default
preferences set in the
User Preferences section.
When a user has the Display Field Help option
enabled, the field help icon will be displayed next to
the fields on the Add, Edit, and Task pages. The user
can move the cursor over the field icon to the left of the to
see a description of the field. All of the fields in the
Add Page Sample have Field Help
configured.
Add Page Visibility
Edit Page (Update) Visibility
Edit Page (Read Only) Visibility
View Page Visibility
Home/Query Page Visibility
Email Message Visibility
These options are for the
Field Visibility feature; they
determine whether a field is available for each user group in the various
areas of Tracker. Review the
Field Visibility section for more
information about configuring these options.
An integer numeric value. The default value for this field is "0". However, if the field is set to be required on the Add page, the default value when it appears on the Add page is "(blank)". This field type will accept positive and negative values. Maximum of 5 Integer fields can be used per form.
Label
The name displayed for this field.
Record Order
Integer specifying the order that the record should
be presented relative to the other fields on the pages on
which the field is displayed. For
example, a field displayed on the Add page
with a value of 5 will be listed
before a field with a value of 100.
Required for Add & Submit
Specifies whether the field is required to be
modified by the user when it appears on the Add
or Submit pages. For Integer fields this means that a blank value will
not be allowed.
You may wish to highlight required fields on the Add or Submit pages with a particular color, bold type or with a special character (e.g. "*"). This can be done by configuring the Required Field Highlights option in the General Preferences section. The fields "Title" and "Description" are set as Required in the Add Page Sample.
When this attribute is set to "Yes", the field visibility set for this field must be set such that the field is visible on the Add page to at least one user group.
Include in Submit Page
Specifies whether the field should be presented
on the
Submit Page.
Copy Field Value for Next Add
When adding a new record using the Add page, a
user has the option to click Add or Add & Copy
to save the new record. Clicking on the Add button
will save the new record, then return to the Add page
with a "blank" form (all fields returned to default or blank
values). Clicking on the Add & Copy button
will save the new record, then return to the Add page
with the values of the fields "copied" from the last
record added. This allows the user to add another record
with similar information as the last record added without
having to re-type information into the fields. In order to have
a field's value copied into the Add form after clicking on the
Add & Copy button, the attribute
Copy Field Value For Next Add must be set to Yes.
Note: If all the fields that are active (present in the
"In Use" column) have the
"Copy Field Value For Next Add" attribute set to No,
then the "Add & Copy button" button will not be
displayed on the Add page.
Display Next Field Inline
Select "Yes" if you would like the next field
in the record to be displayed on the same line
as the field you are editing. The next field is
determined by value of
Record Order attribute for each field.
This attribute will be applied to the fields
on the Add, Edit, Query, Task, Edit Query Results,
and Submit pages and is only applied
to fields that are visible to the user.
The field "Severity"
has this property set to "Yes" in the
Add Page Sample.
Help Description
Enter a description of the field to be displayed on the
Add, Edit, Task, and Submit pages of Tracker
(in the cases where the field is set to be visible on these pages).
The field help icon will be displayed when a user
has the option Display Field Help enabled in their
preferences
settings. The user can move the cursor over the field help icon to
see more detail about the field (the information entered here in the Field
Help section). This option can also be enabled in the default
preferences set in the
User Preferences section.
When a user has the Display Field Help option
enabled, the field help icon will be displayed next to
the fields on the Add, Edit, and Task pages. The user
can move the cursor over the field icon to the left of the to
see a description of the field. All of the fields in the
Add Page Sample have Field Help
configured.
Add Page Visibility
Edit Page (Update) Visibility
Edit Page (Read Only) Visibility
View Page Visibility
Home/Query Page Visibility
Email Message Visibility
These options are for the
Field Visibility feature; they
determine whether a field is available for each user group in the various
areas of Tracker. Review the
Field Visibility section for more
information about configuring these options.
Link fields allow you to cross-reference PRNs. For example, you could create a link field called "Related PRNs" that allows you to associate other PRNs to a particular PRN (e.g. if there are multiple PRNs that report the same issue). Another way to use link fields is when you are using multiple forms. For example, if you have a form for development issues and another form for support tickets, you can use a link field to reflect support tickets related to a particular development issue and vice versa. The sample below shows a link field called "Related Support PRNs" to link Support PRNs to Development PRNs. With link fields a search can be done to narrow down the list of possible PRNs to be linked. The list in the sample below are the Support PRNs with chart in the Title where Title is the Secondary Key Field for the form (as set in the form's properties).
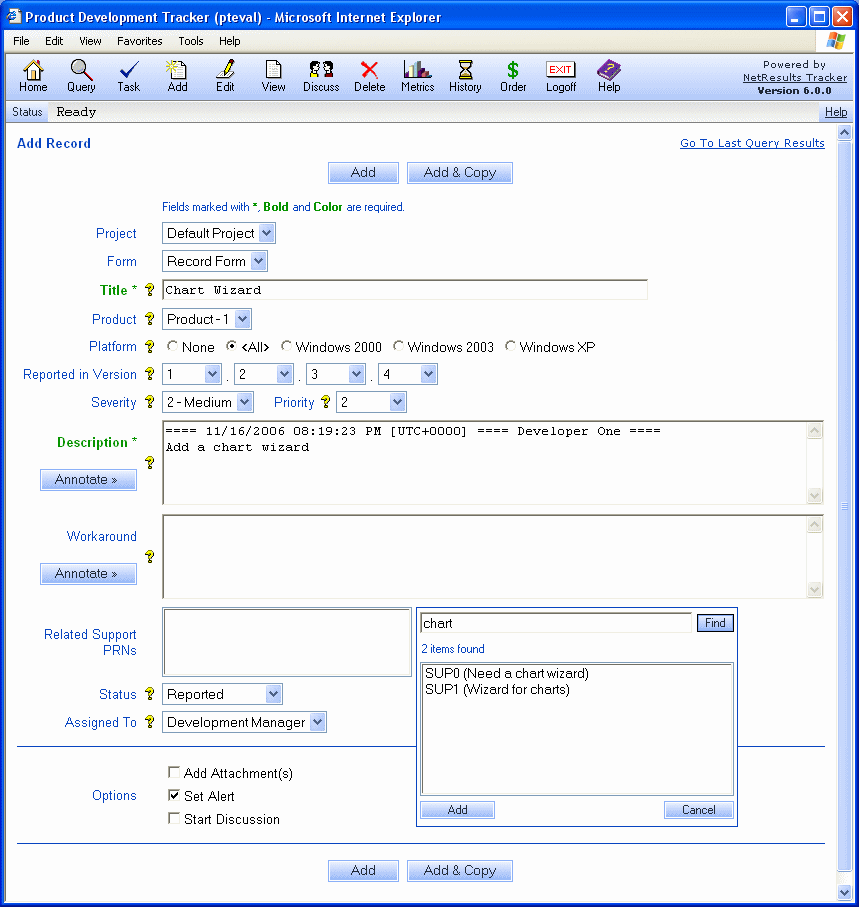
PRNs can be added to a Link Field on the Add, Edit and Submit pages as well as during the Task oepration. Link Fields can be viewed on the View Page, Email Notifications, Query and Home Page results as well as the Knowledge Base. Link Fields cannot be included as part of Query criteria, cannot be changed while editing a set of query results and cannot be used as a sort field for Query results.
If Record Visibility is enabled, it will be applied when a search for or viewing items in a Link Field.
Label
The name displayed for this field.
Record Order
Integer specifying the order that the record should
be presented relative to the other fields on the pages on
which the field is displayed. For
example, a field displayed on the Add page
with a value of 5 will be listed
before a field with a value of 100.
Required for Add & Submit
Specifies whether the field is required to be
modified by the user when it appears on the Add
or Submit pages. For Link fields this means that at least one
item must be selected in the field.
You may wish to highlight required fields on the Add or Submit pages with a particular color, bold type or with a special character (e.g. "*"). This can be done by configuring the Required Field Highlights option in the General Preferences section. The fields "Title" and "Description" are set as Required in the Add Page Sample.
When this attribute is set to "Yes", the field visibility set for this field must be set such that the field is visible on the Add page to at least one user group.
Include in Submit Page
Specifies whether the field should be presented
on the
Submit Page.
Copy Field Value for Next Add
When adding a new record using the Add page, a
user has the option to click Add or Add & Copy
to save the new record. Clicking on the Add button
will save the new record, then return to the Add page
with a "blank" form (all fields returned to default or blank
values). Clicking on the Add & Copy button
will save the new record, then return to the Add page
with the values of the fields "copied" from the last
record added. This allows the user to add another record
with similar information as the last record added without
having to re-type information into the fields. In order to have
a field's value copied into the Add form after clicking on the
Add & Copy button, the attribute
Copy Field Value For Next Add must be set to Yes.
Note: If all the fields that are active (present in the
"In Use" column) have the
"Copy Field Value For Next Add" attribute set to No,
then the "Add & Copy button" button will not be
displayed on the Add page.
Display Next Field Inline
Select "Yes" if you would like the next field
in the record to be displayed on the same line
as the field you are editing. The next field is
determined by value of
Record Order attribute for each field.
This attribute will be applied to the fields
on the Add, Edit, Query, Task, Edit Query Results,
and Submit pages and is only applied
to fields that are visible to the user.
The field "Severity"
has this property set to "Yes" in the
Add Page Sample.
To Forms
Select the form(s) to which a PRN can be linked.
The form selected will determine which items can be selected
as links for a PRN on the Add, Edit and Task pages.
Maximum Allowed Link Items
Enter a number to determine the maximum number of items
that can be linked
to a PRN. Enter "0" to allow unlimited items to be linked.
Maximum Link Items Displayed
Enter a positive number to determine the maximum number of
items to be displayed when searching for possible items to
link to a PRN. If a search returns more items than the maximum
number entered for this option, the search box will display
"X items found, first Y items displayed" where X is the actual
number of items that matched the search (and X is greater than the maximum
number of link items entered for this option) and Y is the maximum
number of link items entered for this option.
Include Link Items From
This option determines whether the available items to be linked to a PRN should be
from any project or should be limited to only those items within the same project
selected for a PRN. Select "All Projects" to allow any item to be linked or select
"Same Project" to limit the list of available items to only those that belong to the same
project selected for the PRN.
Help Description
Enter a description of the field to be displayed on the
Add, Edit, Task, and Submit pages of Tracker
(in the cases where the field is set to be visible on these pages).
The field help icon will be displayed when a user
has the option Display Field Help enabled in their
preferences
settings. The user can move the cursor over the field help icon to
see more detail about the field (the information entered here in the Field
Help section). This option can also be enabled in the default
preferences set in the
User Preferences section.
When a user has the Display Field Help option
enabled, the field help icon will be displayed next to
the fields on the Add, Edit, and Task pages. The user
can move the cursor over the field icon to the left of the to
see a description of the field. All of the fields in the
Add Page Sample have Field Help
configured.
Add Page Visibility
Edit Page (Update) Visibility
Edit Page (Read Only) Visibility
View Page Visibility
Home/Query Page Visibility
Email Message Visibility
These options are for the
Field Visibility feature; they
determine whether a field is available for each user group in the various
areas of Tracker. Review the
Field Visibility and the
Link Fields and Field Visibility sections for more
information about configuring these options.
Reverse Link Properties
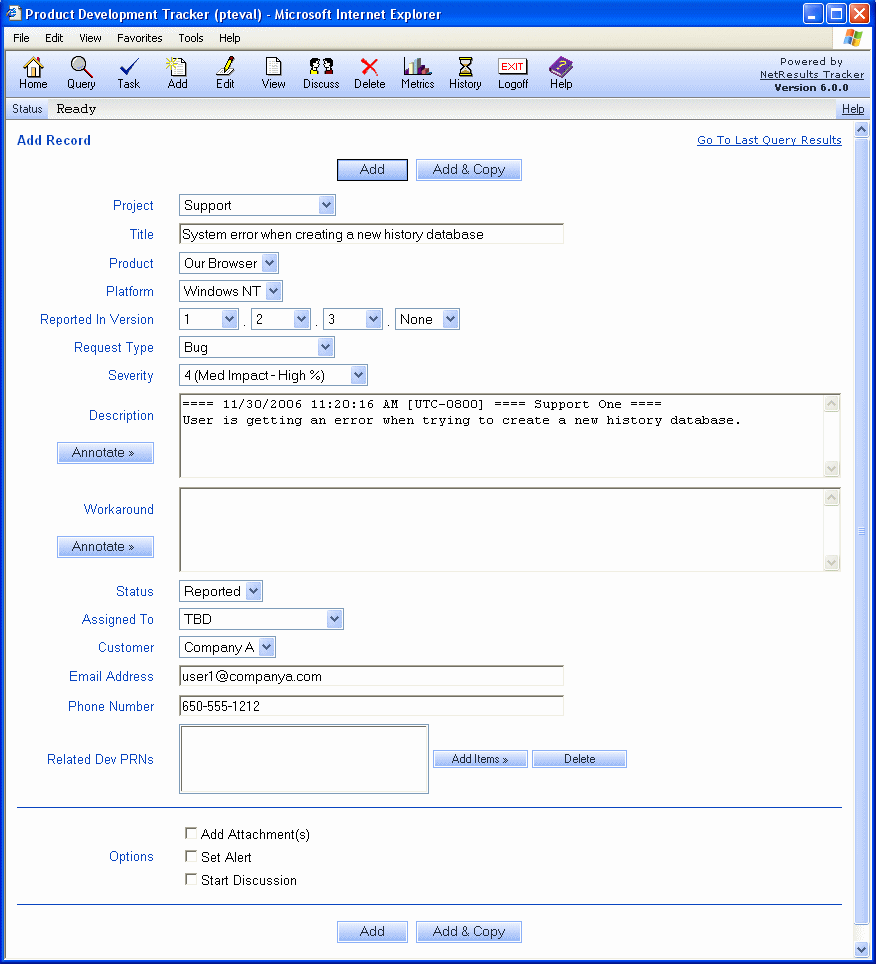
After making selections, click on the Continue button to make selections for the Reverse Link Properties of the Link field. A reverse link is the link field that will be available in the form(s) selected in the To Forms property of the Link Field you created. Using the Link Sample, the Link Field is "Related Support PRNs" and is displayed on the form for submitting development issues. The Reverse Link is "Related Dev PRNs" and is displayed on the form for submitting support tickets as shown in the sample below.
Label
The name displayed for the reverse link field (e.g. the field available on the form(s)
selected in the To Form property of the Link Field).
Show this Reverse Link
Select whether the reverse link should be available on the form(s)
selected in the To Form property of the Link Field.
Record Order
Integer specifying the order that the record should
be presented relative to the other fields on the pages on
which the field is displayed. For
example, a field displayed on the Add page
with a value of 5 will be listed
before a field with a value of 100.
Required for Add & Submit
Specifies whether the field is required to be
modified by the user when it appears on the Add
or Submit pages. For Reverse Link fields this means that at least one
item (PRN) must be selected in the field.
You may wish to highlight required fields on the Add or Submit pages with a particular color, bold type or with a special character (e.g. "*"). This can be done by configuring the Required Field Highlights option in the General Preferences section. The fields "Title" and "Description" are set as Required in the Add Page Sample.
When this attribute is set to "Yes", the field visibility set for this field must be set such that the field is visible on the Add page to at least one user group.
Include in Submit Page
Specifies whether the field should be presented
on the
Submit Page.
Copy Field Value for Next Add
When adding a new record using the Add page, a
user has the option to click Add or Add & Copy
to save the new record. Clicking on the Add button
will save the new record, then return to the Add page
with a "blank" form (all fields returned to default or blank
values). Clicking on the Add & Copy button
will save the new record, then return to the Add page
with the values of the fields "copied" from the last
record added. This allows the user to add another record
with similar information as the last record added without
having to re-type information into the fields. In order to have
a field's value copied into the Add form after clicking on the
Add & Copy button, the attribute
Copy Field Value For Next Add must be set to Yes.
Note: If all the fields that are active (present in the
"In Use" column) have the
"Copy Field Value For Next Add" attribute set to No,
then the "Add & Copy button" button will not be
displayed on the Add page.
Display Next Field Inline
Select "Yes" if you would like the next field
in the record to be displayed on the same line
as the field you are editing. The next field is
determined by value of
Record Order attribute for each field.
This attribute will be applied to the fields
on the Add, Edit, Query, Task, Edit Query Results,
and Submit pages and is only applied
to fields that are visible to the user.
The field "Severity"
has this property set to "Yes" in the
Add Page Sample.
From Forms
This shows the form(s) in which the reverse link will be available.
Allow Link Items to be Set
Select "Yes" if link items can be selected for the reverse link field
(e.g. can link items be added to the Support ticket displayed in the
example above). If you wish for the reverse link
to be read only (no link items can be set using the reverse link field), set this to "No".
Maximum Link Items Displayed
This option will only be available if the
Allow Link Items to be Set option is set to "Yes".
Enter a positive number to determine the maximum number of
items to be displayed when searching for possible items to
link to a PRN. If a search returns more items than the maximum
number entered for this option, the search box will display
"X items found, first Y items displayed" where X is the actual
number of items that matched the search (and X is greater than the maximum
number of link items entered for this option) and Y is the maximum
number of link items entered for this option.
Include Link Items From
This option determines whether the available items to be linked to a PRN should be
from any project or should be limited to only those items within the same project
selected for a PRN. Select "All Projects" to allow any item to be linked or select
"Same Project" to limit the list of available items to only those that belong to the same
project selected for the PRN.
Help Description
Enter a description of the field to be displayed on the
Add, Edit, Task, and Submit pages of Tracker
(in the cases where the field is set to be visible on these pages).
The field help icon will be displayed when a user
has the option Display Field Help enabled in their
preferences
settings. The user can move the cursor over the field help icon to
see more detail about the field (the information entered here in the Field
Help section). This option can also be enabled in the default
preferences set in the
User Preferences section.
When a user has the Display Field Help option
enabled, the field help icon will be displayed next to
the fields on the Add, Edit, and Task pages. The user
can move the cursor over the field icon to the left of the to
see a description of the field. All of the fields in the
Add Page Sample have Field Help
configured.
Add Page Visibility
Edit Page (Update) Visibility
Edit Page (Read Only) Visibility
View Page Visibility
Home/Query Page Visibility
Email Message Visibility
These options are for the
Field Visibility feature; they
determine whether a field is available for each user group in the various
areas of Tracker. Review the
Field Visibility and the
Link Fields and Field Visibility sections for more
information about configuring these options.
One Record ID (Integer) type field called "PRN" is available and it cannot be deleted. This field is the unique numerical identifier for each record in the database.
Label
The name displayed for this field.
Record Order
Integer specifying the order that the record should
be presented relative to the other fields on the pages on
which the field is displayed. For
example, a field displayed on the Add page
with a value of 5 will be listed
before a field with a value of 100.
Display Next Field Inline
Select "Yes" if you would like the next field
in the record to be displayed on the same line
as the field you are editing. The next field is
determined by value of
Record Order attribute for each field.
This attribute will be applied to the fields
on the Add, Edit, Query, Task, Edit Query Results,
and Submit pages and is only applied
to fields that are visible to the user.
The field "Severity"
has this property set to "Yes" in the
Add Page Sample.
Help Description
Enter a description of the field to be displayed on the
Add, Edit, Task, and Submit pages of Tracker
(in the cases where the field is set to be visible on these pages).
The field help icon will be displayed when a user
has the option Display Field Help enabled in their
preferences
settings. The user can move the cursor over the field help icon to
see more detail about the field (the information entered here in the Field
Help section). This option can also be enabled in the default
preferences set in the
User Preferences section.
When a user has the Display Field Help option
enabled, the field help icon will be displayed next to
the fields on the Add, Edit, and Task pages. The user
can move the cursor over the field icon to the left of the to
see a description of the field. All of the fields in the
Add Page Sample have Field Help
configured.
One History Pulldown type field called "Product" (this may have another name in some templates) is available. This field is a pulldown field and it cannot be deleted. This is a key field since the contents of this field are included in the Record History. You should make this field something that is important since its value can be tracked in the History. Using this field for the "Based On" property for workflow settings, email rules and alerts would be a good choice so that you can see why/how a record was routed a certain way using the information in the history.
The option menu items available in the this field can be configured using the information in the Customizing Menu Items section.
Label
The name displayed for this field.
Record Order
Integer specifying the order that the record should
be presented relative to the other fields on the pages on
which the field is displayed. For
example, a field displayed on the Add page
with a value of 5 will be listed
before a field with a value of 100.
Include in Submit Page
Specifies whether the field should be presented
on the
Submit Page.
Copy Field Value for Next Add
When adding a new record using the Add page, a
user has the option to click Add or Add & Copy
to save the new record. Clicking on the Add button
will save the new record, then return to the Add page
with a "blank" form (all fields returned to default or blank
values). Clicking on the Add & Copy button
will save the new record, then return to the Add page
with the values of the fields "copied" from the last
record added. This allows the user to add another record
with similar information as the last record added without
having to re-type information into the fields. In order to have
a field's value copied into the Add form after clicking on the
Add & Copy button, the attribute
Copy Field Value For Next Add must be set to Yes.
Note: If all the fields that are active (present in the
"In Use" column) have the
"Copy Field Value For Next Add" attribute set to No,
then the "Add & Copy button" button will not be
displayed on the Add page.
Display Next Field Inline
Select "Yes" if you would like the next field
in the record to be displayed on the same line
as the field you are editing. The next field is
determined by value of
Record Order attribute for each field.
This attribute will be applied to the fields
on the Add, Edit, Query, Task, Edit Query Results,
and Submit pages and is only applied
to fields that are visible to the user.
The field "Severity"
has this property set to "Yes" in the
Add Page Sample.
Display Style
This field determines how the choices within the field are displayed and
has different options depending on the field type.
The choices are "Pulldown", "Radio"
and "Vertical Radio".
The "Product" field is set to use "Radio",
"Platform" is set to use "Vertical Radio" and "Severity" is set
to user "Pulldown"
in the Add Page Sample.
Parent Pulldown
This option allows you to select a pulldown field to be a parent
pulldown (in a
Dependent Pulldowns
relationship) to the field you are creating.
Selecting "<No Pulldown>" for this option indicates that
this field should not have a parent pulldown.
Help Description
Enter a description of the field to be displayed on the
Add, Edit, Task, and Submit pages of Tracker
(in the cases where the field is set to be visible on these pages).
The field help icon will be displayed when a user
has the option Display Field Help enabled in their
preferences
settings. The user can move the cursor over the field help icon to
see more detail about the field (the information entered here in the Field
Help section). This option can also be enabled in the default
preferences set in the
User Preferences section.
When a user has the Display Field Help option
enabled, the field help icon will be displayed next to
the fields on the Add, Edit, and Task pages. The user
can move the cursor over the field icon to the left of the to
see a description of the field. All of the fields in the
Add Page Sample have Field Help
configured.
Add Page Visibility
Edit Page (Update) Visibility
Edit Page (Read Only) Visibility
View Page Visibility
Home/Query Page Visibility
Email Message Visibility
These options are for the
Field Visibility feature; they
determine whether a field is available for each user group in the various
areas of Tracker. Review the
Field Visibility section for more
information about configuring these options.
A pulldown menu. You can customize the style (pulldown, radio, vertical radio). The option menu items and default item available in a Pulldown field can be configured using the information in the Customizing Menu Items section. Maximum of 40 Pulldown fields can be used per form.
Label
The name displayed for this field.
Record Order
Integer specifying the order that the record should
be presented relative to the other fields on the pages on
which the field is displayed. For
example, a field displayed on the Add page
with a value of 5 will be listed
before a field with a value of 100.
Required for Add & Submit
Specifies whether the field is required to be
modified by the user when it appears on the Add
or Submit pages. For pulldown fields, this means
that the user must select a value other than the
default value displayed on the form.
You may wish to define the first element
of a required pulldown with a value like "Please Select A Value"
to indicate to the user that a non-default
value must be selected before saving the new record.
You may wish to highlight required fields on the Add or Submit pages with a particular color, bold type or with a special character (e.g. "*"). This can be done by configuring the Required Field Highlights option in the General Preferences section. The fields "Title" and "Description" are set as Required in the Add Page Sample.
When this attribute is set to "Yes", the field visibility set for this field must be set such that the field is visible on the Add page to at least one user group.
Include in Submit Page
Specifies whether the field should be presented
on the
Submit Page.
Copy Field Value for Next Add
When adding a new record using the Add page, a
user has the option to click Add or Add & Copy
to save the new record. Clicking on the Add button
will save the new record, then return to the Add page
with a "blank" form (all fields returned to default or blank
values). Clicking on the Add & Copy button
will save the new record, then return to the Add page
with the values of the fields "copied" from the last
record added. This allows the user to add another record
with similar information as the last record added without
having to re-type information into the fields. In order to have
a field's value copied into the Add form after clicking on the
Add & Copy button, the attribute
Copy Field Value For Next Add must be set to Yes.
Note: If all the fields that are active (present in the
"In Use" column) have the
"Copy Field Value For Next Add" attribute set to No,
then the "Add & Copy button" button will not be
displayed on the Add page.
Display Next Field Inline
Select "Yes" if you would like the next field
in the record to be displayed on the same line
as the field you are editing. The next field is
determined by value of
Record Order attribute for each field.
This attribute will be applied to the fields
on the Add, Edit, Query, Task, Edit Query Results,
and Submit pages and is only applied
to fields that are visible to the user.
The field "Severity"
has this property set to "Yes" in the
Add Page Sample.
Display Style
This field determines how the choices within the field are displayed and
has different options depending on the field type.
The choices are "Pulldown", "Radio"
and "Vertical Radio".
The "Product" field is set to use "Radio",
"Platform" is set to use "Vertical Radio" and "Severity" is set
to user "Pulldown"
in the Add Page Sample.
Parent Pulldown
This option allows you to select a pulldown field to be a parent
pulldown (in a
Dependent Pulldowns
relationship) to the field you are creating.
Selecting "<No Pulldown>" for this option indicates that
this field should not have a parent pulldown.
This option is only available for Pulldown type fields.
Help Description
Enter a description of the field to be displayed on the
Add, Edit, Task, and Submit pages of Tracker
(in the cases where the field is set to be visible on these pages).
The field help icon will be displayed when a user
has the option Display Field Help enabled in their
preferences
settings. The user can move the cursor over the field help icon to
see more detail about the field (the information entered here in the Field
Help section). This option can also be enabled in the default
preferences set in the
User Preferences section.
When a user has the Display Field Help option
enabled, the field help icon will be displayed next to
the fields on the Add, Edit, and Task pages. The user
can move the cursor over the field icon to the left of the to
see a description of the field. All of the fields in the
Add Page Sample have Field Help
configured.
Add Page Visibility
Edit Page (Update) Visibility
Edit Page (Read Only) Visibility
View Page Visibility
Home/Query Page Visibility
Email Message Visibility
These options are for the
Field Visibility feature; they
determine whether a field is available for each user group in the various
areas of Tracker. Review the
Field Visibility section for more
information about configuring these options.
One Reporter field is available. This field cannot be deleted. All users present in the User Administration section are displayed as options in this field. "Unregistered User" is selected in this field when a record is reported via the Submit Page or Email.
Label
The name displayed for this field.
Record Order
Integer specifying the order that the record should
be presented relative to the other fields on the pages on
which the field is displayed. For
example, a field displayed on the Add page
with a value of 5 will be listed
before a field with a value of 100.
Include in Submit Page
Specifies whether the field should be presented
on the
Submit Page.
Copy Field Value for Next Add
When adding a new record using the Add page, a
user has the option to click Add or Add & Copy
to save the new record. Clicking on the Add button
will save the new record, then return to the Add page
with a "blank" form (all fields returned to default or blank
values). Clicking on the Add & Copy button
will save the new record, then return to the Add page
with the values of the fields "copied" from the last
record added. This allows the user to add another record
with similar information as the last record added without
having to re-type information into the fields. In order to have
a field's value copied into the Add form after clicking on the
Add & Copy button, the attribute
Copy Field Value For Next Add must be set to Yes.
Note: If all of the fields on a
form have the
"Copy Field Value For Next Add" attribute set to No,
then the "Add & Copy button" button will not be
displayed on the Add page.
Display Next Field Inline
Select "Yes" if you would like the next field
in the record to be displayed on the same line
as the field you are editing. The next field is
determined by value of
Record Order attribute for each field.
This attribute will be applied to the fields
on the Add, Edit, Query, Task, Edit Query Results,
and Submit pages and is only applied
to fields that are visible to the user.
The field "Severity"
has this property set to "Yes" in the
Add Page Sample.
Help Description
Enter a description of the field to be displayed on the
Add, Edit, Task, and Submit pages of Tracker
(in the cases where the field is set to be visible on these pages).
The field help icon will be displayed when a user
has the option Display Field Help enabled in their
preferences
settings. The user can move the cursor over the field help icon to
see more detail about the field (the detail is the information entered here
in the Help Description option). This option can also be enabled in the default
preferences set in the
User Preferences section.
When a user has the Display Field Help option
enabled, the field help icon will be displayed next to
the fields on the Add, Edit, and Task pages. The user
can move the cursor over the field icon to the left of the to
see a description of the field. All of the fields in the
Add Page Sample have Field Help
configured.
Add Page Visibility
Edit Page (Update) Visibility
Edit Page (Read Only) Visibility
View Page Visibility
Home/Query Page Visibility
Email Message Visibility
These options are for the
Field Visibility feature; they
determine whether a field is available for each user group in the various
areas of Tracker. Review the
Field Visibility section for more
information about configuring these options.
A combination of four pulldown menus. You can customize all values in the menu using the information in the Customizing Menu Items section. The default value for this field is determined in the Customizing Menu Items section. Maximum of 5 Release Number fields can be used per form.
Label
The name displayed for this field.
Record Order
Integer specifying the order that the record should
be presented relative to the other fields on the pages on
which the field is displayed. For
example, a field displayed on the Add page
with a value of 5 will be listed
before a field with a value of 100.
Include in Submit Page
Specifies whether the field should be presented
on the
Submit Page.
Copy Field Value for Next Add
When adding a new record using the Add page, a
user has the option to click Add or Add & Copy
to save the new record. Clicking on the Add button
will save the new record, then return to the Add page
with a "blank" form (all fields returned to default or blank
values). Clicking on the Add & Copy button
will save the new record, then return to the Add page
with the values of the fields "copied" from the last
record added. This allows the user to add another record
with similar information as the last record added without
having to re-type information into the fields. In order to have
a field's value copied into the Add form after clicking on the
Add & Copy button, the attribute
Copy Field Value For Next Add must be set to Yes.
Note: If all the fields that are active (present in the
"In Use" column) have the
"Copy Field Value For Next Add" attribute set to No,
then the "Add & Copy button" button will not be
displayed on the Add page.
Display Next Field Inline
Select "Yes" if you would like the next field
in the record to be displayed on the same line
as the field you are editing. The next field is
determined by value of
Record Order attribute for each field.
This attribute will be applied to the fields
on the Add, Edit, Query, Task, Edit Query Results,
and Submit pages and is only applied
to fields that are visible to the user.
The field "Severity"
has this property set to "Yes" in the
Add Page Sample.
Help Description
Enter a description of the field to be displayed on the
Add, Edit, Task, and Submit pages of Tracker
(in the cases where the field is set to be visible on these pages).
The field help icon will be displayed when a user
has the option Display Field Help enabled in their
preferences
settings. The user can move the cursor over the field help icon to
see more detail about the field (the information entered here in the Field
Help section). This option can also be enabled in the default
preferences set in the
User Preferences section.
When a user has the Display Field Help option
enabled, the field help icon will be displayed next to
the fields on the Add, Edit, and Task pages. The user
can move the cursor over the field icon to the left of the to
see a description of the field. All of the fields in the
Add Page Sample have Field Help
configured.
Add Page Visibility
Edit Page (Update) Visibility
Edit Page (Read Only) Visibility
View Page Visibility
Home/Query Page Visibility
Email Message Visibility
These options are for the
Field Visibility feature; they
determine whether a field is available for each user group in the various
areas of Tracker. Review the
Field Visibility section for more
information about configuring these options.
One Status type field is available. This field cannot be deleted. States created in the Manage Workflows section are displayed in this field. Which states are available in this field when performing various operations depend on the workflow settings.
Label
The name displayed for this field.
Record Order
Integer specifying the order that the record should
be presented relative to the other fields on the pages on
which the field is displayed. For
example, a field displayed on the Add page
with a value of 5 will be listed
before a field with a value of 100.
Include in Submit Page
Specifies whether the field should be presented
on the
Submit via Web form
(also known as the Submit Page).
Copy Field Value for Next Add
When adding a new record using the Add page, a
user has the option to click Add or Add & Copy
to save the new record. Clicking on the Add button
will save the new record, then return to the Add page
with a "blank" form (all fields returned to default or blank
values). Clicking on the Add & Copy button
will save the new record, then return to the Add page
with the values of the fields "copied" from the last
record added. This allows the user to add another record
with similar information as the last record added without
having to re-type information into the fields. In order to have
a field's value copied into the Add form after clicking on the
Add & Copy button, the attribute
Copy Field Value For Next Add must be set to Yes.
Note: If all the fields that are active (present in the
"In Use" column) have the
"Copy Field Value For Next Add" attribute set to No,
then the "Add & Copy button" button will not be
displayed on the Add page.
Display Next Field Inline
Select "Yes" if you would like the next field
in the record to be displayed on the same line
as the field you are editing. The next field is
determined by value of
Record Order attribute for each field.
This attribute will be applied to the fields
on the Add, Edit, Query, Task, Edit Query Results,
and Submit pages and is only applied
to fields that are visible to the user.
The field "Severity"
has this property set to "Yes" in the
Add Page Sample.
Help Description
Enter a description of the field to be displayed on the
Add, Edit, Task, and Submit pages of Tracker
(in the cases where the field is set to be visible on these pages).
The field help icon will be displayed when a user
has the option Display Field Help enabled in their
preferences
settings. The user can move the cursor over the field help icon to
see more detail about the field (the information entered here in the Field
Help section). This option can also be enabled in the default
preferences set in the
User Preferences section.
When a user has the Display Field Help option
enabled, the field help icon will be displayed next to
the fields on the Add, Edit, and Task pages. The user
can move the cursor over the field icon to the left of the to
see a description of the field. All of the fields in the
Add Page Sample have Field Help
configured.
Add Page Visibility
Edit Page (Update) Visibility
Edit Page (Read Only) Visibility
View Page Visibility
Home/Query Page Visibility
Email Message Visibility
These options are for the
Field Visibility feature; they
determine whether a field is available for each user group in the various
areas of Tracker. Review the
Field Visibility section for more
information about configuring these options.
A text string up to 80 characters. By default, this field is blank until information is added. Maximum of 20 Text fields can be used per form.
Label
The name displayed for this field.
Record Order
Integer specifying the order that the record should
be presented relative to the other fields on the pages on
which the field is displayed. For
example, a field displayed on the Add page
with a value of 5 will be listed
before a field with a value of 100.
Required for Add & Submit
Specifies whether the field is required to be
modified by the user when it appears on the Add
or Submit pages. For Text fields this means that a blank value will
not be allowed.
You may wish to highlight required fields on the Add or Submit pages with a particular color, bold type or with a special character (e.g. "*"). This can be done by configuring the Required Field Highlights option in the General Preferences section. The fields "Title" and "Description" are set as Required in the Add Page Sample.
When this attribute is set to "Yes", the field visibility set for this field must be set such that the field is visible on the Add page to at least one user group.
Include in Submit Page
Specifies whether the field should be presented
on the
Submit Page.
Copy Field Value for Next Add
When adding a new record using the Add page, a
user has the option to click Add or Add & Copy
to save the new record. Clicking on the Add button
will save the new record, then return to the Add page
with a "blank" form (all fields returned to default or blank
values). Clicking on the Add & Copy button
will save the new record, then return to the Add page
with the values of the fields "copied" from the last
record added. This allows the user to add another record
with similar information as the last record added without
having to re-type information into the fields. In order to have
a field's value copied into the Add form after clicking on the
Add & Copy button, the attribute
Copy Field Value For Next Add must be set to Yes.
Note: If all the fields that are active (present in the
"In Use" column) have the
"Copy Field Value For Next Add" attribute set to No,
then the "Add & Copy button" button will not be
displayed on the Add page.
Display Next Field Inline
Select "Yes" if you would like the next field
in the record to be displayed on the same line
as the field you are editing. The next field is
determined by value of
Record Order attribute for each field.
This attribute will be applied to the fields
on the Add, Edit, Query, Task, Edit Query Results,
and Submit pages and is only applied
to fields that are visible to the user.
The field "Severity"
has this property set to "Yes" in the
Add Page Sample.
Unregistered User Email
Specifies whether a Text type field will be used to
collect the email address of an unregistered user. Only one Text
type field can have this attribute set to "Yes" per workgroup.
This option allows email notification messages to be sent
automatically to users who have submitted issues
from outside of Tracker using the
Submit Page
or Submit via Email features.
If you are using the Submit Page, also set the option Include in Submit Page
to "Yes" for the field you have designated as the Unregistered User Email
so the end users can enter their email address on the form when submitting
a record.
Fixed Width Font
This option determines whether the data entered
into a Text type field will be entered using a
fixed width font. Selecting "Yes" will use a fixed width font
such that each character is displayed with a uniform width. Selecting
"No" will not use a fixed width font (characters have varying
widths).
Input Width
Enter the number of characters to be used as the
display width for Text type fields. This affects the
width of the field on Add, Edit, Task, View and Query
pages. This does not affect the maximum number of characters
that can be entered into the field.
The minimum value for this option is 1 and the maximum value for this option is 80.
Maximum Number of Characters
This option determines the maximum number of characters that can be
entered into the field. For Text fields, this can be set to a maximum of 80 characters.
When the
Autofill option is set to something other than
"<None>", this property will be set to 80 characters and cannot be
changed.
AutoFill Item
The AutoFill feature is a method of automatically collecting
information about a user's system (operating system, browser
type and version, IP Address, etc.) and saving it within a newly
added record. The information collected about the user's
environment could be useful in resolving or processing
the issue reported in the record.
Text type fields can be used to collect the information
from a user's machine when the user submits a record using the
Add or Submit pages.
By default, AutoFill is disabled for Text type fields (the AutoFill fields are set to "<None>" when disabled).
To enable the AutoFill feature for a Text field:
Available AutoFill Items
The following parameters can be collected to automatically
fill a Text type field.
Host Name
The TCP / IP host name of the machine the user is logged into
when accessing Tracker. Note: By default, the
IIS web server will return the IP Address instead of the Host
Name to increase performance for web hosting. If you wish to
get the Host Name, please follow the steps in this
Microsoft article, which would configure IIS to do a reverse
DNS lookup. For more information, please review your IIS documentation.
IP Address
The IP Address of the machine the user is logged into
when accessing Tracker.
Operating System
The Operating System installed on the machine the
user is logged into when accessing Tracker.
Screen Size
The value of Screen Area in the user's
Monitor Display settings.
Web Browser
The type and version of the browser(s) installed on the machine
the user is logged into when accessing
Tracker.
Help Description
Enter a description of the field to be displayed on the
Add, Edit, Task, and Submit pages of Tracker
(in the cases where the field is set to be visible on these pages).
The field help icon will be displayed when a user
has the option Display Field Help enabled in their
preferences
settings. The user can move the cursor over the field help icon to
see more detail about the field (the information entered here in the Field
Help section). This option can also be enabled in the default
preferences set in the
User Preferences section.
When a user has the Display Field Help option
enabled, the field help icon will be displayed next to
the fields on the Add, Edit, and Task pages. The user
can move the cursor over the field icon to the left of the to
see a description of the field. All of the fields in the
Add Page Sample have Field Help
configured.
Add Page Visibility
Edit Page (Update) Visibility
Edit Page (Read Only) Visibility
View Page Visibility
Home/Query Page Visibility
Email Message Visibility
These options are for the
Field Visibility feature; they
determine whether a field is available for each user group in the various
areas of Tracker. Review the
Field Visibility section for more
information about configuring these options.
A very large text string. The maximum size determined by the amount of data supported by the TextArea type on your web browser, and the particular database in use. By default, this field is blank until information is added. Maximum of 10 TextArea fields can be used per form.
Label
The name displayed for this field.
Record Order
Integer specifying the order that the record should
be presented relative to the other fields on the pages on
which the field is displayed. For
example, a field displayed on the Add page
with a value of 5 will be listed
before a field with a value of 100.
Required for Add & Submit
Specifies whether the field is required to be
modified by the user when it appears on the Add
or Submit pages. For TextArea fields this means that a blank value will
not be allowed.
You may wish to highlight required fields on the Add or Submit pages with a particular color, bold type or with a special character (e.g. "*"). This can be done by configuring the Required Field Highlights option in the General Preferences section. The fields "Title" and "Description" are set as Required in the Add Page Sample.
When this attribute is set to "Yes", the field visibility set for this field must be set such that the field is visible on the Add page to at least one user group.
Include in Submit Page
Specifies whether the field should be presented
on the
Submit Page.
Copy Field Value for Next Add
When adding a new record using the Add page, a
user has the option to click Add or Add & Copy
to save the new record. Clicking on the Add button
will save the new record, then return to the Add page
with a "blank" form (all fields returned to default or blank
values). Clicking on the Add & Copy button
will save the new record, then return to the Add page
with the values of the fields "copied" from the last
record added. This allows the user to add another record
with similar information as the last record added without
having to re-type information into the fields. In order to have
a field's value copied into the Add form after clicking on the
Add & Copy button, the attribute
Copy Field Value For Next Add must be set to Yes.
Note: If all the fields that are active (present in the
"In Use" column) have the
"Copy Field Value For Next Add" attribute set to No,
then the "Add & Copy button" button will not be
displayed on the Add page.
Display Next Field Inline
Select "Yes" if you would like the next field
in the record to be displayed on the same line
as the field you are editing. The next field is
determined by value of
Record Order attribute for each field.
This attribute will be applied to the fields
on the Add, Edit, Query, Task, Edit Query Results,
and Submit pages and is only applied
to fields that are visible to the user.
The field "Severity"
has this property set to "Yes" in the
Add Page Sample.
Annotate in Add Page
This option determines whether any additions to the TextArea field
will be preceded with an annotation when the field is modified on the
Add Page. The annotation includes a date and time stamp when the
field was modified
and the User ID of the user who modified the field. Select
"Optional" if you wish to have the annotation be included in the field
only when the user clicks on the Annotate button. Select
"Automatic" if you wish to have the annotation included automatically
when the field is modified. When selecting Automatic, the Annotate
button will not be displayed. The annotation will be applied to the field
(only if it was modified) when the record is submitted either using
the Add or Add & Copy buttons.
Select "Unavailable" if you do not wish to have the field annotated
when it is modified.
Annotate in Edit Page
This option determines whether any additions to the TextArea field
will be preceded with an annotation when the field is modified on the
Edit Page. The annotation includes a date and time stamp when the
field was modified
and the User ID of the user who modified the field. Select
"Optional" if you wish to have the annotation be included in the field
only when the user clicks on the Annotate button.
Select "Unavailable" if you do not wish to have the field annotated
when it is modified.
Annotate in Submit Page
This option determines whether any additions to the TextArea field
will be preceded with an annotation when the field is modified on the
Submit Page.
The annotation includes a date and time stamp
when the field was modified. Select
"Optional" if you wish to have the annotation be included in the field
only when the user clicks on the Annotate button. Select
"Automatic" if you wish to have the annotation included automatically
when the field is modified. When selecting Automatic, the Annotate
button will not be displayed. The annotation will be applied to the field
(only if it was modified) when the record is saved when the Submit button is clicked.
Select "Unavailable" if you do not wish to have the field annotated
when it is modified.
Annotate Button Label
Enter the label for the Annotate button which is displayed to
the left of the TextArea field when "Optional" is selected for
the options Annotate in Add Page, Annotate in
Edit Page or Annotate in Submit Page. By default
the button label is "Annotate >>".
Help Description
Enter a description of the field to be displayed on the
Add, Edit, Task, and Submit pages of Tracker
(in the cases where the field is set to be visible on these pages).
The field help icon will be displayed when a user
has the option Display Field Help enabled in their
preferences
settings. The user can move the cursor over the field help icon to
see more detail about the field (the information entered here in the Field
Help section). This option can also be enabled in the default
preferences set in the
User Preferences section.
When a user has the Display Field Help option
enabled, the field help icon will be displayed next to
the fields on the Add, Edit, and Task pages. The user
can move the cursor over the field icon to the left of the to
see a description of the field. All of the fields in the
Add Page Sample have Field Help
configured.
Add Page Visibility
Edit Page (Update) Visibility
Edit Page (Read Only) Visibility
View Page Visibility
Home/Query Page Visibility
Email Message Visibility
These options are for the
Field Visibility feature; they
determine whether a field is available for each user group in the various
areas of Tracker. Review the
Field Visibility section for more
information about configuring these options.
A 255 character string that is a valid formatted URL. By default, this field is blank until information is added. Maximum of 5 URL fields can be used per form.
Label
The name displayed for this field.
Record Order
Integer specifying the order that the record should
be presented relative to the other fields on the pages on
which the field is displayed. For
example, a field displayed on the Add page
with a value of 5 will be listed
before a field with a value of 100.
Required for Add & Submit
Specifies whether the field is required to be
modified by the user when it appears on the Add
or Submit pages. For URL fields this means that a blank value will
not be allowed.
You may wish to highlight required fields on the Add or Submit pages with a particular color, bold type or with a special character (e.g. "*"). This can be done by configuring the Required Field Highlights option in the General Preferences section. The fields "Title" and "Description" are set as Required in the Add Page Sample.
When this attribute is set to "Yes", the field visibility set for this field must be set such that the field is visible on the Add page to at least one user group.
Include in Submit Page
Specifies whether the field should be presented
on the
Submit Page.
Copy Field Value for Next Add
When adding a new record using the Add page, a
user has the option to click Add or Add & Copy
to save the new record. Clicking on the Add button
will save the new record, then return to the Add page
with a "blank" form (all fields returned to default or blank
values). Clicking on the Add & Copy button
will save the new record, then return to the Add page
with the values of the fields "copied" from the last
record added. This allows the user to add another record
with similar information as the last record added without
having to re-type information into the fields. In order to have
a field's value copied into the Add form after clicking on the
Add & Copy button, the attribute
Copy Field Value For Next Add must be set to Yes.
Note: If all the fields that are active (present in the
"In Use" column) have the
"Copy Field Value For Next Add" attribute set to No,
then the "Add & Copy button" button will not be
displayed on the Add page.
Display Next Field Inline
Select "Yes" if you would like the next field
in the record to be displayed on the same line
as the field you are editing. The next field is
determined by value of
Record Order attribute for each field.
This attribute will be applied to the fields
on the Add, Edit, Query, Task, Edit Query Results,
and Submit pages and is only applied
to fields that are visible to the user.
The field "Severity"
has this property set to "Yes" in the
Add Page Sample.
Fixed Width Font
This option determines whether the data entered
into a Url type field will be entered using a
fixed width font. Selecting "Yes" will use a fixed width font
such that each character is displayed with a uniform width. Selecting
"No" will not use a fixed width font (characters have varying
widths).
Input Width
Enter the number of characters to be used as the
display width for Url type fields. This affects the
width of the field on Add, Edit, Task, View and Query
pages. This does not affect the maximum number of characters
that can be entered into the field.
The minimum value for this option is 1 and the maximum value for this option is 80.
Maximum Number of Characters
This option determines the maximum number of characters that can be
entered into the field.
For URL fields, this can be set to a maximum of 255 characters.
When the
Autofill option is set to something other than
"<None>", this property will be set to 80 characters and cannot be
changed.
AutoFill Item
The AutoFill feature is a method of automatically collecting
information about a user's system and saving it within a newly
added record. The information collected about the user's
environment could be useful in resolving or processing
the issue reported in the record.
A URL type field can be used to collect the last browsed URL
from a user's machine when the user submits a record using the
Add or Submit pages.
By default, AutoFill is disabled for URL type fields (the AutoFill fields are set to "<None>" when disabled).
To enable the AutoFill feature for a URL field:
Help Description
Enter a description of the field to be displayed on the
Add, Edit, Task, and Submit pages of Tracker
(in the cases where the field is set to be visible on these pages).
The field help icon will be displayed when a user
has the option Display Field Help enabled in their
preferences
settings. The user can move the cursor over the field help icon to
see more detail about the field (the information entered here in the Field
Help section). This option can also be enabled in the default
preferences set in the
User Preferences section.
When a user has the Display Field Help option
enabled, the field help icon will be displayed next to
the fields on the Add, Edit, and Task pages. The user
can move the cursor over the field icon to the left of the to
see a description of the field. All of the fields in the
Add Page Sample have Field Help
configured.
Add Page Visibility
Edit Page (Update) Visibility
Edit Page (Read Only) Visibility
View Page Visibility
Home/Query Page Visibility
Email Message Visibility
These options are for the
Field Visibility feature; they
determine whether a field is available for each user group in the various
areas of Tracker. Review the
Field Visibility section for more
information about configuring these options.
A pulldown with the items Yes and No. The default value for this field is determined in the Editing Field Attributes section. Maximum of 5 YesNo fields can be used per form.
Label
The name displayed for this field.
Record Order
Integer specifying the order that the record should
be presented relative to the other fields on the pages on
which the field is displayed. For
example, a field displayed on the Add page
with a value of 5 will be listed
before a field with a value of 100.
Include in Submit Page
Specifies whether the field should be presented
on the
Submit via Web form
(also known as the Submit Page).
Copy Field Value for Next Add
When adding a new record using the Add page, a
user has the option to click Add or Add & Copy
to save the new record. Clicking on the Add button
will save the new record, then return to the Add page
with a "blank" form (all fields returned to default or blank
values). Clicking on the Add & Copy button
will save the new record, then return to the Add page
with the values of the fields "copied" from the last
record added. This allows the user to add another record
with similar information as the last record added without
having to re-type information into the fields. In order to have
a field's value copied into the Add form after clicking on the
Add & Copy button, the attribute
Copy Field Value For Next Add must be set to Yes.
Note: If all the fields that are active (present in the
"In Use" column) have the
"Copy Field Value For Next Add" attribute set to No,
then the "Add & Copy button" button will not be
displayed on the Add page.
Display Next Field Inline
Select "Yes" if you would like the next field
in the record to be displayed on the same line
as the field you are editing. The next field is
determined by value of
Record Order attribute for each field.
This attribute will be applied to the fields
on the Add, Edit, Query, Task, Edit Query Results,
and Submit pages and is only applied
to fields that are visible to the user.
The field "Severity"
has this property set to "Yes" in the
Add Page Sample.
Display Style
This field determines how the choices within the field are displayed and
has different options depending on the field type.
The choices are "Pulldown" and "Checkbox".
Default Value
Specifies the default value for a YesNo type field.
The items that can be selected are "Yes" or "No".
Help Description
Enter a description of the field to be displayed on the
Add, Edit, Task, and Submit pages of Tracker
(in the cases where the field is set to be visible on these pages).
The field help icon will be displayed when a user
has the option Display Field Help enabled in their
preferences
settings. The user can move the cursor over the field help icon to
see more detail about the field (the information entered here in the Field
Help section). This option can also be enabled in the default
preferences set in the
User Preferences section.
When a user has the Display Field Help option
enabled, the field help icon will be displayed next to
the fields on the Add, Edit, and Task pages. The user
can move the cursor over the field icon to the left of the to
see a description of the field. All of the fields in the
Add Page Sample have Field Help
configured.
Add Page Visibility
Edit Page (Update) Visibility
Edit Page (Read Only) Visibility
View Page Visibility
Home/Query Page Visibility
Email Message Visibility
These options are for the
Field Visibility feature; they
determine whether a field is available for each user group in the various
areas of Tracker. Review the
Field Visibility section for more
information about configuring these options.
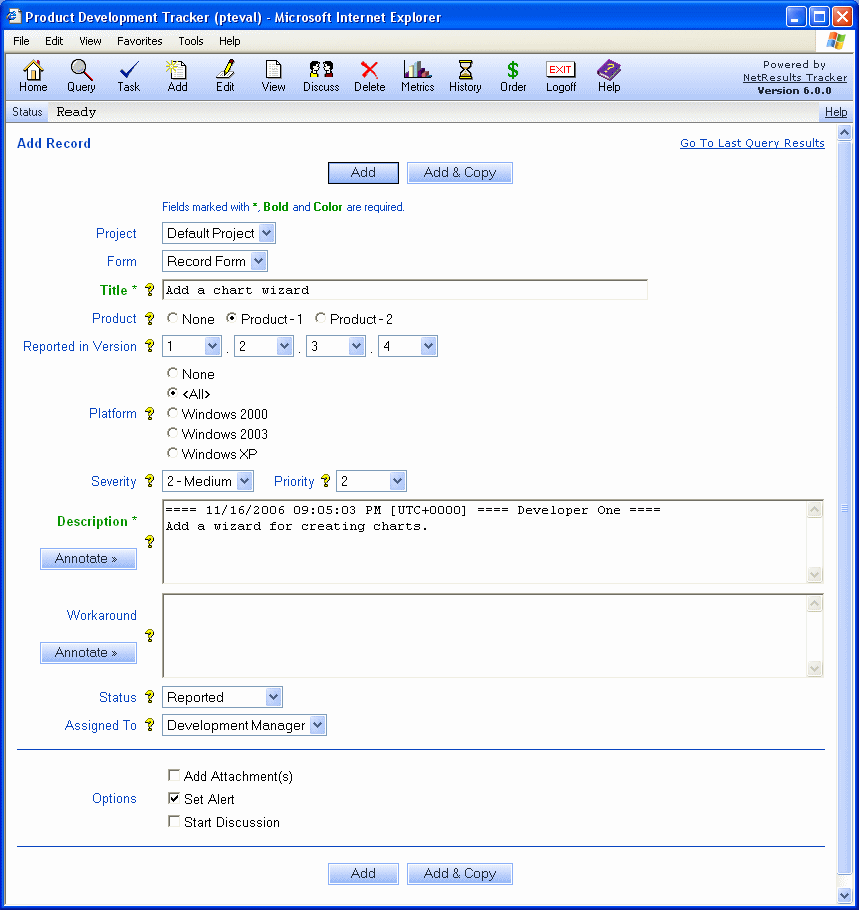
Field Visibility
Field Visibility provides the ability to limit the fields that are visible to a particular user group in different areas such as the Add Page, Edit Page, View Page, running reports on the Query and Home Pages and the email notification messages sent from Tracker. In some circumstances, it is necessary to restrict access to a field while performing certain operations to protect sensitive information or to prevent unauthorized changes to particular fields in a record.
A field's visibility can be configured by user group for the following areas in Tracker:
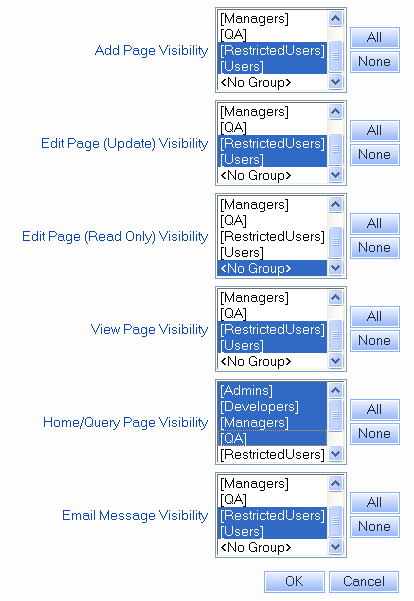
If you wish to restrict the fields which are made visible in the Task operation, this is done while configuring task fields for a transition. The Customizing Transitions Help section provides details on configuring task fields.
Please note that when records are created using the Submit via Email feature, the field visibility settings for the Add page are not enforced on these records when they are created in Tracker.
To configure field visibility options for each field:
A user group can be selected for either Edit Page (Update) or Edit Page (Read Only), but cannot be selected for both of these areas.
Field Visibility Exceptions for Required fields
When a field has the attribute Required on Add set to "Yes", but the field is not visible on the Add page for certain user groups, the newly added record will be saved with the field's default value. The defaults for each field type are listed in the Field Types section.
Certain fields are required for all forms, meaning that they cannot be removed from Tracker. Some field visibility settings cannot be applied to these required fields.
PRN
This field is the record number assigned when a record is added to the database.
Field visibility restrictions cannot be set for this field as it is a field that is displayed
on Tracker pages to distinguish the identity of each record.
Deleted
This field denotes whether a record has been deleted. By design, it does
not appear on the Add page, and thus, field visibility for this field on the Add page
cannot be set.
Effects of Field Visibility Restrictions on Tracker operations
Add page
When a field is not visible to a user group on the Add page, the default value
will be applied to each invisible field when a member of this user group adds a
record. The default values for each field type are listed in the
Field Types section.
Query and Home pages
When a field is not visible to a user group on the Query and Home pages, the
field is also not visible in the personal or group Report Layouts for that user group.
If a field is made Invisible for a user group and this field is already in use in
a report layout for this user group, the field will be replaced with the value "Do
Not Use This Column" in the report layout.
Similar actions will occur with respect to personal or group saved queries and advanced saved queries. In this case, the restricted field will not be displayed in the saved query or advanced saved query. Any fields that are not visible to the user group will have a default value applied when the query is run. In most cases, this default value is "*", which indicates that all possible values for the field will be included in the query results even though this field will not be displayed on the query page or its results. In the case of the "Deleted" field, the default is "No", thus, all records that have not been marked deleted will be included in the query results. If the restricted field was being used as a "Sort By" field, the field will be replaced with "*" for the Sort by value.
Additionally, with respect to personal or group saved advanced queries that were created before a field was made invisible to a user group, any clause in the Query Phrase section containing a restricted field will be automatically removed from the advanced saved query.
Link Fields and Field Visibility
For Link fields, the fields that are selected as Primary and Secondary Key fields for the form in which the Link Field is available will not be subject to Field Visibility settings. In other words, if you have set a field such that it is not visible to certain user groups in certain areas (Add/Edit/Task pages, Query/Home reports, etc.), but the field is either a Primary or Secondary Key Field, the field will be visible to users when they use the Link field. To prevent users from seeing the field, you can either not use the field as a Primary or Secondary Key Field for the form (by changing the form's properties) or you can configure the entire Link field so that it is not visible to certain user groups using the information in the Field Visibility section above.
 NetResults Tracker
